
User's Manual


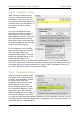


Table Of Contents
- 1 Welcome
- 2 Quick Start
- 3 MIDI Setup Guide
- 4 Program Interface
- 5 MIDI Translator Concepts
- 6 The Project
- 7 The Preset
- 8 The Translator Entry
- 9 Actions
- 9.1 MIDI
- 9.2 Keystrokes
- 9.3 Timer
- 9.4 Preset Change
- 9.5 Disable/Enable Processing Actions
- 9.6 Mouse (Outgoing)
- 9.7 Execute File (Outgoing)
- 9.8 Serial Port
- 9.9 AppleScript
- 10 Rules and Variables
- 11 Settings
- 12 Behind the Scenes
- 13 Tips & Tricks
- 14 Usage Example
- 15 MIDI Translator in Hardware: the BomeBox
- 16 Reference

Bome MIDI Translator: User's Manual 2 Quick Start
The properties panel is where you specify the incoming and outgoing actions
that the translator operates with, as well as the rules and processes that
take place between those actions.
2.6.1 Incoming Action
To start, you will need to specify
an incoming action to work with.
Be sure the Incoming type is set
to MIDI message.
Now click the Capture MIDI
checkbox. Assuming your MIDI
settings are correct, you should
see a list of MIDI messages scroll
by the screen as you move a
controller or press a key or button
on your MIDI device.
Click on an entry in the Capture
list to use it as the incoming
trigger.
Press the X icon to close the
capture list.
You can use the Gear icon next to the “Capture MIDI” checkbox to switch to
displaying the received MIDI messages as raw MIDI messages in
hexadecimal format. This option is for advanced users. In the gear menu,
you can enable/disable timing messages to be included in the captured
messages.
(c) 2019 by Bome Software GmbH & Co. KG page 12