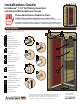
Installation Guide U for Andersen® 1-1/4” Self-Storing Storm Doors with Balanced Retractable Insect Screen Please Do Not Return Product to Store! PLEASE call the storm door Solution Center at 1-800-933-3626, with any questions regarding installation, lost part replacement, or anything else related to your storm door purchase. Read this entire guide before you begin your installation. If your abilities do not match the requirements of this installation, contact an experienced contractor.
SAFETY FIRST: Please read and follow all Cautions and Warnings in this guide. WARNING WARNING Metal fasteners and other hardware components may corrode when exposed to preservative treated and fire-retardant treated lumber. Obtain and use the appropriate size stainless steel fasteners and hardware as called out by the installation guide to fasten unit to any rough opening made from pressure treated and fire-retardant treated lumber.
2 INSTALLATION PREPARATION Tools needed: K X a VIEW T LEFT HANDED A LA IZQUIERDA À MAIN GAUCHE b i VIEW RIGHT HANDED A LA DERECHA À MAIN DROITE 40 1/2” Figure 6 Figure 4 TO DOOR SILL HASTA EL BATIENTE DE LA PUERTA JUSQU’AU SEUIL DE LA PORTE Figure 5 1. Most homeowners prefer to have the storm In this step, you will determine the handle side of your storm door. 1.
For a Right Hand Installation, go to Page 9. PREPARE STORM DOOR FOR INSTALLATION (Left Hand) 3 E Tools needed: H PINK BAG / BOLSA ROSA / SAC ROSE M P O i a VIEW i b VIEW 1/2” x8 1/2” Painted x2 i c VIEW E TOP PARTE SUPERIOR HAUT BOTTOM PARTE INFERIOR BAS T H CAUTION E PROFILE PERFIL PROFIL 1. Identify the top of the hinge rail (E). 2.
4 INSTALL HINGED STORM DOOR IN OPENING (Left Hand) Tools needed: A C YELLOW BAG / BOLSA AMARILLA / SAC JAUNE PINK BAG / BOLSA ROSA / SAC ROSE M x 19 1” 1/8” 3/16” Plug X a X b VIEW VIEW x1 i c VIEW O P 1. Set the door frame on the entry sill so the hinge rail is tight against the mounting surface or hinge rail shim (K) and the sill spacer clip (P) is sitting on the door sill. 2.
5 INSTALL LATCH RAIL AND REMOVE PROTECTIVE FILM (Left Hand) x6 Pad x3 1/8” Plug PAD ALMOHADILLA TAMPON 1. 'JOE UIF UISFF w TRVBSF BEIFTJWF CBDLFE spacer pads in yellow bag in installation kit. 2. 4XJOH EPPS PQFO BOE XJQF Pò BOZ SFTJEVF on edge of door. 3. 1FFM QBQFS CBDLFS Pò FBDI QBE BOE BUUBDI them to latch side door edge.
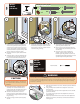
9 INSTALL CLOSER (Left Hand) Tools needed: GREEN BAG / BOLSA VERDE / SAC VERT M 1/8” i a VIEW b OPPOSITE VIEW OTRO PUNTO DE VISTA VUE DE FACE x1 x2 5/8” x1 H i VIEW c i VIEW H 1. Position the base from the installation kit onto the door jamb by touching the front of the base to the back of the hinge rail (or as close as possible), and align the bottom of the base with the top of the sweep. Mark the hole locations on the door jamb. 2. Drill holes in the door jamb at the marked locations.
11 INSTALL SCREW COVERS (Left Hand) I J Tools needed: X a VIEW SHORT LEG PESTAÑA CORTA RAINURE COURTE J J 1. 2. 3. Lock leg of screw cover (J) into short leg of rain cap screw track. Press on other leg to snap it into long leg of track. Make sure screw cover snaps into screw track along the entire length of the rain cap. Repeat this process with remaining side screw covers.
For a Left Hand Installation, go to Page 4. 12 PREPARE STORM DOOR FOR INSTALLATION (Right Hand) E Tools needed: H PINK BAG / BOLSA ROSA / SAC ROSE M P O a i VIEW E i b VIEW 1/2” x8 1/2” Painted x2 i c VIEW BOTTOM PARTE INFERIOR BAS TOP PARTE SUPERIOR HAUT H CAUTION BOTTOM PARTE INFERIOR BAS PROFILE PERFIL PROFIL 1. Identify the top of the hinge rail (E). 2.
13 INSTALL HINGED STORM DOOR IN OPENING (Right Hand) Tools needed: A C 1/8” YELLOW BAG / BOLSA AMARILLA / SAC JAUNE M x 19 1” 3/16” Plug X a PINK BAG / BOLSA ROSA / SAC ROSE X b VIEW VIEW x1 i c VIEW O P 1. Set the door frame on the entry sill so the hinge rail is tight against the mounting surface or hinge rail shim (K) and the sill spacer clip (P) is sitting on the door sill. 2.
14 INSTALL LATCH RAIL AND REMOVE PROTECTIVE FILM (Right Hand) x6 Pad x3 1/8” Plug PAD ALMOHADILLA TAMPON 1. 'JOE UIF UISFF w TRVBSF BEIFTJWF CBDLFE spacer pads in yellow bag in installation kit. 2. 4XJOH EPPS PQFO BOE XJQF Pò BOZ SFTJEVF on edge of door. 3. 1FFM QBQFS CBDLFS Pò FBDI QBE BOE BUUBDI them to latch side door edge.
18 INSTALL CLOSER (Right Hand) Tools needed: GREEN BAG / BOLSA VERDE / SAC VERT M 1/8” i a VIEW x1 VIEW OPPOSITE VIEW OTRO PUNTO DE VISTA VUE DE FACE x1 x2 5/8” i b H x1 x3 2” c i VIEW H 1. Position the base from the installation kit onto the door jamb by touching the front of the base to the back of the hinge rail (or as close as possible), and align the bottom of the base with the top of the sweep. Mark the hole locations on the door jamb. 2.
20 INSTALL SCREW COVERS (Right Hand) I J Tools needed: X a VIEW J J SHORT LEG PESTAÑA CORTA RAINURE COURTE 1. 2. 3. Lock leg of screw cover (J) into short leg of rain cap screw track. Press on other leg to snap it into long leg of track. Make sure screw cover snaps into screw track along the entire length of the rain cap. Repeat this process with remaining side screw covers.
Text CLEANING INSTRUCTIONS WINDOW GLASS – The glass may be cleaned with any household glass cleaner. Keep glass cleaners away from painted parts and brass/nickel components. PLASTIC PARTS – Plastic door components may be cleaned by using a mild soap and water mixture and by gently rubbing the affected area. Do not use harsh abrasives or any product that contains chlorine.
Guide d’installation U pour les contre-portes Andersen® à auto-rangement de 3,17 cm (1¼ po) avec une moustiquaire escamotable équilibrée Veuillez ne pas retourner le produit au magasin! VEUILLEZ appeler le Centre des solutions pour les contre-portes au 1 800 933-3626, pour toute question relative à l’installation, le remplacement de pièces perdues ou tout autre problème relatif à l’achat de votre contre-porte. Lisez ce guide complètement avant de commencer l’installation.
1 VÉRIFIER LES EXIGENCES EN MATIÈRE D’INSTALLATION Vérifiez que la moulure à brique extérieure, la planche de garniture ou l'encadrement sont fermement fixés à l’ouverture. La contre-porte s’affaissera au cours du temps si la surface de montage n’est pas fixée suffisamment fermement à l'entrée. Pour installer la contre-porte, vous devez vérifier qu'il existe la largeur et la hauteur d'ouverture nécessaires ainsi qu'une surface de montage suffisante. 1. 2.
Pour une installation à main gauche, veuillez vous rendre à la page 4 (Instructions en anglais). Pour une installation à main droite, veuillez vous rendre à la page 9 (Instructions en anglais). 3 12 PRÉPARER LA CONTRE-PORTE À L’INSTALLATION a 1. Repérez le haut du montant à charnières (E). 2. Positionnez le montant à charnières le long du bord côté charnière du cadre de porte pour que le trou inférieur de la plaque de charnière supérieure b 1.
5 14 INSTALLER LE MONTANT DE VERROUILLAGE ET RETIRER LA PELLICULE PROTECTRICE a 1. 5SPVWF[ MFT USPJT UBNQPOT E ÏDBSUFNFOU DBSSÏT EF ̓DN ̓QP Ë EPT BEIÏTJG EBOT MF TBD KBVOF EF MB USPVTTF E JOTUBMMBUJPO 2. Ouvrez la porte et essuyez tout résidu sur le bord de la porte. 3. %ÏDPMMF[ MB QFMMJDVMF FO QBQJFS BV EPT EF DIBRVF UBNQPO FU öYF[ MFT BV CPSE EF QPSUF DÙUÏ WFSSPV 1PTJUJPOOF[ FO VO Ë FOWJSPO ̓DN ̓QP EV IBVU b 1.
10 19 a RÉGLER LA VITESSE DE FERMETURE DE LA PORTE Le ferme-porte et la porte illustrés ne le sont qu’à titre de référence. AVERTISSEMENT La contre-porte se fermera plus rapidement lorsque la porte d’entrée est ouverte. Pour obtenir la vitesse de fermeture appropriée, vous devrez ajuster le(s) ferme-porte(s) à l’aide de la vis de réglage intégrée. Vérifiez la vitesse de fermeture sécuritaire avec votre porte d’entrée dans les positions ouverte et fermée.
INSTRUCTIONS POUR LE NETTOYAGE VITRE – Les vitres peuvent être nettoyées avec n’importe quel produit nettoyant à vitres ménager. Veuillez garder les produits pour vitres loin des pièces peintes et des éléments en laiton/nickel. PIÈCES EN PLASTIQUE – Les éléments de portes en plastique peuvent être nettoyés avec un mélange de savon doux et d’eau et en frottant délicatement la surface concernée. N’utilisez pas d’abrasifs corrosifs ou de produits contenant du chlore.
Guía de instalación para las contrapuertas autoalmacenables Andersen® de 3.2 cm con pantalla contra insectos retráctil compensada ¡No devuelvas el producto a la tienda! Llama al centro de soluciones de contrapuertas al 1-800-933-3626 si tienes alguna pregunta sobre la instalación, reemplazo de piezas perdidas o sobre algo más relacionado con la compra de tu contrapuerta. Lee esta guía completa antes de comenzar con la instalación.
1 VERIFICA LOS REQUISITOS PARA EL MONTAJE Verifica que la moldura exterior de ladrillos, la tabla de moldura o el contramarco se encuentran firmemente asegurados a la abertura. La contrapuerta se deformará con el tiempo si la superficie de montaje no está lo suficientemente asegurada al marco de entrada. Para instalar la contrapuerta debes verificar que el ancho y el alto de la abertura y de la superficie de montaje sean los adecuados. 1.
Para la instalación con manija a la izquierda, ve a la página 4 (Instrucciones en inglés). Para la instalación con manija a la derecha, ve a la página 9 (Instrucciones en inglés). 3 12 PREPARA LA CONTRAPUERTA PARA LA INSTALACIÓN a 1. Identifica la parte superior del riel de bisagras (E). 2. Coloca el riel de bisagras a lo largo del borde del lado de la bisagra del marco de la puerta para que el orificio inferior ubicado en la hoja de la bisagra superior b 1.
5 14 a INSTALA EL RIEL DE LA CERRADURA Y QUITA LA PELÍCULA PROTECTORA 1. #VTDB MBT USFT BMNPIBEJMMBT FTQBDJBEPSBT DVBESBEBT DPO BEIFTJWP EF DN FO MB CPMTB BNBSJMMB EFM LJU EF JOTUBMBDJØO 2. Abre la puerta y limpia cualquier residuo del borde del marco de la puerta. 3. Despega la parte posterior del adhesivo de cada almohadilla y colócalas en el borde de la puerta del lado de la cerradura.
10 19 a AJUSTA LA VELOCIDAD DE CIERRE DE LA PUERTA El brazo de cierre y la puerta que se muestran son sólo para referencia. ADVERTENCIA La contrapuerta cerrará más rápidamente cuando la puerta de entrada esté abierta. Para alcanzar la velocidad de cierre adecuada, necesitarás ajustar el o los brazos de cierre, usando el tornillo de ajuste incorporado. Verifica la velocidad de cierre correcta con la puerta de entrada tanto cerrada como abierta.
INSTRUCCIONES DE LIMPIEZA VENTANA DE VIDRIO: El vidrio puede limpiarse con cualquier limpiador doméstico para vidrios. No utilices los limpiadores de vidrios cerca de las piezas pintadas y de los componentes de latón/níquel. PIEZAS PLÁSTICAS: Los componentes plásticos de las puertas pueden limpiarse usando una mezcla de agua y jabón suave, y restregando suavemente el área afectada. No utilices productos abrasivos ni ningún otro que contenga cloro.
Supplemental Guide to Step 3: Prepare Storm Door For Installation IF YOUR DOOR CAME WITH A SILL SPACER CLIP WITHOUT A SCREW SLOT: BOTTOM PARTE INFERIOR BAS i VIEW 1. Carefully slide the pre-installed sill spacer SILL SPACER CLIP SUJETADOR ESPACIADOR DEL BATIENTE PINCE D’ÉCARTEMENT DU SEUIL clip next to the latch side of sweep screw as shown. Make sure the sill spacer clip hasn’t become detached from the sweep. If the sill spacer clip has become detached, just snap it back on.