USER MANUAL LED Lighting Kit with Hand Wave Activation Dimmable 30cm/11.
Thank you for choosing a product of the brand EShine. Before starting up the lights read through the instructions and store it for future reference. Packaging content: · 1X LED bar with IR sensor (this bar acts as a controller unit for rest of lights in the chain) · 11X LED bar without sensor · 11X Connection cable · 11X Connectors · 30X Wire Clips · 12X 3M double-sided stickers · 24X Screws · 24X Screw caps · 1X 42W power supply Technical specifications Dimensions: 28.6(W) x 9.
Precautions · Please check the lamp carefully before installing. · Ensure the power is off before wiring and installing. · This LED strips must be operated with 24V DC voltage. · Please do not open the LED strips. · Please do not retrofit the lamp within warranty period · Please use this product for indoor only! · Warning! The packaging contains small parts. Not for children. · The LED under cabinet light is equipped with IR sensor a socalled " Hand wave on/off ".
1. Use screws or 3M double-sided stickers to fasten lights to the installation location (see Pic.1). Pic.1 Installation with screws Pic.
2. You can use connections cables or connectors to install additional lights (see Pic.2, 3). If you use cables, wire clips included for comfortable installation. Pic.2 Connection cables Pic.
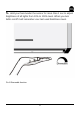
3. The main plug of the 24V power supply must be connected to a specially marked side of LED strip with IR sensor. This strip is labeled with the following note: "Connect power". On the marked side, please connect the power cord (see Pic.4). Pic.
4. After connecting the power cord, to turn on the light wave your hand under IR sensor. (see Pic.5) The sensing distance is 6-8 cm from IR sensor. Pic.5 On/Off function IMPORTANT: Make sure there are no objects within 4 inches from the sensor (wall, wood board, any supplies, cabinet lip etc).
5. Hold your hand under the sensor for more than 1 sec to adjust brightness of all lights from 10% to 100% level. When you turn lights on/off it will remember your last used brightness level. Pic.
6. To ensure better lighting, please clean the lamp at regular intervals. Before you clean the LED lights ensure that the power is off. Absolutely avoid when cleaning the lights wearing metallic or conductive jewelry such as bracelets, necklaces, rings etc. A soft dry cloth is recommended for cleaning. Please do not install the LED lights close to heat sources or on open fires.
7. EShine LED Lighting Kit comes with Limited 3-Years Warranty. What does this limited warranty cover? This Limited Warranty covers any defects in material or workmanship under normal use during the Warranty Period. What will we do to correct problems? During the Warranty Period, we will repair or replace, at no charge, products or parts of a product that proves defective because of improper material or workmanship, under normal use and maintenance.
Gracias por elegir un producto de la marca EShine. Antes de encender las luces lea las instrucciones y guárdelas para futuras consultas.
· Por favor compruebe la lámpara cuidadosamente antes de su instalación. · Asegúrese de que la alimentación esté apagada antes de realizar el cableado y la instalación. · Estas tiras LED deben operar con una tensión de 24V CC. · Por favor no abra las barras LED. · Por favor no modifique la lámpara dentro del período de garantía. · Por favor use este producto solo para interiores. · ¡Advertencia! El embalaje contiene piezas pequeñas. Manténganse fuera del alcance de los niños.
1. Use tornillos o pegatinas adhesivas de doble cara de 3M para fijar las luces al lugar de instalación (vea la Figura 1). Figura.1 Instalación con tornillos Figura.
2. Puede usar cables de conexión o conectores para instalar luces adicionales (vea las Figuras 2, 3). Si usa cables, ganchos de alambre están incluidos para una instalación cómoda. Figura.2 Cables de conexión Figura.
3. El enchufe principal de la fuente de alimentación de 24 V debe estar conectado a un lado especialmente marcado de la tira LED con sensor infrarrojos. Esta barra está etiquetada con la siguiente nota: "Connnect power". Conecte el cable de alimentación en el lado marcado (vea la Figura 4). Figura.4: Conexión del cable de alimentación a la barra con el sensor infrarrojos.
4. Después de conectar el cable de alimentación, para encender la luz, agite su mano debajo del sensor de infrarrojos. (ver Figura 5) La distancia de detección es de 6-8 cm desde el sensor infrarrojos. Figura.5 Función de encendido/apagado IMPORTANTE: Asegúrese de que no haya objetos a menos de 10 centímetros del sensor (paredes, puertas, adornos, muebles, etc) .
5. Mantenga su mano debajo del sensor durante más de 1 segundo para ajustar el brillo de todas las luces desde un nivel del 10% al 100%. Cuando encienda / apague las luces, recordará el último nivel de brillo utilizado. Figura.
6. Para garantizar una mejor iluminación, limpie la lámpara con regularidad. Antes de limpiar las luces LED, asegúrese de que la alimentación esté apagada. Evite por completo limpiar las luces con joyas metálicas o conductoras, como pulseras, collares, anillos, etc. Se recomienda un paño suave y seco para la limpieza. Por favor no instale las luces LED cerca de fuentes de calor o en hogueras.
7. El kit de iluminación LED EShine viene con una garantía limitada de 3 años. ¿Qué cubre esta garantía limitada? Esta Garantía Limitada cubre cualquier defecto material o de mano de obra bajo uso normal durante el Período de Garantía.
Danke, dass Sie sich für ein Produkt der Marke EShine entschieden haben. Bevor Sie die Lichter aktivieren, sollten Sie diese Anleitung genau lesen. Halten Sie dieses Handbuch zum späteren Nachschlagen griffbereit.
Vorbeugende Maßnahmen · Überprüfen Sie die Lampe genau, bevor Sie sie installieren. · Stellen Sie sicher, dass der Strom abgeschaltet wurde, bevor Sie die elektrische Leitung legen und installieren. · Diese LED-Leuchtstreifen müssen mit einer Spannung von 24 Volt DC betrieben werden. · Bitte öffnen Sie die LED-Leuchtstreifen nicht. · Bitte rüsten Sie diese Lampe nicht innerhalb des Garantiezeitraums nach.
1. Verwenden Sie Schrauben oder doppelseitige Klebestreifen von 3M, um die Lichter am Installationsort zu fixieren (siehe Bild 1).
2. Sie können Verbindungskabel oder Verbinder nutzen, um zusätzliche Lichter zu installieren (siehe Bild 2 und 3). Wenn Sie Kabel benutzen, sind Kabelhalter für eine komfortablere Installation beinhaltet.
3. Der Hauptstecker des 24 Volt starken Netzteils muss mit einer eigens hervorgehobenen Seite des LED-Leuchtstreifens mit dem IR-Sensor verbunden werden. Dieser LED-Leuchtstreifen ist mit der folgenden Notiz versehen: „connect power“ (= „Stromanschluss“). Auf der markierten Seite müssen Sie das Netzkabel anschließen (siehe Bild 4).
4. Nachdem Sie das Netzkabel angeschlossen haben, können Sie das Licht mit einer Handbewegung unter dem IR-Sensor aktivieren und deaktivieren (siehe Bild 5). Die Abtastentfernung beträgt sechs bis acht Zentimeter vom IRSensor weg. Bild 5: Funktion Ein / Aus WICHTIG: Stellen Sie sicher, dass sich KEINE Objekte innerhalb von 10 cm im Umkreis des Sensors befinden (zum Beispiel: Wände, Holzbretter, Vorräte oder ähnliches).
5. Halten Sie Ihre Hand länger al seine Sekunde unter dem Sensor, um die Helligkeit von allen Lichtern zwischen zehn Prozent und 100 Prozent anzupassen (siehe Bild 6). Wenn Sie die Lichter ein- oder ausschalten, wird die zuletzt genutzte Einstellung, was die Helligkeit betrifft, gespeichert.
6. Um eine ideale Beleuchtung zu garantieren, sollten Sie Ihre Lampen in regelmäßigen Abständen reinigen. Bevor Sie die LED-Leuchtstreifen reinigen, sollten Sie sicher gehen, dass der Strom abgeschaltet wurde. Legen Sie bei der Reinigung der LED-Lampen bitte jeglichen metallenen oder leitfähigen Schmuck, wie beispielsweise Halsketten, Armbänder, Ringe, und so weiter, ab. Ein weiches, trockenes Tuch wird für die Reinigung empfohlen.
7. Das EShine LED Beleuchtungs-Kit kommt mit einer limitierten Garantie über drei Jahre. Was deckt diese limitierte Garantie ab? Diese limitierte Garantie deckt jegliche Defekte betreffend Material und Verarbeitung während des Garantiezeitraums und nach bestimmungsgemäßem Gebrauch ab.
Merci d’avoir choisi le kit d’éclairage à LED EShine®. Avant toute installation et mise en marche, veuillez lire attentivement les instructions contenues dans ce manuel d’utilisation et conservez celui-ci pour vous y référer ultérieurement.
Mesures de sécurité • Veuillez vérifier attentivement les barres lumineuses avant toute installation. • Veuillez vous assurer que le kit d’éclairage est hors tension avant de procéder au câblage et à l’installation. • Les barres lumineuses à LED doivent fonctionner sous une tension continue de 24 V. • Veuillez ne pas ouvrir les barres lumineuses. • Veuillez ne pas ouvrir (en vue de réparation) les barres lumineuses durant la période de garantie.
1. Utiliser les vis de fixation ou les rubans adhésifs doubleface 3M livrés pour fixer les barres lumineuses à leurs emplacements prévus (voir figure 1). Pic.1 Fixation avec des vis Pic.
2. Vous pouvez utiliser les câbles de raccordement ou les connecteurs électriques pour raccorder ensemble autant de barres lumineuses que vous le souhaitez sur l’adaptateur inclus (voir figure 2.3). Si vous utilisez des câbles, utiliser les attaches-fils incluses pour une installation propre et sécurisée. Pic.2 Cables de raccordement Pic.
3. La fiche principale de l’adaptateur (24 V) doit être insérée dans son emplacement prévu situé sur le côté facilement identifiable de la barre lumineuse dotée du capteur infrarouge. Cette barre lumineuse porte la mention suivante : « Connect power ». C’est sur ce côté marqué que vous devriez raccorder le cordon d’alimentation de votre adaptateur (voir Fig.4). Pic.
4. Après avoir branché le cordon d’alimentation, allumer l’ensemble des barres lumineuses en faisant passer votre main en dessous du capteur infrarouge (voir Fig.5). La hauteur de détection est de 6 à 8 cm en dessous du capteur infrarouge. Pic.5 Fonction d’allumage et d’extinction au passage de la main IMPORTANT : Assurez-vous qu’aucun objet ne se trouve à moins de 4 pouces en dessous du capteur infrarouge (par exemple : mur, planche de bois, ustensiles, bordure d’armoire, etc.
5. Tenir votre main sous le capteur infrarouge pendant plus d’une (1) seconde pour faire varier de 10 % à 100 % l’intensité lumineuse de l’ensemble des barres lumineuses raccordées au même adaptateur. L’équipement mémorise le dernier réglage d’intensité lumineuse pour des utilisations ultérieures. Pic.
6. Pour un meilleur éclairage, les surfaces d’éclairage des barres lumineuses devraient être nettoyées à intervalles réguliers. Avant de procéder au nettoyage, assurez-vous que votre kit d’éclairage est hors tension. Lors du nettoyage, évitez de porter des bijoux métalliques ou des objets conducteurs tels que des bracelets, des colliers, des bagues, etc. Il est recommandé d’utiliser un chiffon doux et sec pour le nettoyage.
7. Le kit d’éclairage à LED EShine® est livré avec une garantie limitée de 3 ans. Que couvre cette garantie limitée ? Cette garantie limitée couvre tout défaut de matériel ou de fabrication se produisant dans des conditions normales d’utilisation et pendant la durée de la garantie.