
User Manual


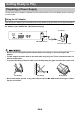
Table Of Contents
- Cover
- Contents
- General Guide
- Getting Ready to Play
- Operations Common to All Modes
- Playing on the Keyboard
- Controlling the Sound of a Performance
- Selecting a Musical Instrument Tone
- Playing with Touch Response
- Using a Pedal
- Sustaining Notes After Keyboard Keys Are Released
- Using the Pitch Bend Wheel
- Playing with Reverb
- Adding the Chorus Effect to a Tone
- Playing with a More Expanded Sound (Surround)
- Sounding Arpeggio Phrases Automatically (Arpeggiator)
- Switching the Button Function from ARP (Arpeggiator) to AH (Auto Harmonize)
- Adding Harmony to Melody Notes (Auto Harmonize)
- Layering and Splitting Tones
- Changing the Volume Balance Between Keyboard Play and Rhythm Play (Balance)
- Changing the Pitch in Octave Units (Octave Shift)
- Changing the Pitch in Semitone Units (Transpose)
- Fine Tuning (Tuning)
- Changing the Keyboard Scale Tuning
- Using the Equalizer
- Saving and Recalling a Setup (MY SETUP)
- Playing a Built-in Song
- Playing with a Rhythm Backing
- Rhythm
- Using the Rhythms
- Playing a Rhythm
- Using Recommended Rhythm Settings (One Touch Presets)
- Adjusting the Tempo by Tapping (Tap Tempo)
- Sounding Rhythm as You Use Tap Tempo
- Changing the Rhythm Pattern
- Inserting a Fill-in Phrase
- Fingering a Chord to Play a Rhythm Accompaniment
- Starting Rhythm Play when a Chord is Played (Synchro Start)
- Configuring Rhythm Play to Stop Automatically when Chord Play is Stopped (Synchro Stop)
- Changing the Rhythm Pattern and the Fill-in Operation Type
- Disabling Automatic Setting of the Tempo and Pattern when a Rhythm is Selected
- Increasing the Number of Rhythms (User Rhythms)
- Saving and Recalling Setups (Registration)
- Recording Your Keyboard Play
- Easy Keyboard Play Recording
- Deleting an Easy Recording
- Overdub Recording (Multi-track Recording)
- Copying a Tone Recording or Rhythm Recording as a Multi-track Recording
- Muting a Multi-track Recording Track
- Adjusting the Volume Level and Pan of Each Track of a Multi-track Recording (Mixing)
- Copying a Multi-track Recording
- Deleting One or More of the Multi-track Recordings in Memory
- Copying the Solo Track of a Multi-track Recording
- Deleting a Multi-track Recording Track
- Customizing the Home Screen (Home Customization)
- Configuring Settings
- Using a USB Flash Drive
- Connecting with External Devices
- Linking with a Smart Device (APP Function)
- Connecting to a Computer and Using MIDI
- Using a Cable to Connect with an Audio Device
- Sounding a Bluetooth Audio Capable Device (Bluetooth Audio Pairing)
- Deleting Bluetooth Audio Capable Device Pairing Registration
- Connecting with a Bluetooth MIDI Capable Device
- Turning Off Bluetooth
- Reference
- MIDI Implementation Chart

EN-8
Though either an AC adaptor or batteries can be used for power, use of AC adaptor power is normally
recommended.
Use only the AC adaptor (JEITA Standard with unified polarity plug) specified for this Digital Keyboard.
Use of a different type of AC adaptor can cause malfunction.
AC Adaptor Type: AD-E95100L (JEITA Standard plug)
• Be sure to turn off Digital Keyboard power before connecting or disconnecting the AC
adaptor.
• The AC adaptor becomes warm to the touch after very long use. This is normal and does not
indicate malfunction.
• To prevent breaking of the wire, take care to avoid putting any type of load on the power cord.
• Never insert metal, pencils, or any other objects into the DC 9.5V terminal. Doing so creates
the risk of accident.
Getting Ready to Play
Preparing a Power Supply
Using the AC Adaptor
No twisting No pulling No wrapping
AC adaptor
DC 9.5V terminal
Household power outlet