IMPORTANT SAFEGUARDS BASIC SAFETY PRECAUTIONS SHOULD ALWAYS BE FOLLOWED WHEN USING ELECTRICAL APPLIANCES, INCLUDING THE FOLLOWING: 1 Read all instructions thoroughly. 2 Avoid touching hot surfaces and do not close or clog the steam vent opening under any circumstances. The handles and knobs are provided for your safety and protection. 3 To prevent hazardous operation or electric shock, do not immerse power cord, power plug, or rice cooker (except inner cooking pan) in water or other liquids.
Cot These WARNINGS and CAUTIONS are intended to protect you and others from personal injury and household damage. To ensure safe operation, please follow carefully. AW ARMING N\ A Indicates a warning or caution. A pacific caution is indicated inside or near the triangle by sentences or illustrations. IMPORTANT SAFEGUARDS Indicates risk of serious injury. *1 ies risk of injury or Lama A C AUCTIONS prove flamage if © Indicates a prohibited operation.
IMPORTANT SAFEGUARDS (cont) /\ WARNINGS Stop using Immediately If you notice any of the following symptoms Indicating a malfunction or breakdown. Continued usa of the Rice Cooker may cause smoke, fire, galactic shock or Injury. « Power Plug or Power Cord has backrooms very hot « The Paar Cord is damaged or the electricity tums on and off when touched. « The body of the Rice Cooker is deformed or unusually hot. + Smoke is arising from the Rice Cooker or there is a booming smell.
PARTS NAMES AND FUNCTIONS Steam Vent Cap « Steam arising from the vent is very hot while rice is cooking. Please exercise care. 0 OL Center Sensor Heating Plate # Please remove the protective sheet placed between the Heating Plate and the Inner Cooking Pan before initial use. Outer Lid Gasket Inner Lid Knob Use this knob for detaching and attaching the Inner Lid Set © Be sure to reattach the Inner Lid Set after every cleaning —pg.
PARTS NAMES AND FUNCTIONS (cont) CONTROL PANEL © Press buttons down firmly. ® The raised dot and dash (e, in the center of the COOKING and RESET buttons are provided for individuals with visual impairment. MENU light RESET button TIMER light Use this button to cancel the selected setting or function in operation. KEEP WARM light KEEP WARM button —— COOKING light COOKING button Use this button to initiate the cooking process.
EXPLANATION OF RICE TYPES OF RICE © Names and types of rice varies according to how the grain has been polished and/or processed. Different grades of rice comes pond to the percentage of bran and germ removed. Rice In the husk Bran layer £m £™ ND Brown Rice : Se ml-Brown | Se ml-Brown Se ml-Brown White Rice | Rinse-Free Rice | Steeplechase !Rice 30% 'Rice% ricer% ' Aldebaran | All specks of bran + been removed.
Eel [eT Fen Measure rice accurately Be sure to use the Measuring Cup provided, as other measuring cups may differ. Level the rice off at the top of the cup to maintain accuracy. Rinse rice quickly The first rinse should be done quickly, swishing and stirring the rice by hand with plenty of water. Drain the water immediately afterwards. Then rinse the rice 4-5 times with fresh water to clean out the bran.
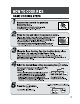
HOW TO COOK RICE BASIC COOKING STEPS Measure the rice with the provided Measuring Cup. Overfill the Measuring Cup with rice, then level off. {1 Cup = approx 6.1 oz / approx 180 mL} 2 Rinse the rice and adjust the amount of water. Place the Inner Cooking Pan on a liar surface. Add water to the water lave) according 1o the menu setting you have chosen (see pg. 11 "TIPS TO COOKING GREAT-TASTING RICE BY MENUS". For an accurate measurement, level the surface of the rice.
HOW TO COOK RICE (cont) BASIC COOKING STEPS (cont) Stir the rice and loosen it immediately after cooking has completed. Tha Rice Cooker automatically switches 1a the Keep Warm mode after cooking has completed and the KEEP WARM light tums on. Sir the rice and loosen it immediately to release excessive moisture for fluffy rice.
HOW TO COOK RICE (cont) TIPS TO COOKING GREAT-TASTING RICE BY MENUS Overfill the Measuring Cup with rice, then level off. lies Use the water level for Rice: Limit the amount of rice to be cooked to 1-4 cups for the 1.0L model, or 2-8 cups for the 1.8L model; otherwise it may not cook wall. Water Level: Use the water level for WHITE NICER Menu Selection: Select the [WHITE | menu setting. Ingredients: The recommended amount of ingredients should be about 30-50% of the weight of the rice (mass).
USING THE TIMER # The Rice Cooker will automatically complete cooking in the hours of time you have selected. T Press the {wes union to select how many hours later you wish to complete cooking. Each press of the button changes the TIMER light blinking from "4H" — "6H" — "8H" — "OH" cE | sprogs and hold the bunion to quickly cycle " through the selections (it will stop when it en maces) Hak wen wen “sou e The blinking TIMER light indicates the ; one selected.
Measurement conversion guideline 1133S tl Lee ER LT Ingredients (4-5 servings) 4 cups Rice 4.6 paces Prawns 4 8 pieces Hard clams (mull clams, If available) 54 07 (150g) Squid 3 places Green peppers 2 Tbsp Rive oil 121p Salt A 1 cube Soup stock (cube) 1/2 tap Saffron {1/2 sp Turmeric can be substituted) How to cook 1 Peel shells off prawns and remove entrails. Remove sand from clams and wash. Cut squid into slam pieces. Cut green peppers into small cubes. 2 Stir-fry ingredients from Step 1 with olive oil.
Tablespoon Measurement teaspoon 20.200 (nL) 0 STI] ine” | “Beria teems ewes oo Sal man EE ee a Ingredients (4-5 servings) 3 cups Sweet dice 1802 (50 g) Adkins beans Sat with parched sesame In taste How to cook 1 Rinse rice and drain in a strainer for more than 30 minutes. 2 Rinse the adze beans, put into a saucepan with 2 cups of water and boil for 2 minutes. Then add 3 cups of water and boll for 20 minutes until the beans become soft enough to break by pressing with your fingertip.
CLEANING AND MAINTENANCE Any other servicing should be performed by an authorized service representative. © Be sure to unplug the Power Cord and allow the Main Body and the Inner Cooking Pan to cool down. # Do not use a thinner, benzene, abrasive cleaners and brushes (nylon/metal), bleach or anything that may damage the surface of the Rice Cooker.
CLEANING AND MAINTENANCE / REPLACEMENT PARTS HOW TO DETACH AND ATTACH THE INNER LID SET How to detach the Inner Lid Set: Hod the Outer Lid with one hand and pull the Inner & i ith t 3 id Knob toward you with the other hand inner Lid Knob h, L. How to attach the Inner Lid Set: Affix the hollow part of Inner Lid Set (opposite side of the Inner Lid Knob) to the Inner Lid Set Mounting Axis to attach the Inner Lid Set. Affix this hollow part fo he Inner Lid Set Mounting is.
BEFORE CALLING FOR SERVICE TROUBLESHOOTING GUIDE ile ET cell ® Cause (Points to check) Problems i | Rice cooks too | hard or too soft: If the Rice Cooker is positioned on an uneven or tilted surface, the texture of the cooked rice may be too hard or too soft as the amount of water becomes inconsistent. ®The texture of rice varies depending on the brand of the rice, where it was harvested, and how long it was stored (new crop or old crop).
BEFORE CALLING FOR SERVICE TROUBLESHOOTING GUIDE (cont) Problems TIMER | The Timer did not COOKING | work: ® Cause (Points to check) ® Did you press the COOKING button after setting the Timer? — You need to press the COOKING bitten to complete setting the Timer. When power lure occurs: OTHER ® If power rectums immediately, the Rice Ocker will rectum to its condition immediately before the power failure.
Mode! No. NSWXC10 NS-WXC18 Cooking | White Rice ishotmesumgranwiito ee) [1-651 036-18L [2-10] Capacity | Sushi Rice (shortsighted brainwashing ice) | [1-55] [2-10] o Each Porridge shorimedumginwiderios) | 009-027 [05-15] | 008-045. [05-25] Setting*! | Brown Rice {showtime gran brown toe) | [1-4] [2-8] (approx. L) Mixed Rice (shortsighted grain whits ice) | [1-4] [2-6] lemurs] great Rice we io minnesingers) | 0.180721 [1-4] 036-108L [2.
IMPORTANTES MESURES DE SÉCURITÉ LORS DE L'UTILISATION D’APPAREILS ÉLECTRIQUES, SUIVEZ LES précautions DE BASE SUIVANTES : 1 Lisez bien toutes les instructions. Évitez en tout temps de toucher les surfaces chaudes et de fermer ou boucher ouverture de I'évent & vapeur. Des poignées et boutons ont été prévus pour vous assurer sécurité et protection.
importantes MESURES DE SECOURISTE Ces MISES EN GARDE et AVERTISSEMENTS ont pour but de vous protégé: ainsi que les autres personnes présentes, contre les blessures, et d'éviter les dommages 4 la propriété Veuillez les respecter rigoureusement, pour assurer un fonctionnement sécuritaire.
/\ MISES EN GARDE Utilisation par dea compris les enfants) Cap ac physiques, sensorielles ou mentales réduites, ou qui ne possèdent pas I'expérience ou les connaissances requises, moins qu'elles ne dolent supervises ou guldens par une personne responsable de leur ‘sécurité lorsqu’elles utilisent Appareil. Las enfants doivent être surveillés pour s'assurer qu’ils ne Jouent pas avec "appareil.
NOMENCLATURE ET FONCTIONS DES PIÈCES © Avant la première utilisation, veuillez retirer la feuille de protection qui se trouve entre la plaque chauffante et la casserole intérieure. Joint de couvercle extérieur Bouton du couvercle Intérieur Utilisez ce bouton pour enlever ou fixer 'ensemble de couvercle intérieur. # Pensez a remettre en place l'ensemble de couvercle intérieur après chaque nettoyage.
BEN Ret Sel Enfoncez fermement les boutons. Voyant MENU Voyant MINUTERIE Bouton réinitialiser Utilisez ce bouton pour annuler I'option sélectionnée ou la fonction en cours d'exécution. Voyant MAINTIEN AU CHAUD Bouton MAINTIEN AU CHAUD Utilisez ce bouton pour garder le riz chaud. Bouton MENU Utilisez ce bouton pour choisir le menu & utiliser.
A PROPOS DU RIZ ® Les types de riz et leur nomenclature varient suivant la faon dont a été poli et/ou traité le grain. Les différentes catégories de Hz correspondent Riz dans son au pourcentage de son et de marge retiré. enveloppe Couche de son bre brunir {Rizseml|Rizseml- |Rizseml|Rikzblanc | Riz sans rengage {Rizdortiaballe {brunir % 'brunir% 'brunir% | Endodontie | Toutes ls particules 1aétdenievée.
CONSEILS POUR OBTENIR UN délicieux. wre ca Mesurer le riz avec précision Assurez-vous d'utiliser le gobelet & mesurer fourni, car les autres gobelets ou tasses a mesurer peuvent être différents. Égalisez la surface du riz dans le gobelet, pour assurer I'exactitude de la mesure. Nettoyer le riz un bref instant Le premier rengage doit &tre effectué brisement, en agitant le riz avec la main dans une grande EX. : Pour vairs cuira 6 Quarts d'eau, puis en jetant l'eau aussitôt.
CUISSON DU RIZ em sor BOUILLE, SHOW (RUN ÉTAPES D'UNE CUISSON ELEMENTAIRE 7 Mesures le riz 4 I'aide du gobelet 4 mesurer fourni. Lasurez la riz 4 aide du gobelet & mesurer fourni, en égalisant la surface. (1 tassa = environ 6,1 oz / environ 180 ml) 2 Nettoyez le riz et ajustez la quantité d'eau. Nattez (a casserole intérieurs sur une surface plane. Ajoutez de l'eau {usql’au niveau qui correspond & l’option de ment due Vaud avez chaise.
CUISSON DU RIZ (suite) ÉTAPES D’UNE CUISSON ELEMENTAIRE (suite) 6 Des la fin de la cuisson, remuez et aérez le ria. Une lois la cuisson termine, le cuiseur a riz permute: automatiquement en mode de maintien au chaud et le voyant MAINTIEN AU CHAUD s'allume. Remuez et rasez immédiatement le riz pour libérer excavas d’humidité et obtenir un riz moelleux.
CUISSON DU RIZ (suite) CONSEILS POUR OBTENIR UN RIZ DÉLICIEUX A L' AIDE DES MENUS Remplissez de riz le gobelet & mesurer, puis égalisez a ras bord. Respectez les limites de quantité de riz Versos 'wall en vous reportant aux indications oll de Ne pas cuire correctement. pour la cuisson, soit 1 & 4 tasses pour le Niveau d'eau : | 4 veo) ERRE Riz: modale asses pour lo n ea pour modelé 1.8 a hiement il se peut que le Sélection de | Ssiactionnez option de menu [SUSHI |.
UTILISATION DE LA MINUTERIE # |e cuiseur a riz terminera automatiquement la cuisson au bout du nombre d’heures sélectionné. Cague pression sur le bouton change le clignotement du voyant MINUTERIE dans U'ordre suivant: «4H» 10H». ‘#Maintenez Ia bantou enfonces pour parcourir rapidement |as sélections (ie cycle s’arrêtera lorsqu atteindra voyant MINUTERIE clignotant indique I'option sélectionnée. T Appuyez sur le bouton me pour sélectionner dans comble d’heures vous souhaitez terminer [a cuisson. désiré.
NETTOYAGE ET ENTRETIEN Tout autre travail de maintenance doit être effectué par un représentant de service après-vente autorisé. * Pensez a débrancher le cordon d’alimentation et a laisser refroidir le corps principal et la casserole intérieure. # N'utilisez pas de diluant, de benzène, de nettoyant abrasif, de broches (en nylon ou en métal), d'eau de Javel, ni quoi que cs soit qui puisse abîmer la surface du cuiseur & riz.
NETTOYAGE ET ENTRETIEN/ PIÈCES DE RECHANGE Y \. FIXATION ET RETRAIT DE L ENSEMBLE DE COUVERCLE INTÉRIEUR Retrait de I'ensemble de couvercle intérieur : Tenez le couvercle extérieur d'une main et, de & l'autre, tirez le bouton de couvercle intérieur Boutonne Vers vous.
AVANT D’APPELER LE SERVICE APRÈS VENTE eo] 7 Ne] See Problèmes # Cause (Points a vérifier) | Le riz cul est trop i dur ou trop mou cuiseur A riz se trouve sur une surface inégale ou inclinée, le riz cuit risque d’être trop dur ou trop mou, car la quantité d'eau est inégale.
GUIDE DE DE AVANT D’APPELER LE SERVICE ARDES VENTE PANAGE (suite) Problèmes ® Cause (Points a vérifier) CUISSON ® Avez-vous appuyé sur le bouton CUISSON paras avoir réglé la PAR La minuterie n'a minuterie ? MINUTERIE pas fonctionné : on faut appuyer sur le bouton BUISSON pour valider le réglage AUTRES | nc te pare ® S| le courant est Immédiatement rétabli, le cuiseur A riz reviendra a I'état oll il se trouvait immédiatement avant la panne de courant.
FICHE TECHNIQUE Numéro de Modélise NS WXC10 NS WXC1s Capacité | Riz Blanc (riz blanc a grain courtoisement 0,182 1,01 [125,51 satellite [2a10] de cague Riz & Sushi (izbancagancurtoumopen) | 0,1821,0L [1455] | 036a1,8L [2a10] option de | Bouillie de Riz {ambiance gminoourtoumeyen)| 0,09 20,27L [0,521,51 | 0,092045L [05425] men Riz Brun {tribun d bran scoumoune) | 0,18 20,72L [124] 0362144.
PRECAUCIONES IMPORTANTES sa ess construcción © Estas ADVERTENCIAS y PRECAUCIONES son para evitar dacios a la propiedad y personales a usted u otras personas. Siga las indicaciones cuidadosamente para garantizar un funcionamiento seguro del producto. ADVERTENCIAS simposios, /\ fin mse PRECONICES lustraciones dentro o cerca del triangulo. A Cago do lonas © Indica una prohibición. La prohibición So incomode. =2 Ln concreta se indica con explicaciones o eee prohibir Lustraciones dentro o cerca del circulo.
/\ ADVERTENCIAS O Esto aj no debe ser O Interrumpa Inmediatamente al uso del producto sl utilizado por personas detecta cualquiera de los siguientes síntomas que {Incluidos nis) con Indican mal funcionamiento o averna.
NOMBRES DE PIEZAS Y FUNCIONES # Retire la película protectora situada entre la placa calentadora y la cazuela interior antes de usar el producto por primera vez. Junta de la tapadera exterior Cierre de la tapadera Interior Utilice el cierre para desmontar y fijar ol juego de la tapadera interior. ® Vuelva a montar el juego de la tapadera interior siempre después de lavaría. —p.47 Juego de la tapadera Cazuela Interior Pulse el boten de apertura para abrir la tapadera exterior.
NOMBRES DE PIEZAS Y FUNCIONES PANEL DE CONTROL © Pulse los botones con ® El punto y Ia raya con relieve (es, == ) que hay en el centro de los botones COCCIÓN y RESTABLECER son para las personas con discapacidades visuales. Boten RESTABLECER Utilice este boten para cancelar la configuración seleccionada o la función en uso. Luz CONSERVAR CALOR Botón CONSERVAR CALOR Utilice este botan para mantener el arroz caliente. firmeza. Luz MENO Boten MENÚ Utilice este boten para configurar el menú que vasar.
EXPLICACIÓN SOBRE EL ARROZ © Los nombres y tipos de arroz varan según la forma de pulir o procesar el grano. Las distintas categorías de arroz corresponden al porcentaje de salvado y germen eliminados. Arroz con ciscara . > Capa de salvado Arroz Integral | Arroz | Arroz | Arroz ! Mazo banco | | Arroz sin | Sa ha laminado ! ! litografiar 1 semiología | semiología | So ha eliminado | acarado | lascara.
TASE TELAR edema Mida el arroz con precisión Utilice el vaso medidor suministrado, ya que otros vasos medidores pueden ser distintos. Nivele el arroz por la parte superior del vaso para mantener la precisión. Lave el arroz rápidamente El primer aclarado debe realizarse rápidamente, moviendo y mezclando el arroz con la mano y abundante agua. Luego escurra Ejemplo: Para cocer 6 vasos el agua inmediatamente. Aclare el arroz 4-5 de arroz blanco veces con agua fresca para eliminar el salvado.
COMO COCER EL ARROZ PASOS BÁSICOS DE LA COCCIÓN 7 Mida el arroz con el vaso medidor suministrado. Iliense a} vaso medidor hasta que robase y elimine el acceso por arriba. {1 vaso = 6,1 oz aproa. / 180 m| aproa } 2 Aclare el arroz y ajuste la cantidad de agua. Mide la cazuela interior sobre una superficie plana. Fiada agua hasta ol vine indicado para el ajuste del menta que elegido (ver p. 44, "CONEJOS PARA COCER UN ARROZ SABROSO POR MENUZOS. Para medir con precisión nivela la superficie del arroz.
MENÚS : HITE (BLANCO) SUS (SUS) PORRINO (GACHAS) BRONCO (INTEGRAL) 6 Remueva y despegue el arroz inmediatamente tras finalizar la cocción. La arrocera cambia automáticamente al modo de Eh conservación del calor al finalizar la acadio y la luz CONSERVAR CALOR se enciende. Remueva y despegue el arroz inmediatamente para WA eliminar a humedad excesiva y lograr un arroz esponjoso.
COMO COCER EL ARROZ (con) CONSEJOS PARA COCER UN ARROZ SABROSO POR MENÚS Llene el vaso medidor hasta que rebose y elimine el exceso por arriba. ARROZ Limite la cantidad de armo a cocer a 1-4 oxiuro: J ARROZ PARA SUS cocerse correctamente.
USO DEL TEMPORIZADOR # a arrocera completara la cocción automáticamente tras el minero de horas que se haya seleccionado. Tf Pulse el boten (w=) para seleccionar cuantas horas mas tarde desea finalizar la cocción. Cada vez que se pisa el botón la luz intermitentes TEMPORIZADOR, ostia en mrs of siguientes orden: MHP HOH" La [Son #Mantenga pisado sl bota para cambiar 26aH EH EH Loen | rápidamente entre (as pensionas de solsticio (al llegar a "4H" pararse.
BL 2S EEE Cualquier otro servicio debe ser llevado a cabo por un representante de servicio autorizado. ® Aseglares de desenchufar el cable de alimentación y deje enfriar el cuerpo de la arrocera y la cazuela interior. ® No utilice disolvente, benceno, limpiadores y cepillos abrasivos {nailon/metal), lejía ni nada que pueda aindiar la superficie de la arrocera.
NE EEN COMO DESMONTAR Y MONTAR EL JUEGO DE LA TAPADERA INTERIOR Como desmontar el juego de la tapadera interior: Sujete la tapadera exterior con una mano, y . * con |a otra tire del cierre de la tapadera Cierre de la interior hacia usted. tapadera interior Como montar el Juego de la tapadera Interior: Para montar el juego de la tapadera interior, fije su parte hueca (lado opuesto al cierre) al eje de montaje del juego. Fije esta parte hueca al sje de montaje del juego de la tapadera interior.
ANTES DE SOLICITAR UNA REPARACIÓN GUÍA DE SOLUCIÓN DE PROBLEMAS # Antes de 8g citar Und reparación compruebe log siguientes unios # Causa (puntos a comprobar) | Al cocerlo, el arroz | queda demasiado i duro o demasiado : blando: © Si la moceara esta situada sobre una superficie irregular o inclinada, la textura del arroz cocida puede quedar demasiado dura o demasiado blanda, ya que la cantidad de agua no se reparte de forma homogénea.
ANTES DE SOLICITAR UNA REPARACIÓN GUÍA DE SOLUCIÓN DE PROBLEMAS # Antes de 8g citar Und reparación compruebe log siguientes unios I: Problemas © Causa (puntos a comprobar) 1 (CONSOCIO CON El temporizador ® Pulsé el botón COCCIÓN después de configurar el tiempo? — Siena . que pulsar el boten COCCIÓN para completar la configuración del TEMPORIZADOR | dale: temporizador. ® Si la electricidad se restablece inmediatamente, la arrocera volverá al : estado anterior al corte eléctrico.