V32.35 Yealink Network Technology CO., LTD Yealink MVCⅡSeries for Microsoft Teams Rooms System Quick Start Guide(V2.
Package Contents MVC900ⅡPackage Camera-Hub USB3.0 to Ethernet Adapter 7.5m Ethernet Cable 3m RCA to 3.5mm Audio Cable Cable Tie×5 Power Adapter Camera-Hub Quick Start Guide Camera-Hub Package (1/4”-20 UNC screw) 2.5m USB Cable UVC80 VCR20 Remote Control VESA Accessory Power Adapter 48V/0.7A 7.
MVC800ⅡPackage (1/4”-20 UNC screw) 2.5m USB Cable UVC80 Power Adapter 48V/0.7A 7.5m Ethernet Cable VCR20 Remote Control VESA Accessory (T4×30 screw) (M3×8 screw) Camera Lens Privacy cover Cable Tie×5 Velcro×2 (One Velcro is on the bracket) Mounting Bracket and Accessories UVC80 Quick Start Guide UVC80 Package (Camera) ×2 + + 4 4 MCore 1.
MVC500ⅡPackage (1/4”-20 UNC screw) 2.5m USB Cable UVC50 VCR20 Remote Control VESA Accessory Power Adapter 48V/0.7A 7.5m Ethernet Cable (T4×30 screw) (M3×8 screw) Camera Lens Privacy cover Velcro×2 UVC50 Quick Start Guide Mounting Bracket and Accessories Cable Tie×5 (One Velcro is on the bracket) UVC50 Package (Camera) ×2 + + 4 4 MCore 1.
MVC300ⅡPackage UVC30 Room Camera Lens Privacy Cover CP900 UVC30 Room Quick Start Guide UVC30 Room Package (Camera) Carrying Case 5m CP900 USB Extension Cable Quick Start Guide CP900 Package (Microphone) + + 4 4 MCore 1.8M HDMI Cable×2 Bracket Power Adapter Expansion Screw and Machine Screw Velcro×2 ×2 (M3×8 screw) Screwdriver MCore Quick Start Guide MCore Package ×2 (M3×8 screw) MTouchⅡ 7.
MVC900Ⅱ& MVC800Ⅱ& MVC500Ⅱ& MVC300ⅡConnection MVC900ⅡConnection UVC80 UVC80 CAT5e CAT5e CAT5e ... Switch Camera-Hub CAT5e 3m RCA to 3.5mm Audio Cable USB3.
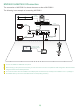
MVC800Ⅱ& MVC500ⅡConnection The connection of MVC500Ⅱis almost the same as that of MVC800Ⅱ. The following is an example of connecting MVC800Ⅱ. 3.5mm Audio Cable MSpeakerⅡ Display UVC80 CAT5e HDMI USB2.0 HDMI Display HDMI 5V 5V VCH Internet DC19V MCore HDMI CAT5e Ethernet Cable USB Tpye-C Cable (with an HDMI adapter) VCM34 CAT5e MTouchⅡ VCM34 You can use VCM34 or CPW90 as microphone.
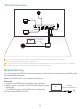
MVC300ⅡConnection UVC30 Room Display HDMI USB2.0 HDMI Display HDMI 5V 5V VCH HDMI Internet DC19V Ethernet Cable CAT5e USB Tpye-C Cable (with an HDMI adapter) USB2.0 MTouchⅡ CP900 When starting up the system for the first time, you need to connect a mouse to complete the initial configuration. We recommend using the wireless mouse and keyboard kit.
Upgrading System Software through Windows Update The system software(including the Windows, the Camera-Hub/UVC80/UVC50/UVC30 Room, the MTouchⅡ) can be automatically upgraded via windows update by default. Otherwise, you can enable automatically windows update or upgrade the devices manually. Enabling Automatically Windows Update Procedure 1. On the display screen, navigate to More->Settings. 2. Enter the administrator password (default: sfb) to access Setup screen. 3. Navigate to Windows Settings. 4.
Enabling/Disabling Auto-framing Procedure 1. Tap More-> to enter the Camera Control page. 2. Select . 3. Enable/Disable Auto-framing. Controlling UVC80/UVC50/UVC30 Room Camera Position Procedure 1. Tap More-> to enter the Camera Control page. 2. If you are using MVC900Ⅱsystem, select a desired UVC80 camera. 3. Tap or to zoom camera in/out. 4. Tap the arrow keys to pan/tilt the camera. If the auto-framing feature is enabled, you can not control the UVC30 Room camera.
包装清单 MVC900Ⅱ产品包 Camera-Hub主机 USB3.0转RJ45 适配器 电源适配器 7.5m 网线 束线带x 5 3米 RCA转 3.5mm音频线 Camera-Hub主机套件 (1/4”-20 UNC screw) 2.5m USB 线 UVC80 电源适配器 48V/0.7A 7.5m 网线 VCR20遥控器 VESA 配件 (T4×30 screw) (M3×8 screw) 镜头隐私盖 魔术贴x2 (一套已贴在支架上) 支架配件 (用于安装主机) 束线带x 5 UVC80套件(摄像机)×2 UVC80 快速入门指南 ×2 + + 4 4 MCore 1.8M HDMI 线×2 挂架版 电源适配器 魔术贴x2 (M3×8 screw) 膨胀螺丝和机械螺丝 螺丝刀 MCore 快速入门指南 MCore套件 ×2 (M3×8 screw) MTouchⅡ 7.
MVC800Ⅱ产品包 (1/4”-20 UNC screw) 2.5m USB 线 UVC80 电源适配器 48V/0.7A 7.5m 网线 VCR20遥控器 VESA 配件 (T4×30 screw) (M3×8 screw) 镜头隐私盖 魔术贴x2 (一套已贴在支架上) 支架配件 (用于安装主机) 束线带x 5 UVC80套件(摄像机) UVC80 快速入门指南 ×2 + + 4 4 1.8M HDMI 线×2 MCore 电源适配器 挂架版 魔术贴x2 (M3×8 screw) 膨胀螺丝和机械螺丝 螺丝刀 MCore 快速入门指南 MCore套件 + + 2 2 MSpeakerⅡ 3.5mm音频线 电源适配器 膨胀螺丝和自攻螺丝 挂墙架 硅胶垫×2 VCM34 快速入门指南 MSpeakerⅡ套件 (音箱) 3m网线 硅胶垫 VCM34 快速入门指南 VCM34 套件×2 (麦克风) ×2 (M3×8 screw) MTouchⅡ 7.
MVC500Ⅱ产品包 (1/4”-20 UNC screw) 2.5m USB 线 UVC50 电源适配器 48V/0.7A 7.5m 网线 VCR20遥控器 VESA 配件 (T4×30 screw) (M3×8 screw) 镜头隐私盖 魔术贴x2 (一套已贴在支架上) 支架配件 (用于安装主机) 束线带x 5 UVC50 快速入门指南 UVC50套件(摄像机) ×2 + + 4 4 MCore 1.8M HDMI 线×2 电源适配器 挂架版 魔术贴x2 (M3×8 screw) 膨胀螺丝和机械螺丝 螺丝刀 MCore 快速入门指南 MCore套件 + + 2 2 MSpeakerⅡ 电源适配器 膨胀螺丝和自攻螺丝 挂墙架 3.5mm音频线 硅胶垫×2 VCM34 快速入门指南 MSpeakerⅡ套件 (音箱) 3m网线 硅胶垫 VCM34 快速入门指南 VCM34 套件 (麦克风) ×2 (M3×8 screw) MTouchⅡ 7.
MVC300Ⅱ产品包 UVC30 Room 镜头隐私盖 UVC30 Room 快速入门指南 便携包 CP900 5米USB延长线 CP900套件 (USB 扬声器) UVC30 Room套件(摄像机) + + 4 4 MCore 1.8M HDMI 线×2 挂架版 CP900 快速入门指南 电源适配器 魔术贴x2 膨胀螺丝和机械螺丝 ×2 (M3×8 screw) 螺丝刀 MCore 快速入门指南 MCore套件 ×2 (M3×8 screw) MTouchⅡ 7.
连接MVC900Ⅱ& MVC800Ⅱ& MVC500Ⅱ& MVC300Ⅱ 连接MVC900Ⅱ UVC80 UVC80 CAT5e CAT5e CAT5e 交换机 ... Camera-Hub主机 CAT5e 投影仪 HDMI USB3.0转RJ45 转换头 HDMI 显示器 3米 RCA转 3.
连接MVC800Ⅱ& MVC500Ⅱ MVC500Ⅱ的连接与MVC800Ⅱ的连接相似,下图为MVC800Ⅱ的连接示例。 3.5mm 音频线 MSpeakerⅡ 显示器 UVC80 CAT5e HDMI USB2.
连接MVC300Ⅱ UVC30 Room 显示器 USB2.0 HDMI HDMI 显示器 HDMI 5V 5V VCH MCore HDMI CAT5e Internet DC19V 网线 USB Tpye-C线 (带HDMI转接头) USB2.0 CP900 MTouchⅡ 首次启动时,你需要在MCore上连接一个鼠标来完成系统初始化配置,我们推荐使用无线键鼠套装。 更多关于如何安装和部署配件(例如安装MCore或UVC30 Room摄像机),请参阅相应配件的快速入门指南。 无线辅流分享内容 你可以使用WPP20无线传屏助手进行无线辅流分享内容。 WPP20需要单独购买。 分享内容前,确保MTouchⅡ已正确连接在MCore上。 过程 1. 将WPP20连接到MTouchⅡ的USB口。 2. 约3秒后,WPP20指示灯显示绿色常亮。 WPP20与MTouchⅡ配对成功。 PC 3.
通过Windows更新系统 系统软件(包括Windows, Camera-Hub/UVC80/UVC50/UVC30 Room和 MTouchⅡ)默认情况下 可以通过windows 自动更新升级。 如果设备软件没有自动升级,你可以启用自动windows 自动更新或手动升级设备。 开启Windows自动更新 过程 1. 在显示屏上, 按更多->设置。 2. 输入管理员密码(默认: sfb)进入设置界面。 3. 按 Windows设置。 4. 从左下角选择Administrator帐户,并输入管理员帐户密码(默认: sfb)。 5. 按开始菜单,选择设置->更新和安全->Windows更新, 再按高级选项。 6. 开启自动下载更新,即使通过按流量计费的数据连续也是如此(可能会收费)。 手动更新升级设备 过程 1. 在显示屏上, 按更多->设置。 2. 输入管理员密码(默认: sfb)进入设置界面。 3. 按 Windows设置。 4. 从左下角选择Administrator帐户,并输入管理员帐户密码(默认: sfb)。 5.
开启/关闭自动框全景 过程 1. 按更多-> 进入摄像机控制界面。 。 2. 选择 3. 开启/关闭自动框全景。 控制UVC80/UVC50/UVC30 Room摄像头位置 过程 1. 按更多-> 进入摄像机控制界面。 2. 如果使用MVC900Ⅱ系统,选择相应的UVC80摄像机。 3. 按 或 调整摄像机的焦距。 4. 按方向键调整摄像机角度。 UVC30 Room摄像机开启自动框全景功能后,无法控制摄像头。 恢复UVC80/UVC50/UVC30 Room摄像头到主位置 过程 1. 按更多-> 进入摄像机控制界面。 2. 如果使用MVC900Ⅱ系统,选择相应的UVC80摄像机。 3.
Regulatory Notices Operating Ambient Temperatures Operating temperature: +32 to 104°F (0 to 40°C) Relative humidity: 5% to 90%, noncondensing Storage temperature: -22 to +160°F (-30 to +70°C) Warranty Our product warranty is limited only to the unit itself, when used normally in accordance with the operating instructions and the system environment. We are not liable for damage or loss resulting from the use of this product, or for any claim from a third party.