
Operation Manual


4-17
CYLINDER HEAD, CYLINDER AND PISTON
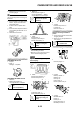
• Install the spring to the link lever,
and then to the cylinder.
• Install the spring with its stopper
portion "a" facing inward.
• Apply the lithium soap base grease
on the oil seal lip.
3. Install:
• Thrust plate "1"
• Screw (thrust plate) "2"
4. Check:
• Power valve smooth movement
Unsmooth movement → Repair
or replace.
5. Install:
• Gasket (power valve cover) "1"
• Power valve cover "2"
• Screw (power valve cover) "3"
• YPVS breather hose "4"
• Install the power valve cover so that
the arrow mark "a" faces upward.
• Install the clamp of the YPVS
breather hose with its opening por-
tion "b" facing backward.
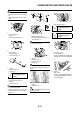
INSTALLING THE PISTON RING
AND PISTON
1. Install:
• Piston ring "1"
• Take care not to scratch the piston
or damage the piston ring.
• Align the piston ring gap with the pin
"2".
• After installing the piston ring,
check the smooth movement of it.
2. Install:
• Gasket (cylinder) "1"
• Small end bearing "2"
• Dowel pin "3"
• Apply the engine oil onto the bear-
ing (crankshaft and connecting rod)
and connecting rod big end wash-
ers.
• Install the gasket with the seal print
side toward the crankcase.
3. Install:
•Piston "1"
• Piston pin "2"
• Piston pin clip "3"
• The arrow "a" on the piston dome
must point to exhaust side.
• Before installing the piston pin clip,
cover the crankcase with a clean
rag to prevent the piston pin clip
from falling into the crankcase cavi-
ty.
• When installing the piston pin
clip, use the hand so that it may
not be distorted.
• Do not allow the clip open ends
to meet the piston pin slot "b".
INSTALLING THE CYLINDER
HEAD AND CYLINDER
1. Apply:
• Engine oil
To piston "1", piston ring "2" and
cylinder surface.
2. Install:
• Cylinder "1"
Make sure the piston ring is prop-
erly positioned. Install the cylinder
with one hand while compressing
the piston ring with the other hand.
After installing, check the smooth
movement of the piston.
Screw (thrust plate):
4 Nm (0.4 m•kg, 2.9
ft•lb)
Screw (power valve cov-
er):
5 Nm (0.5 m•kg, 3.6
ft•lb)