
User Guide


Chapter 1 Tune-up and routine maintenance
1-23
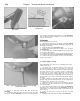
19.3 Turn the throttle stop screw to set
idle speed (1981 through 1987 XV700
through 1100 shown; XV535 and 1988-on
XV750 and 1100 similar)
20.7 Remove the rubber caps and connect
the vacuum gauges or manometer to the
fittings (A); turn the synchronizing screw
(B) to obtain even vacuum readings (XV535
shown; others similar)
20.9 Disconnect the smaller ho^e from
the front carburetor's intake joint and
connect one of the vacuum gauges or
manometer tubes to the fitting
back-and-forth and see if the idle speed changes as this is done. If it
does, the accelerator cable may not be adjusted correctly, or it may be
worn out. This is a dangerous condition that can cause loss of control
of the bike. Be sure to correct this problem before proceeding.
2 The engine should be at normal operating temperature, which is
usually reached after 10 to 15 minutes of stop and go riding. Support
the motorcycle securely and make sure the transmission is in Neutral.
3 Turn the throttle stop screw (see illustration), until the idle speed
listed in this Chapter's Specifications is obtained.
4 Snap the throttle open and shut a few times, then recheck the idle
speed. If necessary, repeat the adjustment procedure.
5 If a smooth, steady idle can't be achieved, the fuel/air mixture
may be incorrect. Refer to Chapter 5 for additional carburetor
information.
20 Carburetor synchronization - check and adjustment
Warning: Gasoline is extremely flammable, so take extra precautions
when you work on any part of the fuel system. Don't smoke or allow
open flames or bare light bulbs near the work area, and don't work in a
garage where a natural gas-type appliance (such as a water heater or
clothes dryer) is present. If you spill any fuel on your skin, rinse it off
immediately with soap and water. When you perform any kind of work
on the fuel system, wear safety glasses and have a class B type fire
extinguisher on hand.
1 Carburetor synchronization is simply the process of adjusting the
carburetors so they pass the same amount of fuel/air mixture to each
cylinder. This is done by measuring the vacuum produced in each
cylinder. Carburetors that are out of synchronization will result in
decreased fuel mileage, increased engine temperature, less than ideal
throttle response and higher vibration levels.
2 To properly synchronize the carburetors, you will need some sort
of vacuum gauge setup, preferably with a gauge for each cylinder, or a
mercury manometer, which is a calibrated tube arrangement that
utilizes columns of mercury to indicate engine vacuum. You'll also
need an auxiliary fuel tank, since the bike's fuel tank must be removed
for access to the vacuum fittings and synchronizing screws.
3 A manometer can be purchased from a motorcycle dealer or
accessory shop and should have the necessary rubber hoses supplied
with it for hooking into the vacuum hose fittings on the carburetors.
4 A vacuum gauge setup can also be purchased from a dealer or
fabricated from commonly available hardware and automotive vacuum
gauges.
5 The manometer is the more reliable and accurate instrument, and
for that reason is preferred over the vacuum gauge setup; however,
since the mercury used in the manometer is a liquid, and extremely
toxic, extra precautions must be taken during useand storage of
the instrument.
6 Because of the nature of the synchronization procedure and the
need for special instruments, most owners leave the task to a dealer
service department or a reputable motorcycle repair shop.
XV535 models
Refer to illustration 20.7
7 Remove the vacuum caps from the intake joint fittings (see
illustration). Connect the vacuum gauges or manometer to the fittings.
1981 through 1983 models
Refer to illustration 20.9
8 Remove the seat (see Chapter 7). If necessary for access, detach
the fuel tank and raise it slightly, leaving the fuel hoses connected (see
Chapter 3).
9 Disconnect the smaller hose from the front carburetor's intake
joint (see illustration). Remove the rubber cap from the vacuym fitting
on the rear carburetor's intake joint, then connect the vacuum gauges
or manometer to the hose fitting and vacuum fitting.
1984 through 1987 XV700 models
10 Remove the seat (see Chapter 7). Detach the fuel tank at the rear
and raise it slightly, leaving the fuel hoses connected..
11 Turn the fuel tap to the PRI position.
12 Disconnect the smaller hose from the front carburetor's intake
joint (see illustration 20.9). Remove the rubber cap from the vacuum
fitting on the rear carburetor's intake joint, then connect the vacuum
gauges or manometer to the hose fitting and vacuum fitting.
1984 through 1987 XV1000 and 1100 models
13 Remove the seat (see Chapter 7).
14 Remove the mixture control valve case cover (see Chapter 3).
Disconnect the mixture control valve vacuum hose at the T-fitting and
connect one of the manometer tubes or vacuum gauges to the fitting.
15 Remove the rubber cap from the vacuum fitting o%_tbe rear
carburetor's intake joint and connect the other vacuurrNgauge or
manometer tube to it.
1988 and later models
16 Remove the seat (see Chapter 7) and the fuel tank (see Chap-
ter 3). Connect an auxiliary fuel source.
17 If you're working on an 1100 model, remove the left side cover.
18 Disconnect the smaller hose from the front carburetor's intake
joint. Remove the rubber cap from the vacuum fitting on the rear
carburetor's intake joint, then connect the vacuum gauges or
manometer to the hose fitting and vacuum fitting.