
Owner`s manual


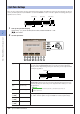


Table Of Contents
- 1 Voices - Playing the Keyboard -
- 2 Styles - Playing Rhythm and Accompaniment -
- 3 Songs - Recording Your Performances and Creating Songs -
- 4 Multi Pads - Adding Musical Phrases to Your Performance -
- 5 Music Finder - Calling Up Ideal Setups for Your Music -
- 6 Registration Memory - Saving and Recalling Custom Panel Setups -
- 7 Recording Audio with the Hard Disk Recorder
- 8 Mixing Console - Editing the Volume and Tonal Balance -
- 9 Internet Direct Connection - Connecting the Tyros3 Directly to the Internet -
- 10 Connections - Using Tyros3 with Other Devices -
- 11 Utility - Making Global Settings -
- Index

2
2
Styles – Playing Rhythm and Accompaniment –
40 • Tyros3 Reference Manual
Step Recording
In the EDIT Page, you can record notes with absolutely precise timing. This Step Recording procedure is essentially
the same as that for Song Recording (page 56) with the exception of the points listed below:
• In the Song Creator, the End Mark position can be changed freely; in the Style Creator, it cannot be changed.
This is because the length of the Style is automatically fixed, depending on the selected section. For example, if
you create a Style based on a section of four measures length, the End Mark position is automatically set to the
end of the fourth measure, and cannot be changed in the Step Recording display.
• Recording channels can be changed in the Song Creator 1-16 tab display; however, they cannot be changed in
the Style Creator. Select the recording channel in the BASIC tab display.
• In the Style Creator, the channel data can be entered and System Exclusive data can be edited (delete, copy, or
move). You can switch between the two by pressing the [F] button. However, Chord, Lyrics, and System Exclu-
sive data cannot be entered.
For instructions on Step Recording, refer to pages 56–59. For information on the EDIT display (Event List display),
refer to page 66.
Style Assembly
Style Assembly allows you to create a single Style by mixing the various patterns (channels) from existing internal
Styles.
1 Select the desired Style to serve as the basis for recording/editing
before calling up the Style Creator display.
2 Call up the operation display.
[DIGITAL RECORDING] → [B] STYLE CREATOR → TAB [
QQ
QQ
][
WW
WW
] ASSEMBLY
3 Select the desired section (Intro, Main, Ending, etc.) for your new
Style.
First call up the SECTION Selection display by pressing one of the Section but-
tons (INTRO, MAIN, ENDING, etc.) on the panel. Then change the section as
desired by using the [6 ▲▼]/[7 ▲▼] buttons and actually enter the selection
by pressing the [8 ▲] (OK) button.
You cannot select INTRO 4 and ENDING
4 sections directly via the panel opera-
tion.
NOTE
NEXT PAGE