
User Manual


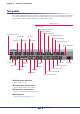


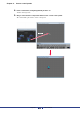


Table Of Contents
- Cover
- What is Amp Editor?
- Special Notices
- Contents
- Preparing for operation
- An overview of Amp Editor
- Setup
- Basic operations in Amp Editor
- Main panel window
- Objects in the window and their function
- Menus in the main panel window
- Preferences
- Event Log
- Device Information
- Scene Manager
- Alert Setup
- Word Clock (TXn only)
- Speaker Processor Library Manager (TXn only)
- Clock
- Language (TXn only)
- GPI (ACD1 only)
- Utility
- IP Address
- IP Control Port No.
- Firmware Update (Updating the internal firmware)
- Scene Link Manager (for devices other than XMV)
- Network Setup
- Synchronization (Synchronization with devices)
- Custom Control Panel Manager
- System View Creator
- Speaker Processor Library Converter
- Tree View window
- Detail View window
- Device Properties window
- Signal Path View window (TXn only)
- Component editor (TXn only)
- Custom control panels
- Appendix

Chapter 11 Custom control panels
Amp Editor Owner’s Manual
187
• If controls (e.g., a knob or slider), edit boxes, or labels that indicate the parameter type are dragged
and dropped one at a time onto the custom control panel, their alignment will need to be adjusted in
the custom control panel. If you drag and drop a multiple selection, the items will be copied to the
custom control panel with their relative alignment intact.
Using the mouse to place a control
Drag and drop a control from the component editor or Detail View window into the custom control panel.
1. Open the component editor or Detail View window that contains the control you want to
place.
2. Open the custom control panel.
In the main panel window, the [View] menu [Custom Control Panel] submenu will show the name of
the custom control panel. Click this to open the window.
3. Right-click in the component editor, the Detail View window, or the custom control panel.
A context menu will appear.
Drag
NOTE