
Owner's Manual


8
SPX2000 Editor Owner’s Manual
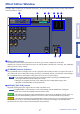
LCD color
For each effect that is recalled, this indicates the background color of the SPX2000’s display. For USER bank
effects, you can use [LCD color select] in the Library window to change the background color.
[IN] button
This button is used to set the metering position to the effects processor’s inputs.
[OUT] button
This button is used to set the metering position to the effects processor’s outputs.
Level Meters
SPX2000 Editor displays the effect input level or output level.
Effect parameter section
This section contains the various effects controls, buttons, and displays. Its layout depends on the selected effect
type.
[MIX BALANCE] knob
This knob enables you to adjust the balance between the wet and dry signals. When set to 0, only the dry signal is
heard. When set to 100, only the wet signal is heard.
[BYPASS] button
This button is used to bypass the currently selected effects processor.
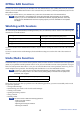
PLAY/REC section
This window is displayed only if the FREEZE/FREEZE A/
FREEZE B effect type is selected. To begin recording (sam-
pling), click the REC button and then click the PLAY button.
The progress bar lets you to check the currently recording
position. To play back the recorded sample, click the PLAY
button.
TEMPO section
The TEMPO parameter is displayed only if an effect type that includes the TEMPO parameter is selected. Select
one of the three buttons below to choose how the TEMPO parameter will be set.
[VALUE ONLY] : You can set the TEMPO parameter by
using the rotating knob.
[MIDI CLK] : You can set the TEMPO parameter by using
the rotating knob and by MIDI clock messages from an exter-
nal device.
[TAP] : You can set the TEMPO parameter by using the rotat-
ing knob or the [TAP TEMPO] button.
[TAP TEMPO] : Repeatedly click the [TAP TEMPO] button
to set the TEMPO parameter to the corresponding interval.
SOLO section
This window is displayed only if the effect type M.BAND
DYNA is selected. The SPX2000 unit will output only bands
that are turned ON. If you turn all three buttons to ON, all
bands will be output.
4
5
6
7
8
9
)
PLAY button
Progress bar
REC button
!
@
VALUE ONLY button
Rotating knob
TAP TEMPO button
TAP button
MIDI CLK button
#
Getting StartedAppendix
Using SPX2000
Editor Windows