
Owner's Manual


En 23
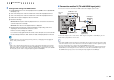
■ Connection method 2 (HDMI Control-compatible TV)
Connect the TV to this unit with an HDMI cable and a digital optical cable.
• The following explanation is based on the assumption that you have not changed the “HDMI” parameters
(p.94) in the “Setup” menu.
• HDMI Control is available only on the HDMI OUT 1 jack.
• If you make an HDMI connection between your TV and this unit, any videos input to this unit can be output
to the TV no matter how you connect video devices to this unit. For details, see “Video signal flow” (p.119).
• You can connect another TV or a projector by using the HDMI OUT 2 jack (p.25).
Necessary settings
To use HDMI Control, you need to configure the following settings.
For details on settings and operations of your TV, refer to the instruction manual of the
TV.
1
After connecting external devices (TV, playback devices, etc.) and
power cable of this unit, turn on this unit, TV and playback devices.
2
Configure the settings of this unit.
a Switch the TV input to display the video from this unit.
b Press ON SCREEN.
c Use the cursor keys to select “Setup” and press ENTER.
d Use the cursor keys ( / ) to select “HDMI”.
e Use the cursor keys ( / ) to select “HDMI Control” and press ENTER.
f Use the cursor keys to select “On”.
g Press ON SCREEN.
COMPONENT
VIDEO
VI
D
DOCK NETWORK
FM
75Ω
ANTENNA
P
R
P
B
Y
P
R
P
B
Y
AUDIO 2AUDIO 1
AV 6AV 5AV 4AV 3
(
CD
)(
TV
)
VIDEO
AV 2
AV 1
COAXIAL OPTICALCOAXIAL
OPTICAL
AV
OUT
COMPONENT
VIDEO
R
L
HDMI OUT
ARC
12
(
MONITOR O
U
AM
HDMI OUT
ARC
12
HDMI
AV 4
(
TV
)
OPTICAL
OPTICAL
HDMI
HDMI
OO
This unit
(rear)
HDMI OUT 1 jack
AV4 (OPTICAL) jack Audio output
(digital optical)
TV
HDMI input
RETURN
VOLUME
ENTER
TOP
POP UP
DISPLAY
OPTION
ON SCREEN
RETURN
V
O
L
U
ME
TO
P
POP U
P
DISPLA
Y
A
A
O
PTI
O
N
D
RN
DIS
ON SCREEN
Cursor keys
ENTER
1 2 3
TV connection
4 5 6 7 8 9 10