
Service manual


36
DVR-700/NS-PSW700/NS-P700
DVR-700/
NS-PSW700/NS-P700
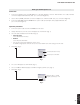
Upgrade File DETECTED
Upgrade ?
Press Play To Start
Upgrade File DETECTED
Upgrade ?
Press Play To Start
File Copying
UPGRADING
Upgrade File DETECTED
Upgrade ?
Press Play To Start
Writing being executed.
Writing to the Module Board
6. After a few minutes, the firmware CD is drained from a slot automatically.
Remove the firmware CD.
* At this time, do not turn off the power as writing of the firmware is going on in this unit.
* Writing takes about 1 minute.
7. When writing is completed, the display on the TV monitor screen disappears.
8. Press the “STANDBY/ON” key of this unit to turn off the power.
Connection
1. Connect the DVR-700 and NS-PSW700 with the system cable (D-sub 15pin cable) supplied with this unit.
(See connection diagram 3)
2. Connect the VIDEO OUT terminal of the DVR-700 to the VIDEO IN terminal of the TV monitor with a video pin cable.
Operation procedures
1. Connect the power cable of the NS-PSW700 to the AC outlet.
2. Press the “STANDBY/ON” key of the DVR-700 to turn on the power.
3. Insert the firmware CD to the disc slot.
4. “Upgrade?” is displayed on the TV monitor screen. (Fig. 1)
5. Press the “PLAY” key of the DVR-700, then writing of the firmware is started. (Fig. 1)
Fig. 1
Fig. 2