NP-30 YNP-25 Digital Keyboard Owner’s Manual
SPECIAL MESSAGE SECTION This product utilizes batteries or an external power supply (adapter). DO NOT connect this product to any power supply or adapter other than one described in the manual, on the name plate, or specifically recommended by Yamaha. WARNING: Do not place this product in a position where anyone could walk on, trip over, or roll anything over power or connecting cords of any kind.
FCC INFORMATION (U.S.A.) 1. IMPORTANT NOTICE: DO NOT MODIFY THIS UNIT! This product, when installed as indicated in the instructions contained in this manual, meets FCC requirements. Modifications not expressly approved by Yamaha may void your authority, granted by the FCC, to use the product. 2. IMPORTANT: When connecting this product to accessories and/ or another product use only high quality shielded cables. Cable/s supplied with this product MUST be used. Follow all installation instructions.
PRECAUTIONS PLEASE READ CAREFULLY BEFORE PROCEEDING * Please keep this manual in a safe place for future reference. WARNING Always follow the basic precautions listed below to avoid the possibility of serious injury or even death from electrical shock, short-circuiting, damages, fire or other hazards. These precautions include, but are not limited to, the following: Power supply/AC power adaptor Water warning • Only use the voltage specified as correct for the instrument.
PRECAUTIONS • Before moving the instrument, remove all connected adaptor and other cables. • When setting up the product, make sure that the AC outlet you are using is easily accessible. If some trouble or malfunction occurs, immediately turn off the power switch and disconnect the plug from the outlet. Even when the power switch is turned off, electricity is still flowing to the product at the minimum level.
Introduction Thank you for purchasing the Yamaha NP-30/YNP-25! We recommend that you read this manual carefully so that you can fully take advantage of the advanced and convenient functions of the NP-30/YNP-25. We also recommend that you keep this manual in a safe and handy place for future reference. Main Features Graded Touch Keyboard Features well balanced weight gradations of the keys—heavy in the lower end, light in the upper keys.
About this Owner’s Manual This manual consists of three main sections: Introduction, Reference and Appendix. Introduction (page 6): Please read this section first. Reference (page 14): This section explains how to make detailed settings for the instrument’s various functions. Appendix (page 28): This section features a variety of essential, detailed information on the instrument.
Table of Contents Introduction Main Features...............................................................................................6 About this Owner’s Manual .........................................................................7 Accessories ...................................................................................................7 Application Index .........................................................................................9 Panel Controls and Terminals....................
Application Index Use this index to find reference pages that may be helpful for your particular application and situation. Listening Listening to demo songs with different voices.....................................................................Listening to the Demo Songs on page 14 Playing Using the sustain pedal ...............................................................................................................................
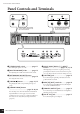
Panel Controls and Terminals Panel Controls and Terminals 9 ) 7 Shows the jacks and terminals as seen when viewed from the rear of the instrument. 1 2 1 [STANDBY/ON] switch ................ page 11 For turning the power on or off. 2 [MASTER VOLUME] slider ........... page 13 For adjusting the volume level of the entire sound. 3 [METRONOME ON/OFF] button ..................................................... page 16 For using the metronome. A] button ................
Before Using Before Using Be sure to do the following operations BEFORE turning on the power. Power Requirements Although the instrument will run either from an optional AC adaptor or batteries, Yamaha recommends use of an AC adaptor whenever possible. An AC adaptor is more environmentally friendly than batteries and does not deplete resources. Using an AC Power Adaptor............................................................... 1.
Before Using Using Batteries .................................................................................... 1. Open the battery compartment cover located on the instrument’s bottom panel. 2. Insert the six new alkaline batteries, being careful to follow the polarity markings on the side of the compartment. 3. Replace the compartment cover, making sure that it locks firmly in place. NOTE Never connect or disconnect the AC power adaptor when the power is on and the batteries are installed.
Before Using Setting the Volume Initially set the [MASTER VOLUME] slider about halfway between the “MIN” and “MAX” settings. Then, when you start playing, re-adjust the [MASTER VOLUME] slider to the most comfortable listening level. TERMINOLOGY MASTER VOLUME: The volume level of the entire keyboard sound The level decreases. The level increases. Using the Pedal [SUSTAIN] jack This jack is for connecting an optional pedal. The pedal functions in the same way as a damper pedal on an acoustic piano.
Reference Listening to the Demo Songs Listening to the Demo Songs Demo songs are provided that effectively demonstrate each of the voices. 1. Press the [STANDBY/ON] switch to turn the power on. Refer to the voice list on page 18 for more information on the characteristics of each preset voice. When the power is turned ON, the power indicator located to the left of the [STANDBY/ON] switch lights up. NOTE The demo songs will not be transmitted via MIDI. 2. Adjust the volume.
Listening to the Piano Preset Songs Listening to the Piano Preset Songs The NP-30/YNP-25 provides performance data for piano songs as well as voice demo songs, for your listening pleasure. 1. While holding down the [SONG W/A] button, press one of the C2–A2 keys to select a song to play back. The number of each piano preset song is assigned to the C2–A2 keys. While holding down the [SONG W/AA] button, press the A#2 key to play all preset songs consecutively in sequence.
Using the Metronome Using the Metronome This instrument features a built-in metronome (a device that keeps an accurate tempo) that is convenient for practicing. 1. Press the [METRONOME ON/OFF] button to turn on the metronome. Start the metronome. Determine the time signature While holding down the [METRONOME ON/OFF] button, press one of the C3– F3 keys. The first beat is accented with a bell sound and the rest with clicks. Default set is 0/4 (C3). In this setting, clicks sound in all beats.
Using the Metronome Increasing the tempo value in steps of one: While holding down the [METRONOME ON/OFF] button, press the C#5 key. Decreasing the tempo value in steps of one: While holding down the [METRONOME ON/OFF] button, press the B4 key. Increasing the tempo value in steps of ten: While holding down the [METRONOME ON/OFF] button, press the D5 key. Decreasing the tempo value in steps of ten: While holding down the [METRONOME ON/OFF] button, press the A#4 key.
Selecting & Playing Voices Selecting & Playing Voices Selecting Voices 1. While holding down the [GRAND PIANO] button, press one of the C1–A1 keys to select a voice. C1 A1 C1 A1 Pressing the VOICE/SONG [BACK<<] or [>>NEXT] button switches among the following ten voices. Key Voice Name Description C1 Grand Piano 1 Recorded samples from a full concert grand piano. Perfect for classical compositions as well as any other style that requires acoustic piano.
Selecting & Playing Voices Combining Voices (Dual) You can play voices simultaneously across the entire range of the keyboard. In this way, you can combine similar voices to create a thicker sound. 1. While holding down the [GRAND PIANO] button, press two keys in the range of C1 through A1 simultaneously (or press one key while holding another) to engage Dual. Refer to “Selecting Voices” on page 18 for more information on the voices that are assigned to the keys.
Selecting & Playing Voices Adding Variations to the Sound – Reverb This control enables you to select four different types of reverb effect that add extra depth and expression to the sound to create a realistic acoustic ambience. Key Reverb Type Description C2 Room This setting adds a continuous reverb effect to the sound, similar to the acoustic reverberation you would hear in a room. C#2 Hall1 For a “bigger” reverb sound, use the HALL 1 setting.
Selecting & Playing Voices Transposition The Transpose function makes it possible to shift the pitch of the entire keyboard up or down in semitone intervals to facilitate playing in difficult key signatures, and to let you easily match the pitch of the keyboard to the range of a singer or other instruments. For example, if you set the transposition amount to “+5,” playing key C produces pitch F.
Selecting & Playing Voices Touch Sensitivity You can adjust the volume level that changes depending on how fast or strong you hit the keys. The following four settings are available. Key Touch Sensitivity Description A5 FIXED The volume level does not change at all regardless of whether you play the keyboard soft or hard. A#5 SOFT The volume level does not change much when you play the keyboard soft or hard. B5 MEDIUM This is the standard piano touch response (default setting).
Connecting MIDI Instruments Connecting MIDI Instruments The NP-30/YNP-25 features MIDI IN/OUT terminals, allowing you to connect the NP-30/YNP-25 to other instruments and devices—including computers—and take advantage of the various performance and recording capabilities in MIDI applications. Connecting MIDI [IN] [OUT] terminals MIDI [IN] [OUT] terminals NOTE Use MIDI cables to connect external MIDI devices to these connectors.
Connecting MIDI Instruments Connecting a Personal Computer By connecting a computer to the MIDI terminals, you can transfer data between the NP-30/YNP-25 and the computer via MIDI. CAUTION NOTE When connecting the NP-30/YNP-25 to a computer, first turn off the power to both the NP-30/ YNP-25 and the computer before connecting any cables. After making connections, turn on the power to the computer first, then to the NP-30/YNP-25.
MIDI Functions MIDI Functions You can make detailed adjustments to MIDI settings. MIDI Transmit/Receive Channel Selection In any MIDI control setup, the MIDI channels of the transmitting and receiving devices must be matched for proper data transfer. This parameter enables you to specify the channel on which the NP30/YNP-25 transmits or receives MIDI data. Setting the Transmit Channel While holding down the [SONG W/AA] and [GRAND PIANO] buttons, press one of the C1–E2 keys.
MIDI Functions Program Change ON/OFF Normally the NP-30/YNP-25 will respond to MIDI program change numbers received from an external keyboard or other MIDI device, causing the same numbered voice to be selected on the corresponding channel (the keyboard voice does not change).
Troubleshooting Troubleshooting Problem The NP-30/YNP-25 does not turn on. Possible Cause and Solution The NP-30/YNP-25 has not been plugged in properly. Securely insert the female plug into the jack on the NP-30/YNP-25, and the male plug into a proper AC outlet (page 11). The batteries are low or dead. Replace all six batteries with completely new alkaline ones, or use the optional AC adaptor. Noise is heard from the speakers or headphones.
Appendix MIDI Data Format If you’re already very familiar with MIDI, or are using a computer to control your music hardware with computer-generated MIDI messages, the data provided in this section can help you to control the NP-30/YNP-25. 1. NOTE ON/OFF 3.
4. PROGRAM CHANGE 7. SYSTEM EXCLUSIVE MESSAGES (Universal System Exclusive) Data format: [CnH] -> [ppH] CnH = Program event (n = channel number) ppH = Program change number P.C.#=Program Change number NP-30/YNP-25 Grand Piano 1 Grand Piano 2 E. Piano 1 E. Piano 2 Church Organ 1 Church Organ 2 Strings Harpsichord 1 Harpsichord 2 Vibraphone MSB 0 0 0 0 0 0 0 0 0 0 LSB 122 112 122 122 123 122 122 122 123 122 P.C.
8. SYSTEM EXCLUSIVE MESSAGES (XG Standard) (1) XG Native Parameter Change Data format: [F0H] -> [43H] -> [1nH] -> [4CH] -> [hhH] -> [mmH] -> [llH] -> [ddH] -> [F7H] F0H = Exclusive status 43H = YAMAHA ID 1nH = When received, n=0–F. When transmitted, n=0. 4CH = Model ID of XG hhH = Address High mmH = Address Mid llH = Address Low ddH = Data | F7H = End of Exclusive Data size must match parameter size (2 or 4 bytes).
MIDI Parameter Change table (SYSTEM) Address (H) Size (H) Data (H) 00 00 00 4 020C–05F4(*1) 01 02 03 04 1 7E 7F TOTAL SIZE 07 00–7F 00 00 Parameter MASTER TUNE MASTER VOLUME XG SYSTEM ON RESET ALL PARAMETERS Description -50–+50[cent] 1st bit 3–0 ➝ bit 15–12 2nd bit 3–0 ➝ bit 11–8 3rd bit 3–0 ➝ bit 7–4 4th bit 3–0 ➝ bit 3–0 0–127 00=XG sytem ON 00=ON (receive only) Default value (H) 00 04 00 00 400 7F *1: Values lower than 020CH select -50 cents. Values higher than 05F4H select +50 cents.NP-30/YNP-25 Owner’s Manual 0 - 127 ************** ˛ Ø ˛ Ø ˛ ˛ ˛ Ø ˛ ˛ Ø ˛ ˛ Pitch Bend Control Change 0,32 1 7 10 11 6,38 64 66,67 84 91,94 96-97 100-101 Key's Ch's After Touch ˛ ˛ Note ON Ø 9nH,v=1-127 Note OFF ˛ Velocity Ø Ø Ø Ø Ø Ø Ø Ø Ø Ø Ø Ø Ø ˛ ˛ Ø ˛ 0 - 24 semi 9nH,v=1-127 0 - 127 0 - 127 ˛ ˛ Note Number : True voice 3 ˛ ************** Recognized 1 - 16 1 - 16 3 Default Messages Altered Mode 1 1 - 16 Transmitted MIDI Implementation Chart Default Changed Function [
NP-30/YNP-25 Owner’s Manual 33 : True # Ø Ø ˛ Ø Ø ˛ Mode 1 : OMNI ON , POLY Mode 3 : OMNI OFF, POLY Notes: All Sound Off Reset All Cntrls Local ON/OFF All Notes OFF Active Sense Reset : : : Mes- : sages: : Aux Ø Ø : Song Pos. ˛ : Song Sel.
Specifications Keyboard 76 keys (Graded Touch) Sound Source AWM Stereo Sampling Polyphony (Max.
Index Index C S Combining Voices (Dual)...............................................19 Song ................................................................................. 15 Connecting a Personal Computer ..................................24 [SONG W/A] button .................................................. 14, 15 Specifications................................................................... 34 D [STANDBY/ON] switch ................................................. 12 Default setting ....
Memo 36 NP-30/YNP-25 Owner’s Manual
Memo NP-30/YNP-25 Owner’s Manual 37
Limited Warranty 90 DAYS LABOR 1 YEAR PARTS Yamaha Corporation of America, hereafter referred to as Yamaha, warrants to the original consumer of a product included in the categories listed below, that the product will be free of defects in materials and/or workmanship for the periods indicated.
For details of products, please contact your nearest Yamaha representative or the authorized distributor listed below. Pour plus de détails sur les produits, veuillez-vous adresser à Yamaha ou au distributeur le plus proche de vous figurant dans la liste suivante. NORTH AMERICA CANADA Yamaha Canada Music Ltd.
Yamaha Home Keyboards Home Page (English Only) http://music.yamaha.com/homekeyboard Yamaha Manual Library http://www.yamaha.co.jp/manual/ U.R.G., Pro Audio & Digital Musical Instrument Division, Yamaha Corporation © 2007 Yamaha Corporation WJ15960 004POXXXX.