
Owners Manual


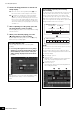
Table Of Contents
- PRECAUTIONS
- Contents
- Controls and Functions
- Setting Up
- Basic Operation and Displays
- Selecting Performances
- Playing the Keyboard
- Creating Your Own Live Sets
- Editing the Settings
- Recording and Playback
- Using as a Master Keyboard
- Connecting a Microphone or Audio Equipment
- Making Global System Settings
- Connecting External MIDI Instruments
- Using a Connected Computer
- Saving/Loading Data
- Shift Function List
- Display Messages
- Troubleshooting
- Specifications
- Index

MODX+ Owner’s Manual
43
Editing the Settings
3 Touch the [Individual] tab to call up the
setting display for each Arpeggio Type.
4 Touch the Arpeggio type and select the
[Category Search] menu at the left side of the
screen. (Alternately, you can press the
[CATEGORY] button.)
The Category determines the instrument type and the
Sub Category determines the music type.
The Arpeggio types include variations for each section of
the song, such as intro, verse, refrain, chorus, and
bridge. Play the keyboard to hear the arpeggios to select
one you like.
Go on and assign other Arpeggio types in the same way
as desired.
5 Store the Performance as necessary.
Using the Rhythm Patterns
The [Rhythm Pattern] button provides a simple way to add a
rhythm part to the current Performance.
By combining rhythm patterns and the Envelope Follower,
you can modify the patterns even further.
Here, as an example, we explain how to add the rhythm
pattern “8Z Trance Basics 1” to the Performance
“Supertrance,” and then modify the sound with the Envelope
Follower.
Adding a Rhythm Part (simple way)
1 Select the desired Performance for adding
the rhythm part.
Here, select “Supertrance.”
2 Press the [RHYTHM PATTERN] button.
The Rhythm Pattern display appears.
When all of the parts in Part 1 to 8 are already in use, the
message “Part Full” appears and the rhythm pattern
cannot be added.
1 Bank/Favorite
2 Name Search
3 Kit Selection
4 Mute
5 Sort
6 Switching pages
3 From the Rhythm Pattern List, touch the
Rhythm Pattern kit you want to use.
Here, touch “8Z Trans Basics1.”
A rhythm part is added.
4 Play the keyboard and the rhythm pattern
starts playing.
[Common] tab
Setting of Arpeggio type
3
4
1 2
5 6