
User Guide


25
AUTO SETUP
PREPARATION
For best results, make sure the room is as quiet as possible
during the auto setup procedure. If there is too much
ambient noise, the results may not be satisfactory.
y
If your subwoofer can adjust the output volume and the crossover
frequency, set the volume to about half way (or slightly less) and
set the crossover frequency to the maximum.
1 Switch on the receiver and video monitor.
Make sure the OSD is displayed.
2 Press AMP to select the AMP mode, then
press SET MENU to enter the SET MENU.
3 Press u / d to select AUTO SETUP, then
press i once to enter the main menu.
4 Press u / d repeatedly to select WIRING,
DISTANCE, SIZE, EQUALIZING or LEVEL.
5 When WIRING, DISTANCE, SIZE or LEVEL is
selected, press j / i to select:
CHECK
To automatically check and adjust the selected
item.
SKIP To skip the selected item and perform no
adjustments.
y
When using THX speakers, set SIZE to SKIP and make sure
that SMALL or SMLx2 is selected in SPEAKER SET
(page 49) and that 80Hz is selected in CROSS OVER
(page 50).
When EQUALIZING is selected, press j / i to
select:
FRONT To adjust the frequency response of
each speaker in accordance with the
sound of your front speakers.
Recommended if your front speakers
are of much higher quality than your
other speakers.
FLAT To average the frequency response of
all speakers. Recommended if all of
your speakers are of similar quality.
LOW To average the frequency response of
all speakers, giving priority to the
accuracy of bass frequencies.
MID To average the frequency response of
all speakers, giving priority to the
accuracy of mid-range frequencies.
HIGH To average the frequency response of
all speakers, giving priority to the
accuracy of high frequencies.
SKIP To skip the selected item and perform
no adjustments.
6 Press d to select SETUP, then press j / i to
select:
AUTO To automatically perform the entire
auto setup procedure.
STEP To pause for confirmation between
each check in the auto setup procedure.
RELOAD To restore the last auto setup setting.
7 Press d to select START PUSH +, then press
i.
Loud test tones will be output from each speaker and
WAIT appears during the auto setup procedure.
If E-10:OTHER ERROR appears during testing, restart the
procedure from step 3.
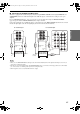
Starting the setup
SET MENU
A/B/C/D/E
MENU
AMP
then
TV VOL
PRESET PRESET
TV MUTE
TV VOL
SELECT
CHCH
+
+
–
–
TV VOL
PRESET PRESET
TV MUTE
TV VOL
SELECT
CHCH
+
+
–
–
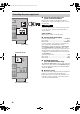
SET MENU
. ;AUTO SETUP
;MANUAL SETUP
: Up/Down
p
/
p
: Select
-/+
1
AUTO:MENU
.WIRING;;;;;CHECK
DISTANCE;;;CHECK
SIZE;;;;;;;CHECK
EQUALIZING;;FLAT
LEVEL;;;;;;CHECK
SETUP;;;;;;;AUTO
START PUSH +
: Up/Down
p
/
p
: Select
-/+
Note
00_HTR-5790U_EN.book Page 25 Tuesday, December 9, 2003 9:16 AM