
Operation Manual


9
English
Controls and their functions
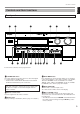
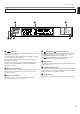
Front panel
NATURAL SOUND AV AMPLIFIER DSP A2
CINEMA DSP
7ch
VOLUME
INPUT SELECTOR
INPUT MODE
l6
20
28
40
60
l2
8
4
2
0
–dB
PHONES
BASS
EXTENSION
BASS TREBLE BALANCE
TONE
BYPASS
VCR 2
VIDEO AUX
REC OUT
VCR 1
TV/DBS
PHONO
TUNER
CD
DVD/LD
SOURCE
TAPE/MD
VIDEO AUX
NEXT EFFECT PROGRAM
A
SPEAKERS
B
SET MENU
EXT. DECODER
STANDBY/ON
55
4
3
2
l
0
l
2
3
4
LR
55
4
3
2
l
0
l
2
3
4
55
4
3
2
l
0
l
2
3
4
A
1
D F HBI
23 4
5
6
87 9 0 C EG
1 STANDBY/ON switch
Press this switch to turn on the power. Press this switch again
to set this unit in the standby mode.
* A click from the switch and the initial rotation of the built-in
fan will be heard when the power is turned on.
Standby mode
This unit is still using a small amount of power in this mode
in order to be ready to receive infrared-signals from the
remote controller.
2 Remote control sensor
Receives signals from the remote controller.
3 Display panel
Displays a variety of information. (Refer to page 11 for details.)
4 INPUT MODE button
Press this button to select how input signals are received from
sources that output two or more types of signals. The “AUTO”,
“DTS” and “ANALOG” modes are available. The “AUTO”,
“D.D.RF”, “DTS”, “DGTL” and “ANALOG” modes are available
for DVD/LD sources. Refer to page 35 for details.
5 INPUT SELECTOR
Turn this knob to select the input source.
The selected source will be shown on the display.
6 Master VOLUME control
Simultaneously controls volume for all output sounds; front
effect, main, rear, center and subwoofer. (The REC OUT level
is not affected.)
* The indicator on the master VOLUME control will flash when
the volume is decreased by pressing the MUTE key on the
remote controller.
For the remote controller, refer to pages 60 to 61.
GETTING STARTED