
User Manual


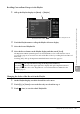


Table Of Contents
- PRECAUTIONS
- NOTICE
- Information
- Compatible formats for this instrument
- About the Manuals
- Included Accessories
- Contents
- Welcome to the World of CVP!
- Panel Controls
- Starting Up
- Basic Operations
- Display Structure
- Display Configuration
- Closing the Current Display
- Display-based Controls
- Using the ASSIGNABLE Buttons
- File Management
- Entering Characters
- Using the Pedals
- Using the Metronome
- Adjusting the Tempo
- Setting the Touch Sensitivity of the Keyboard
- Transposing the Pitch in Semitones
- Adjusting the Volume Balance
- Restoring the Factory-programmed Settings (Initializing)
- Data Backup
- Piano Room – Enjoying the Piano Performance –
- Voices – Playing the Keyboard –
- Playing Preset Voices
- Setting the Split Point
- Calling up the Appropriate Settings for Piano Performance (Piano Reset)
- Locking the Settings for Piano Performance (Piano Lock)
- Playing Realistic Resonance-enhanced Piano Sounds (VRM Voices)
- Playing Super Articulation Voices
- Creating Original Organ Flutes Voices
- Styles – Playing Rhythm and Accompaniment –
- Song Playback – Playing and Practice Songs –
- Song Recording – Recording Your Performance –
- Microphone – Adding Vocal Harmony Effects to Your Singing –
- Registration Memory/Playlist – Saving and Recalling Custom Panel Setups –
- Mixer – Editing the Volume and Tonal Balance –
- Connections – Using Your Instrument with Other Devices –
- I/O Connectors
- Connecting USB Devices ([USB TO DEVICE] terminal)
- Connecting to a Computer ([USB TO HOST] terminal/MIDI terminals)
- Connecting to a Smart Device ([AUX IN] jack/Bluetooth/[USB TO HOST] terminal/Wireless LAN)
- Listening to Audio Playback by the External Device through the Instrument’s Speaker ([AUX IN] jack/Bluetooth/[USB TO HOST] terminal)
- Using an External Speaker System for Playback (AUX OUT [L/L+R]/[R] jacks)
- Connecting External MIDI Devices (MIDI terminals)
- Viewing the Instrument’s Display on an External Monitor
- Connecting a Microphone or Guitar ([MIC/LINE IN] jack)
- Connecting a Footswitch/Foot Controller ([AUX PEDAL] jack)
- Menu Display Function List
- CVP-809 (Grand piano type) Assembly
- CVP-809 Assembly
- CVP-805 Assembly
- Troubleshooting
- Specifications
- Index

CVP-809/CVP-805 Owner’s Manual
96
3 Touch a tab for editing the desired parameters.
When a tab other than “Master” is selected in step 2:
When “Master” is selected in step 2:
4 Set the value of each parameter.
NOTE
To reset each parameter to the default value, touch the number value or setting and hold it.
5 Save your Mixer settings.
To save the “Panel” Mixer settings:
Register them to Registration Memory (page 87).
To save the “Style” Mixer settings:
Save them as a Style file to the User memory or USB flash drive. If you want to recall the settings
for future use, select the Style file saved here.
1. Call up the operation display via [Menu] → [StyleCreator].
2. Touch (Save) to call up the Style Selection display, then save as a Style file (page 32).
To save the “Song Ch 1-8/9-16” Mixer settings:
First register the edited settings as part of the Song data (Setup), then save the Song to the User
memory or USB flash drive. If you want to recall the settings for future use, select the Song file
saved here.
1. Call up the operation display via [Menu] → [SongCreator] → [Channel Edit].
2. Touch [ S etup].
3. Touch [Execute] to execute the Setup.
4. Touch (Save) to call up the Song Selection display, then save as a Song file (page 32).
To save the “Aud i o” Mixer s etti ngs:
Saving operation is not necessary. Audio Mixer settings are retained even when the power is
turned off.
Master
Unlike the other displays, use this display when you want to adjust the tonal
characteristics of the entire sound (except for Audio Songs) of this instrument.
Filter
For adjusting the Harmonic Content (resonance) and sound brightness.
EQ
For adjusting equalization parameters to correct the tone or timbre of the
sound.
Effect
For selecting an Effect type and adjusting its depth for each part.
Chorus/Reverb
For selecting a Chorus/Reverb type and adjusts its depth for each part.
Pan/Volume
For adjusting panning and volume for each part.
Compressor
Lets you turn the Master Compressor (which is applied to the entire sound)
on or off, select the Master Compressor type, and edit the related parameters.
Your original edits can be saved as the Master Compressor type.
EQ
Lets you select the Master EQ type applied to the entire sound and edit the
related parameters. Your original edits can be saved as the Master EQ type.