
User Manual
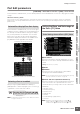


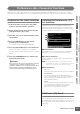

Table Of Contents
- Introduction
- How to use the manual
- Accessories
- Main Features
- Contents
- The Controls & Connectors
- Start Guide
- Step 1: Setting Up
- Resetting the User Memory to the Initial Factory Settings
- Step 2: Selecting and Playing a Voice
- Step 3: Selecting and Playing a Performance
- Step 4: Creating Your Original Song
- Step 5: Creating a Pattern
- Using a Computer
- Basic Section
- Reference
- Playing the Keyboard in the Voice Play Mode
- Selecting a Voice
- Select a Voice using the Category Search function
- Grouping your most-used Voices together-Favorite Category
- Using Knobs and Control Sliders
- Keyboard MIDI transmit channel setting
- Keyboard Octave setting
- Using the Arpeggio function
- The Voice Play display
- Voice information-[SF6] INFO (Information)
- Portamento settings-[F2] Porta
- Changing tonal color-[F3] EG/EQ
- Arpeggio settings-[F4] Arpeggio
- Editing a Normal Voice
- Common Edit and Element Edit
- Editing Normal Voices
- Convenient functions for editing Voices
- Common Edit parameters
- Element Edit parameters
- Selected Element display/ Four-Element display
- Setting the Waveform and Note range of the Element-[F1] Oscillator
- Pitch Settings-[F2] Pitch
- Adjust the brightness using the Filter-[F3] Filter
- Output Level settings-[F4] Amplitude
- Modulating the Voice-[F5] Elm LFO (Element LFO)
- Equalizer (EQ) Settings-[F6] EQ
- Editing a Drum Voice
- Voice Job-Convenient Functions
- Playing in the Performance Mode
- Selecting a Performance
- Switching a Part on/off
- Using the Arpeggio Function
- Using Knobs
- Using Sliders
- The Performance Play display
- Performance information-[SF6] INFO (Information)
- Parameters for the Voice assigned to each Part-[F2] Voice
- Changing the tonal characteristics- [F3] EG (Envelope Generator)
- Arpeggio settings-[F4] Arpeggio
- Recording your keyboard performance in the Performance mode
- Editing a Performance
- Performance Job-Convenient Functions
- Creating a Voice/Performance by Using the Sampling Function
- Song Playback
- Song Recording
- Editing MIDI Events (Song Edit)
- Song Job
- Pattern Playback
- Pattern Playback Procedure
- Playback types
- Mixing Setup for each track
- Knobs and Control Sliders
- Pattern Playback-[F1] Play
- Changing the rhythmic “feel” of the Pattern-[F2] Play FX (Play Effect)
- Track Settings-[F3] Track
- Pattern Creating-[F4] Patch
- Pattern Chain-[F5] Chain (Pattern Chain)
- Dividing the Pattern data to create a new Pattern-[F6] Remix
- Pattern Recording
- Editing MIDI Events (Pattern Edit)
- Pattern Jobs
- Multi-timbral Tone Generator Settings for Song/Pattern Playback (Mixing mode)
- Audio Recording to Song/Pattern (Sampling mode)
- Using as a Master Keyboard (Master mode)
- System Settings (Utility mode, etc.)
- Basic Procedure in the Utility mode
- System Information-[SF6] INFO
- General Settings-[F1] General
- Audio In/Out Settings-[F2] I/O (Input/Output)
- System Settings for the Voice mode-[F3] Voice
- Audio Input Settings in the Voice mode-[F4] VoiceAudio
- Remote Control and MIDI settings -[F5] Control
- Resetting the User Memory to the Initial Factory Settings-[JOB] (Factory Set)
- Sequencer Settings-[SEQ SETUP]
- File Management (File mode)
- Playing the Keyboard in the Voice Play Mode
- Appendix

MOTIF XS Owner’s Manual
159
Voice mode
Song mode
Pattern mode
Mixing mode
Master mode
Utility mode
File mode
Performance
mode
Sampling
mode 1
Sampling
mode 2
Reference
Performance Job—Convenient Functions
The Performance Job mode features some convenient data organization and initialization tools, for use when creating
Performances and archiving them. Press the [JOB] button in the Performance mode to enter the Performance Job mode.
Performance Job—Basic Operation
1
In the Performance mode, press the [JOB]
button to enter Performance Job Mode.
2 Select the desired Job menu by pressing the
appropriate button, [F1] – [F4].
3 Move the cursor to the desired parameter, then
set the value.
4 Press the [ENTER] button. (The display
prompts you for confirmation.)
To cancel the Job, press the [DEC/NO] button.
5 Press the [INC/YES] button to execute the Job.
After the Job has been completed, a “Completed”
message appears and operation returns to the original
display.
6 Press the [PERFORM] button to return to the
Performance Play mode.
Even if you execute the Job, selecting a different Performance
or turning the power off without storing will erase the
Performance data. Make sure to store the Performance data to
internal memory by pressing the [STORE] button before
selecting a different Performance or turning the power off.
Initializing the Performance—[F1]
Init (Initialize)
This function lets you reset (initialize) all Performance
parameters to their default settings. It also allows you to
selectively initialize certain parameters, such as Common
settings, settings for each Part, and so on.
1 All Parameters
All settings for the selected Performance are initialized.
When this is set to on, the cursor cannot be moved.
2 Common Parameters
Common parameter settings for the selected Performance
are initialized.
n The Insertion Effect Switch is a Part parameter. Therefore,
checkmark the box of Part 1 – 4 described below if you wish to
initialize the Insertion Effect Switch parameter settings.
3 Part Parameters
Part 1 – 4
Parameter settings for Parts which are turned on are initialized.
A/D (A/D Input)
This is the Part input from the external audio equipment
connected to the A/D INPUT jack. When this is checkmarked,
parameter settings for the A/D Input Part (page 147) of
Common Edit are initialized.
mLAN
This is the Part input from the external equipment connected
to the mLAN jack via the IEEE1394 cable. When this is
checkmarked, parameter settings for the mLAN Part
(page 147) of the Common Edit are initialized.
Edit Recall—[F2] Recall
If you are editing a Performance but you have not stored it
before switching to another Performance, the edits you
have made will be cleared. If this happens, you can use the
Recall function to restore the Performance with your latest
edits intact.
CAUTION
1
2
3