
User Manual


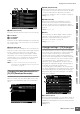

Table Of Contents
- Introduction
- How to use the manual
- Accessories
- Main Features
- Contents
- The Controls & Connectors
- Start Guide
- Step 1: Setting Up
- Resetting the User Memory to the Initial Factory Settings
- Step 2: Selecting and Playing a Voice
- Step 3: Selecting and Playing a Performance
- Step 4: Creating Your Original Song
- Step 5: Creating a Pattern
- Using a Computer
- Basic Section
- Reference
- Playing the Keyboard in the Voice Play Mode
- Selecting a Voice
- Select a Voice using the Category Search function
- Grouping your most-used Voices together-Favorite Category
- Using Knobs and Control Sliders
- Keyboard MIDI transmit channel setting
- Keyboard Octave setting
- Using the Arpeggio function
- The Voice Play display
- Voice information-[SF6] INFO (Information)
- Portamento settings-[F2] Porta
- Changing tonal color-[F3] EG/EQ
- Arpeggio settings-[F4] Arpeggio
- Editing a Normal Voice
- Common Edit and Element Edit
- Editing Normal Voices
- Convenient functions for editing Voices
- Common Edit parameters
- Element Edit parameters
- Selected Element display/ Four-Element display
- Setting the Waveform and Note range of the Element-[F1] Oscillator
- Pitch Settings-[F2] Pitch
- Adjust the brightness using the Filter-[F3] Filter
- Output Level settings-[F4] Amplitude
- Modulating the Voice-[F5] Elm LFO (Element LFO)
- Equalizer (EQ) Settings-[F6] EQ
- Editing a Drum Voice
- Voice Job-Convenient Functions
- Playing in the Performance Mode
- Selecting a Performance
- Switching a Part on/off
- Using the Arpeggio Function
- Using Knobs
- Using Sliders
- The Performance Play display
- Performance information-[SF6] INFO (Information)
- Parameters for the Voice assigned to each Part-[F2] Voice
- Changing the tonal characteristics- [F3] EG (Envelope Generator)
- Arpeggio settings-[F4] Arpeggio
- Recording your keyboard performance in the Performance mode
- Editing a Performance
- Performance Job-Convenient Functions
- Creating a Voice/Performance by Using the Sampling Function
- Song Playback
- Song Recording
- Editing MIDI Events (Song Edit)
- Song Job
- Pattern Playback
- Pattern Playback Procedure
- Playback types
- Mixing Setup for each track
- Knobs and Control Sliders
- Pattern Playback-[F1] Play
- Changing the rhythmic “feel” of the Pattern-[F2] Play FX (Play Effect)
- Track Settings-[F3] Track
- Pattern Creating-[F4] Patch
- Pattern Chain-[F5] Chain (Pattern Chain)
- Dividing the Pattern data to create a new Pattern-[F6] Remix
- Pattern Recording
- Editing MIDI Events (Pattern Edit)
- Pattern Jobs
- Multi-timbral Tone Generator Settings for Song/Pattern Playback (Mixing mode)
- Audio Recording to Song/Pattern (Sampling mode)
- Using as a Master Keyboard (Master mode)
- System Settings (Utility mode, etc.)
- Basic Procedure in the Utility mode
- System Information-[SF6] INFO
- General Settings-[F1] General
- Audio In/Out Settings-[F2] I/O (Input/Output)
- System Settings for the Voice mode-[F3] Voice
- Audio Input Settings in the Voice mode-[F4] VoiceAudio
- Remote Control and MIDI settings -[F5] Control
- Resetting the User Memory to the Initial Factory Settings-[JOB] (Factory Set)
- Sequencer Settings-[SEQ SETUP]
- File Management (File mode)
- Playing the Keyboard in the Voice Play Mode
- Appendix

Playing in the Performance Mode
MOTIF XS Owner’s Manual
137
Voice mode
Song mode
Pattern mode
Mixing mode
Master mode
Utility mode
File mode
Performance
mode
Sampling
mode 1
Sampling
mode 2
Reference
2 Change tonal color.
Moving the Knobs changes various aspects of the
Voice’s sound in real time—while you play.
When one of the TONE 1, TONE 2 or ARP FX lamps are
lit, the eight Knobs are used to control the
corresponding functions as printed on the panel (the
same as in the Voice mode). For details, see page 90.
When one of the REVERB, CHORUS or PAN lamps are
lit, the following functions are assigned to the four
leftmost Knobs.
n If the [E] (Edit) indicator appears at the top right of the
display when you adjust the Knobs, the current
Performance can be stored (page 142) as a new User
Performance.
Using Sliders
The far left four sliders adjust the volume for each of four
Parts. Each of the Control Sliders 1 – 4 corresponds to the
same numbered Part. The status of the sliders is shown on
the display.
The Performance Play display
You can call up the Performance Play display by pressing
the [PERFORM] button.
1 Performance Bank
2 Performance Number (Group/Number)
Indicates the Bank and Number of the selected
Performance. A Bank is a memory location that includes
data of 128 different Performances. Three Banks (User 1 –
3) are provided. Each Performance within a Bank is
assigned to a Performance Number of 001 to 128.
Performance Numbers 001 to 128 are converted to the
format (shown in parentheses) of Banks A to H and
Numbers 1 to 16 (for the Bank). This format corresponds to
the Group buttons [A] – [H] and the Number buttons [1] –
[16]. The Performance Numbers and the corresponding
Group/Numbers are listed below.
3 Category (Main Category <Sub Category>)
Indicates the Category of the selected Performance.
“Category,” consisting of Main Category and Sub
Category, is a keyword that indicates the instrument
characteristics or the type of sound. Each Performance
can be registered to a Main Category and its Sub
Category. The Category settings can be edited in the
General display (page 143) of the Performance Common
Edit mode.
4 Performance name
Indicates the name of the current Performance.
5 Transmit Ch (MIDI Transmit Channel)
Indicates the Keyboard MIDI transmit channel. For
information about how to set the value, see page 91.
Active lamp Functions of the left four knobs
REVERB Adjusts the reverb depth for Parts 1 – 4
CHORUS Adjusts the chorus depth for Parts 1 – 4
PAN Adjusts the pan position for Parts 1 – 4
Changing a Part to be controlled
You can change a Part to be controlled by Knob
operations via any of the following instruction.
1 Turn the [PERFORMANCE CONTROL] lamp on
by pressing the [SELECTED PART CONTROL]
button to call up the Control Function window.
2 Select the desired Part by pressing the [1] – [4]
buttons and [COMMON EDIT] button.
By pressing the [COMMON EDIT] button, Knob
operations will be applied to all four Parts. By
pressing the one of the [1] – [4] buttons, Knob
operations will be applied only to the selected Part.
Note that controlling the knobs printed “ASSIGN 1”
and “ASSIGN 2” of “TONE 1” will always affect the
sound of all Parts.
n Note that the Control Function window cannot be
called up even if you press the [SELECTED PART
CONTROL] button in the Performance Play display.
If you wish to change a Part in the Performance Play
display, press the [PERFORMANCE CONTROL]
button (the lamp lights), then press one of the [1] –
[4] and [COMMON EDIT] buttons.
Group/Number Performance Number
A01 – 16 001 – 016
B01 – 16 017 – 032
C01 – 16 033 – 048
D01 – 16 049 – 064
E01 – 16 065 – 080
F01 – 16 081 – 096
G01 – 16 097 – 112
H01 – 16 113 – 128
312 5 6
4
7
8
9
!@#$ %
)