
Owner's Manual


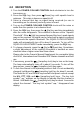


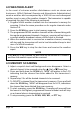


Table Of Contents
- TABLE OF CONTENTS
- FCC NOTICE
- 1 GENERAL INFORMATION
- 1.1 INTRODUCTION
- 1.2 FCC/ Industry Canada INFORMATION
- 2 ACCESSORIES
- 2.1 PACKING LIST
- 2.2 OPTIONS
- 2.3 REPLACEMENT PARTS
- 3 CONTROLS AND INDICATORS
- 3.1 CONTROLS AND CONNECTIONS
- 3.2 INDICATORS
- 4 OPERATION
- 4.1 INITIAL PROCEDURE
- 4.2 RECEPTION
- 4.3 TRANSMISSION
- 4.4 TRANSMIT TIME - OUT TIMER (TOT)
- 4.5 SIMPLEX/DUPLEX CHANNEL USE
- 4.6 USA, CANADA, and INTERNATIONAL MODE
- 4.7 NOAA WEATHER CHANNELS
- 4.8 WEATHER ALERT
- 4.9 MEMORY SCANNING
- 4.10 DUAL WATCHING
- 4.11 EMERGENCY CHANNEL 16
- 4.12 CHANNEL 9
- 4.13 OPERATING ON CHANNEL 13
- 4.14 OPERATING ON CHANNEL 67
- 4.15 RESETTING THE TRANSCEIVERユS MICROPROCESSOR
- 5 BATTERY
- 5.1 BATTERY CHARGING
- 5.2 BATTERY PACK REMOVAL/INSTALLATION
- 5.3 Using battery tray
- 5.3 OPERATING CWC260 BATTERY CHARGEr
- 5.4 BATTERY SAFETY
- 6 MAINTENANCE
- 7 SPECIFICATIONS
- 7.1 GENERAL
- 7.2 TRANSMITTER
- 7.3 RECEIVER

page 18 Owner’s Manual HX260S
5.3 USING BATTERY TRAY
1. Push the lock of the battery tray, and
open the lid.
2. Install the AA battery sell.
(We recommend you use alkaline
battery.)
3. Confirm the polarity of the batteries.
4. Close the lid.
5. Attach the battery tray to transceiver,
and turn the lock screw clockwise 1/4
turn.
CAUTION
Never use Ni-Cd batteries or other rechagable batteries.
5.3 OPERATING CWC260 BATTERY CHARGER
1. Turn the transceiver off.
2. Plug the DC plug of CWC260 into the
battery.
3. Plug the wall charger into a 120 VAC
wall outlet.
4. The indicator lights, and charging begins.
5. Remove the DC plug from the battery
when charging time has passed.
Figure 7. Installing the battery pack
Figure 6. Removing the battery case lid
L
O
C
K
O
P
E
N
Figure 9. Pluging the DC plug
Figure 8. Confirm the polarity