Instructions for use WASHING MACHINE Contents GB English,1 PL Polski,13 CZ Èeský,25 GB Installation, 2-3 Unpacking and levelling Connecting the electricity and water supplies Technical details GB Description of the machine, 4-5 CIS Ðóññêèé,37 Self-cleaning detergent dispenser drawer Control panel Load balancing system Running a wash cycle, 6 Wash programmes, 7 Detergents and laundry, 8 Preparing the laundry Washing recommendations SISL 129 Precautions and advice, 9 General safety Disposal Saving
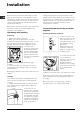
Installation GB This instruction manual should be kept in a safe place for future reference. If the appliance is sold, transferred or moved, make sure that the instruction manual remains with the machine so that the new owner is able to familiarise himself/herself with its operation and features. Levelling the machine correctly will provide it with stability, help to avoid vibrations and excessive noise and prevent it from shifting while it is operating.
Do not use extension cords or multiple sockets. Connecting the drain hose 65 - 100 cm Connect the drain hose, without bending it, to a draining duct or a wall drain situated between 65 and 100 cm from the floor; GB The cable should not be bent or compressed. GB The power supply cable must only be replaced by authorised technicians. Warning! The company shall not be held responsible in the event that these regulations are not respected.
Description of the machine GB CONTROL PANEL PORTHOLE DOOR HANDLE PORTHOLE DOOR ACCESS PANEL FOR THE DRAIN PUMP ADJUSTABLE FEET Self-cleaning detergent dispenser drawer This washing machine is fitted with an innovative selfcleaning detergent drawer which enhances the quality of each wash. The drawer is located inside the porthole door. We recommend that the maximum levels indicated on the detergent dispenser drawer are not exceeded. STOP ST OP MAX MAX A B 1.
Control panel GB ON/OFF button WASHING TIME INDICATOR lights GB DOOR LOCKED red indicator light START DAILY WASH 30 PROGRAMME button START WHITE COTTON PROGRAMME button START DELICATES PROGRAMME button ON/OFF button: press this to switch the machine on or off. When the machine is switched on, the buttons used to start various programmes begin to flash, while the washing time indicator lights illuminate in a fixed manner.
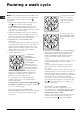
Running a wash cycle GB Note: Once the appliance has been installed, and before you use it for the first time, run a wash cycle with detergent and no laundry, using the programme. 1. SWITCH ON THE MACHINE by pressing the ON/ OFF button. The icons for the START PROGRAMME buttons begin to flash and the WASHING TIME INDICATOR lights light up in a fixed manner, to indicate that the washing machine is ready to receive instructions. 2. LOAD THE LAUNDRY. Open the door using the handle.
Wash programmes B u tto n F abr ics M ax .
Detergents and laundry GB Preparing the laundry Divide the laundry according to: - the type of fabric/the symbol on the label; - the colours: separate coloured garments from whites. Empty all garment pockets and check the buttons. Do not exceed the load values indicated for the Wash programmes. How much does your laundry weigh? 1 1 1 1 1 1 1 sheet 400-500 g pillow case 150-200 g tablecloth 400-500 g bathrobe 900-1.
Precautions and advice This machine was designed and constructed in accordance with international safety regulations. The following information is provided for safety reasons and must therefore be read carefully. General safety This appliance was designed for domestic use only. The machine must only be used by adults, in accordance with the instructions given in this manual. symbol on the product reminds you of your obligation, that when you dispose of the appliance it must be separately collected.
Care and maintenance GB Cutting off the water and electricity supply Caring for the door and drum of your appliance Turn off the water tap after every wash. This will limit wear on the hydraulic system in the machine and help to prevent leaks. Always leave the porthole door ajar in order to prevent unpleasant odours from forming. Unplug the appliance when cleaning it and during all maintenance work.
Troubleshooting Your washing machine could occasionally fail to work. Before contacting the Technical Assistance Centre (see Service), make sure that the problem is not easily solved using the following list. GB Problem: Possible causes / Solutions: GB The washing machine does not switch on. The appliance is not plugged into the socket fully, or is not making contact. There is no power in the house. The wash cycle wont start. The washing machine door is not closed properly.
Service Before calling for Assistance: Check whether you can solve the problem alone (see Troubleshooting); Restart the programme to check whether the problem has been solved; If it has not, contact the Authorised Technical Assistance Service. GB If the machine has been installed or used incorrectly, you may be charged for the maintenance callout service. Always request the assistance of authorised technicians.
Instrukcja obs³ugi PRALKA Spis treci PL Polski PL Instalacja, 14-15 Rozpakowanie i wypoziomowanie Pod³¹czenie do sieci wodnej i elektrycznej Dane techniczne Opis maszyny, 16-17 Samooczyszczaj¹ca siê szufladka na rodki pior¹ce Panel sterowania System równowa¿enia za³adunku W jaki sposób wykonaæ cykl prania, 18 Programy prania, 19 rodki pior¹ce i bielizna, 20 Przygotowanie bielizny Zalecenia dotycz¹ce prania SISL 129 Zalecenia i rodki ostro¿noci, 21 Ogólne zasady bezpieczeñstwa Utylizacja Oszczêd
Instalacja PL Nale¿y zachowaæ niniejsz¹ ksi¹¿eczkê aby móc z niej skorzystaæ w ka¿dej chwili. W przypadku sprzeda¿y, odst¹pienia lub przeniesienia pralki w inne miejsce, nale¿y zadbaæ o przekazanie ksi¹¿eczki wraz z maszyn¹, aby nowy w³aciciel móg³ zapoznaæ siê z dzia³aniem urz¹dzenia i z dotycz¹cymi go ostrze¿eniami. Nale¿y uwa¿nie przeczytaæ instrukcjê obs³ugi: zawiera ona wa¿ne informacje dotycz¹ce instalacji oraz w³aciwego i bezpiecznego u¿ytkowania pralki.
Pod³¹czenie przewodu odp³ywowego 65 - 100 cm Pod³¹czyæ przewód odp³ywowy, nie zginaj¹c go, do rury ciekowej lub do otworu odp³ywowego w cianie, które powinny znajdowaæ siê na wysokoci od 65 do 100 cm od pod³ogi; Nie u¿ywaæ przed³u¿aczy ani rozga³êziaczy. PL Kabel nie powinien byæ pogiêty ani przygnieciony. Kabel zasilania elektrycznego mo¿e byæ wymieniany wy³¹cznie przez autoryzowanych techników.
Opis maszyny PL PANEL STEROWANIA UCHWYT OKR¥G£YCH DRZWICZEK DRZWICZKI DRZWICZKI DOSTÊPU DO POMPY ODPROWADZAJ¥CEJ WODÊ REGULOWANE NÓ¯KI Samooczyszczaj¹ca siê szufladka na rodki pior¹ce Pralka ta wyposa¿ona jest w innowacyjn¹ samooczyszczaj¹c¹ siê szufladkê na rodki pior¹ce, która umo¿liwia poprawê jakoci prania. Szufladka umieszczona jest wewn¹trz okr¹g³ych drzwiczek. Zaleca siê nigdy nie przekraczaæ maksymalnego poziomu rodków pior¹cych wskazanego na szufladce. STOP ST OP MAX MAX A B 1.
Panel sterowania Kontrolki WSKAZUJ¥CE CZAS PRANIA Przycisk PL W£¥CZANIA/ WY£¥CZANIA Czerwona kontrolka ZABLOKOWANIA OKR¥G£YCH DRZWICZEK Przycisk URUCHOMIENIA SZYBKI PROGRAMU 30 Przycisk URUCHOMIENIA PROGRAMU DELIKATNE Przycisk W£¥CZANIA/WY£¥CZANIA: wcisn¹æ go, aby w³¹czyæ lub wy³¹czyæ maszynê. Kiedy maszyna jest w³¹czona, ikony przycisków uruchomienia programu zaczynaj¹ pulsowaæ, natomiast kontrolki wskazuj¹ce czas prania zaczynaj¹ wieciæ wiat³em ci¹g³ym.
W jaki sposób wykonaæ cykl prania PL Uwaga: Po zainstalowaniu pralki, przed przyst¹pieniem do jej u¿ytkowania, nale¿y wykonaæ jeden cykl prania ze rodkiem pior¹cym, lecz bez . wsadu, nastawiaj¹c program 1. W£¥CZYÆ MASZYNÊ naciskaj¹c przycisk W£¥CZANIA/WY£¥CZANIA . Ikony przycisków URUCHOMIENIA PROGRAMU zaczynaj¹ pulsowaæ, a kontrolki WSKAZUJ¥CE CZAS PRANIA zaczynaj¹ wieciæ wiat³em ci¹g³ym, wskazuj¹c, ¿e pralka jest gotowa do zaprogramowania. 2. ZA£ADUNEK BIELIZNY.
Programy prania Tasta R odzaj tkanin y oraz stopieñ zabrudzenia £adune k m aks.
rodki pior¹ce i bielizna PL Przygotowanie bielizny Podzieliæ bieliznê do prania wed³ug: - rodzaju tkaniny / symbolu na etykietce. - kolorów: oddzieliæ tkaniny kolorowe od bia³ych. Opró¿niæ kieszenie i sprawdziæ guziki. Nie przekraczaæ wartoci maksymalnego ³adunku wskazanych w Programy prania. Ile wa¿y bielizna? 1 1 1 1 1 1 1 przecierad³o 400-500 gr. poszewka 150-200 gr. obrus 400-500 gr. szlafrok 900-1.200 gr. rêcznik 150-250 gr. d¿insy 400-500 gr. koszula 150-200 gr.
Zalecenia i rodki ostro¿noci Pralka ta zosta³a zaprojektowana i wyprodukowana zgodnie z miêdzynarodowymi przepisami bezpieczeñstwa. Ostrze¿enia te zosta³y tu zamieszczone ze wzglêdów bezpieczeñstwa i nale¿y je uwa¿nie przeczytaæ. Dodatkowe informacje dotycz¹ce prawid³owej utylizacji elektrycznych urz¹dzeñ domowych ich w³aciciele mog¹ uzyskaæ, zwracaj¹c siê do odpowiednich s³u¿b publicznych lub do sprzedawców tych urz¹dzeñ.
Utrzymanie i konserwacja PL Od³¹czenie wody i pr¹du elektrycznego Dbanie o okr¹g³e drzwiczki oraz bêben Zamkn¹æ kurek dop³ywu wody po ka¿dym praniu. Zmniejsza siê w ten sposób zu¿ycie instalacji hydraulicznej pralki oraz eliminuje siê niebezpieczeñstwo przecieków. Drzwiczki pralki nale¿y zawsze pozostawiaæ uchylone, aby zapobiec tworzeniu siê nieprzyjemnych zapachów. Wyj¹æ wtyczkê z kontaktu przed przyst¹pieniem do czyszczenia pralki oraz podczas wykonywania czynnoci konserwacyjnych.
Nieprawid³owoci w dzia³aniu i sposoby ich usuwania Mo¿e siê zdarzyæ, ¿e pralka nie dzia³a. Przed wezwaniem Serwisu Technicznego (patrz Serwis Techniczny) nale¿y sprawdziæ, czy problemu nie da siê ³atwo rozwi¹zaæ przy pomocy poni¿szego wykazu. Nieprawid³owoci w dzia³aniu: Mo¿liwe przyczyny/Rozwi¹zania: Pralka nie w³¹cza siê. Wtyczka nie jest w³¹czona do gniazdka lub jest wsuniêta za s³abo, tak ¿e nie ma styku. W domu brak jest pr¹du. Cykl prania nie rozpoczyna siê.
Serwis Techniczny Przed skontaktowaniem siê z Serwisem Technicznym: Sprawdziæ, czy problemu nie mo¿na rozwi¹zaæ samodzielnie (patrz Nieprawid³owoci w dzia³aniu i sposoby ich usuwania); Ponownie uruchomiæ program i sprawdziæ, czy problem nie znikn¹³; W przeciwnym razie wezwaæ Autoryzowany Serwis Techniczny. PL Nieprawid³owo wykonana instalacja lub niew³aciwa obs³uga pralki mo¿e spowodowaæ obci¹¿enie u¿ytkownika kosztami naprawy. Nigdy nie zwracaæ siê do nieautoryzowanych techników.
Návod k pouití PRAÈKA Obsah CZ Èesky CZ Instalace, 26-27 Rozbalení a vyrovnání do vodorovné polohy Pøipojení k elektrické síti a k rozvodu vody Technické údaje Popis zaøízení, 28-29 Samoèisticí dávkovaè pracích prostøedkù Ovládací panel Systém automatického vyváení náplnì Jak provést prací cyklus, 30 Prací programy, 31 Prací prostøedky a prádlo, 32 SISL 129 Pøíprava prádla Rady pro praní Opatøení a rady, 33 Základní bezpeènostní pokyny Likvidace Jak uetøit a brát ohled na ivotní prostøedí Syst
Instalace CZ Je velmi dùleité uschovat tento návod za úèelem jeho dalí konzultace. V pøípadì prodeje, darování nebo pøestìhování zaøízení se ujistìte, e návod zùstane uloen v jeho blízkosti, aby mohl poslouit novému majiteli pøi seznámení se s èinností a s pøíslunými upozornìními. Dokonalé vyrovnání do vodorovné polohy zabezpeèí stabilitu zaøízení a zamezí vzniku vibrací a hluku bìhem èinnosti.
Nepouívejte prodluovací kabely a rozvodky. Pøipojení vypoutìcí hadice 65 - 100 cm Pøipojte vypoutìcí hadici k odpadovému potrubí nebo k odpadu ve stìnì, který se nachází od 65 do 100 cm nad zemí; zamezte jejímu ohybu; CZ Kabel nesmí být ohnutý ani stlaèený. Výmìna kabelu musí být svìøena výhradnì autorizovanému technickému personálu. Upozornìní! Výrobce neponese ádnou odpovìdnost za následky nerespektování uvedených pøedpisù.
Popis zaøízení OVLÁDACÍ PANEL CZ RUKOJE DVÍØEK DVÍØKA DVÍØKA PRO PØÍSTUP K VYPOUTÌCÍMU ÈERPADLU NASTAVITELNÉ NOKY Samoèisticí dávkovaè pracích prostøedkù Tato praèka je vybavena inovaèním samoèisticím dávkovaèem pracích prostøedkù, který je schopen zlepit kvalitu praní. Dávkovaè se nachází uvnitø dvíøek. Doporuèujeme nikdy nepøekraèovat vyznaèené maximální úrovnì na dávkovaèi pracích prostøedkù. STOP ST OP MAX MAX A B 1.
Ovládací panel Kontrolky ZNÁZORNÌNÍ PRACÍ DOBY CZ Tlaèítko ZAPNUTÍ/VYPNUTÍ Èervená kontrolka SIGNALIZACE ZABLOKOVANÝCH DVÍØEK Tlaèítko SPUTÌNÍ PROGRAMU RYCHLÉ PRANÍ 30 Tlaèítko SPUTÌNÍ PROGRAMU JEMNÉ Tlaèítko ZAPNUTÍ/VYPNUTÍ: jeho stisknutí slouí k zapnutí a vypnutí zaøízení. Pøi zapnutém zaøízení zaènou ikony tlaèítek pro sputìní programu blikat, zatímco kontrolky znázoròující dobu praní se rozsvítí stálým svìtlem.
Jak provést prací cyklus CZ Poznámka: Po instalaci zaøízení je tøeba jetì pøed jeho bìným pouitím provést jeden zkuební . cyklus s pracím prostøedkem a bez náplnì 1. ZAPNÌTE ZAØÍZENÍ stisknutím tlaèítka ZAPNUTÍ/ VYPNUTÍ . Ikony tlaèítek SPUTÌNÍ PROGRAMU zaènou blikat a kontrolky ZNÁZORNÌNÍ PRACÍ DOBY se rozsvítí stálým svìtlem, co poukazuje na skuteènost, e je praèka pøipravena pøijmout ovládací pøíkazy. 2. NAPLÒTE PRAÈKU PRÁDLEM. Otevøete dvíøka s pouitím pøísluné rukojeti.
Prací programy Tlaèítko Tkanin y M ax.
Prací prostøedky a prádlo CZ Pøíprava prádla Roztøiïte prádlo podle: - druhu tkaniny / symbolu na visaèce. - barvy: oddìlte barevné prádlo od bílého. Vyprázdnìte kapsy a zkontrolujte knoflíky. Nepøekraèujte hodnoty maximální náplnì, uvedené v èásti Prací programy. Kolik váí prádlo? 1 1 1 1 1 1 1 prostìradlo 400-500 g povlak na poltáø 150-200 g ubrus 400-500 g upan 900-1.
Opatøení a rady Praèka byla navrena a vyrobena v souladu s platnými mezinárodními bezpeènostním pøedpisy. Tato upozornìní jsou uvádìna z bezpeènostních dùvodù a je tøeba si je pozornì pøeèíst. Základní bezpeènostní pokyny Toto zaøízení bylo navreno výhradnì pro pouití v domácnosti. Zaøízení mohou pouívat pouze dospìlé osoby podle pokynù uvedených v tomto návodu. Nedotýkejte se zaøízení bosí, anebo v pøípadì, e máte mokré ruce èi nohy.
Údrba a péèe CZ Uzavøení pøívodu vody a vypnutí elektrického napájení Po kadém praní uzavøete pøívod vody. Tímto zpùsobem dochází k omezení opotøebení rozvodu vody a ke sníení nebezpeèí úniku vody. Pøed zahájením èitìní zaøízení a bìhem operací údrby je tøeba vytáhnout zástrèku pøívodního kabelu ze zásuvky. Èitìní zaøízení Péèe o dvíøka a buben Dvíøka ponechte pokadé pootevøená, aby se zabránilo tvorbì nepøíjemných zápachù.
Poruchy a zpùsob jejich odstranìní Mùe se stát, e zaøízení nebude fungovat. Døíve, ne kontaktujete servisní slubu (viz Servisní sluba), zkontrolujte, zda se nejedná o problém, který lze snadno vyøeit s pomocí následujícího seznamu. Poruchy: Moné pøíèiny / Zpùsob jejich odstranìní: Praèku nelze zapnout. Zástrèka není zasunuta v zásuvce nebo není zasunuta natolik, aby dolo ke spojení kontaktù. V celém domì je vypnutý proud. Nedochází k zahájení pracího cyklu.
Servisní sluba Pøed pøivoláním servisní sluby: Zkontrolujte, zda nejste schopni poruchu odstranit sami (viz Poruchy a zpùsob jejich odstranìní); Opìtovnì uveïte do chodu prací program, abyste ovìøili, zda byla porucha odstranìna; V pøípadì negativního výsledku se obrate na Servisní slubu nebo na specializovaný technický personál. CZ V pøípadì chybné instalace nebo nesprávného pouití mùete být poádáni o zaplacení servisního zásahu.
Ðóêîâîäñòâî ïî ýêñïëóàòàöèè ÑÒÈÐÀËÜÍÀß ÌÀØÈÍÀ Ñîäåðæàíèå CIS Ðóññêèé CIS Óñòàíîâêà, 38-39 Ðàñïàêîâêà è âûðàâíèâàíèå Ïîäêëþ÷åíèå ê õîëîäíîé âîäå è ýëåêòðîñåòè Òåõíè÷åñêèå õàðàêòåðèñòèêè Îïèñàíèå ñòèðàëüíîé ìàøèíû, 40-41 Ñàìîî÷èùàþùèéñÿ ðàñïðåäåëèòåëü ìîþùèõ ñðåäñòâ Ïàíåëü óïðàâëåíèÿ Ñèñòåìà áàëàíñèðîâêè çàãðóçêè Âûïîëíåíèå ïðîãðàììû ñòèðêè, 42 Ïðîãðàììû ñòèðêè, 43 Ìîþùèå ñðåäñòâà è áåëüå, 44 SISL 129 Ïîäãîòîâêà áåëüÿ Ðåêîìåíäàöèè ïî ñòèðêå Ïðåäóïðåæäåíèÿ è ðåêîìåíäàöèè, 45 Îñíîâíûå ïðàâèëà áåçîïàñíî
Óñòàíîâêà CIS Ñîõðàíèòå ðóêîâîäñòâî êàê èñòî÷íèê ñïðàâî÷íîé èíôîðìàöèè ïî îáîðóäîâàíèþ.  ñëó÷àå ïåðååçäà, ïðîäàæè èëè ïåðåäà÷è ìàøèíû íîâîìó âëàäåëüöó îíî äîëæíî áûòü â êîìïëåêòå ñî ñòèðàëüíîé ìàøèíîé. Âíèìàòåëüíî ïðî÷èòàéòå ðóêîâîäñòâî: â íåì ñîäåðæàòñÿ âàæíûå ñâåäåíèÿ ïî áåçîïàñíîé óñòàíîâêå, ýêñïëóàòàöèè è îáñëóæèâàíèþ ñòèðàëüíîé ìàøèíû. Ðàñïàêîâêà è âûðàâíèâàíèå Ðàñïàêîâêà 1. Ðàñïàêóéòå ñòèðàëüíóþ ìàøèíó. 2. Óáåäèòåñü, ÷òî ìàøèíà íå áûëà ïîâðåæäåíà âî âðåìÿ òðàíñïîðòèðîâêè.
Ïîäñîåäèíåíèå ñëèâíîãî øëàíãà 65 - 100 cm Ïîäñîåäèíèòå ñëèâíîé øëàíã, òàê ÷òîáû îí íå áûë èçîãíóò, ê ñëèâíîìó òðóáîïðîâîäó èëè ñëèâíîìó îòâåðñòèþ â ñòåíå, ðàñïîëîæåííîìó íà âûñîòå 65-100 ñì îò ïîëà. Ïèòàþùèé êàáåëü íå äîëæåí áûòü ïåðåêðó÷åí èëè ïåðåæàò (íàõîäèòüñÿ ïîä ìàøèíîé ïîñëå ïîäêëþ÷åíèÿ). CIS Çàìåíà ïèòàþùåãî êàáåëÿ äîëæíà ðîèçâîäèòüñÿ òîëüêî ñïåöèàëèñòàìè Àâòîðèçîâàííîãî åðâèñíîãî öåíòðà.
Îïèñàíèå ñòèðàëüíîé ìàøèíû CIS ÏÀÍÅËÜ ÓÏÐÀÂËÅÍÈß ÐÓ×ÊÀ ÄÂÅÐÖÛ ÄÂÅÐÖÀ ÇÀÃÐÓÇÎ×ÍÎÃÎ ËÞÊÀ ÏÀÍÅËÜ ÄËß ÄÎÑÒÓÏÀ Ê ÑËÈÂÍÎÌÓ ÍÀÑÎÑÓ ÐÅÃÓËÈÐÓÅÌÛÅ ÍÎÆÊÈ Ñàìîî÷èùàþùèéñÿ ðàñïðåäåëèòåëü ìîþùèõ ñðåäñòâ Ýòà ñòèðàëüíàÿ ìàøèíà îñíàùåíà óñîâåðøåíñòâîâàííûì ñàìîî÷èùàþùèìñÿ ðàñïðåäåëèòåëåì ìîþùèõ ñðåäñòâ, êîòîðûé ïîâûøàåò êà÷åñòâî ñòèðêè. Ðàñïðåäåëèòåëü ðàñïîëîæåí âíóòðè äâåðöû çàãðóçî÷ íîãî ëþêà. STOP ST OP MAX MAX A B 1. ×òîáû ïîëó÷èòü äîñòóï ê ðàñïðåäåëèòåëþ îþùèõ ñðåäñòâ, îòêðîéòå äâåðöó ëþêà (ñì. ðèñ. A). 2.
Ïàíåëü óïðàâëåíèÿ Èíäèêàòîðû ÏÐÎÄÎËÆÈÒÅËÜÍÎÑÒÈ ÑÒÈÐÊÈ Êíîïêà ÇÀÏÓÑÊ ÏÐÎÃÐÀÌÌÛ ÁÛÑÒÐÀß ÑÒÈÐÊÀ, 30 ìèí. Êíîïêà ÇÀÏÓÑÊ ÏÐÎÃÐÀÌÌÛ ÄÅËÈÊÀÒÍÛÅ ÒÊÀÍÈ Êíîïêà ÂÊËÞ×ÅÍÈß/ÂÛÊËÞ×ÅÍÈß: ñëóæèò äëÿ âêëþ÷åíèÿ è âûêëþ÷åíèÿ ìàøèíû. Ïðè âêëþ÷åíèè ìàøèíû êíîïêè çàïóñêà ðàçëè÷íûõ ïðîãðàìì íà÷èíàþò ìèãàòü, à èíäèêàòîðû ïðîäîëæèòåëüíîñòè ñòèðêè ãîðÿò, íå ìèãàÿ. ×òîáû îòìåíèòü ðàáîòàþùóþ ïðîãðàììó, íàæìèòå è óäåðæèâàéòå êíîïêó íàæàòîé ïðèìåðíî 2 ñåêóíäû.
Âûïîëíåíèå ïðîãðàììû ñòèðêè CIS Ïðèìå÷àíèå: Ïîñëå óñòàíîâêè, ïåðåä ïåðâûì èñïîëüçîâàíèåì ìàøèíû çàïóñòèòå öèêë ñòèðêè ñ ìîþùèì ñðåäñòâîì, íî áåç áåëüÿ, óñòàíîâèâ . ïðîãðàììó Ðèñóíîê ñáîêó îòíîñèòñÿ ê ñèòóàöèè, êîãäà öèêë âûïîëíåí ïðèìåðíî íà 50%. 1. ÂÊËÞ×ÈÒÅ ÌÀØÈÍÓ, íàæàâ êíîïêó ÂÊËÞ×ÅÍÈß/ ÂÛÊËÞ×ÅÍÈß . Ñèìâîëû êíîïîê ÇÀÏÓÑÊ ÏÐÎÃÐÀÌÌÛ íà÷íóò ìèãàòü, à èíäèêàòîðû ÏÐÎÄÎËÆÈÒÅËÜÍÎÑÒÈ ÑÒÈÐÊÈ çàãîðÿòñÿ, íå ìèãàÿ, ïîêàçûâàÿ, ÷òî ñòèðàëüíàÿ ìàøèíà ãîòîâà ê ââåäåíèþ êîìàíä. 2. ÇÀÃÐÓÇÈÒÅ ÁÅËÜÅ.
Ïðîãðàììû ñòèðêè Êíîïêà Òêàíè Ìàêñ. çàãóðçêà (êã) Òåìïåðàòóðà Ñêîðîñòü îòæèìà (îá./ìèí.) Ïðîäîëæèòåëüíî ñòü öèêëà, ìèí.
Ìîþùèå ñðåäñòâà è áåëüå CIS Ïîäãîòîâêà áåëüÿ Ðàçáåðèòå áåëüå â ñîîòâåòñòâèè: - òèïîì òêàíè / ñèìâîëîì íà ýòèêåòêå; - öâåòîì: îòäåëèòå öâåòíîå áåëüå îò áåëîãî. Âûíüòå âñå èç êàðìàíîâ è ïðîâåðüòå, õîðîøî ëè äåðæàòñÿ ïóãîâèöû. Íå ïðåâûøàéòå ìàêñèìàëüíûå íîðìû çàãðóçêè áàðàáàíà, óêàçàííûå â òàáë. "Ïðîãðàììû ñòèðêè".
Ïðåäóïðåæäåíèÿ è ðåêîìåíäàöèè Ñòèðàëüíàÿ ìàøèíà ñïðîåêòèðîâàíà è èçãîòîâëåíà â ñîîòâåòñòâèè ñ ìåæäóíàðîäíûìè íîðìàìè áåçîïàñíîñòè. Âíèìàòåëüíî ïðî÷èòàéòå íàñòîÿùèå ïðåäóïðåæäåíèÿ, ïðèâîäèìûå â öåëÿõ âàøåé áåçîïàñíîñòè. Îñíîâíûå ïðàâèëà áåçîïàñíîñòè Ýòî îáîðóäîâàíèå ïðåäíàçíà÷åíî òîëüêî äëÿ áûòîâîãî èñïîëüçîâàíèÿ. Ñòèðàëüíàÿ ìàøèíà äîëæíà èñïîëüçîâàòüñÿ òîëüêî âçðîñëûìè ëèöàìè è â ñîîòâåòñòâèè ñ èíñòðóêöèÿìè äàííîãî ðóêîâîäñòâà.
Îáñëóæèâàíèå è óõîä CIS Îòêëþ÷åíèå âîäî- è ýëåêòðîñíàáæåíèÿ Óõîä çà äâåðöåé è áàðàáàíîì ìàøèíû Ïåðåêðûâàéòå âîäîïðîâîäíûé êðàí ïîñëå êàæäîé ñòèðêè. Òàêèì îáðàçîì ñîêðàùàåòñÿ èçíîñ âîäîïðîâîäíîé ñèñòåìû ñòèðàëüíîé ìàøèíû è óñòðàíÿåòñÿ âåðîÿòíîñòü ïðîòå÷åê. Ïîñëå êàæäîé ñòèðêè îñòàâëÿéòå äâåðöó ìàøèíû ïîëóîòêðûòîé âî èçáåæàíèå îáðàçîâàíèÿ â áàðàáàíå íåïðèÿòíûõ çàïàõîâ. Ïåðåä ìîéêîé è îáñëóæèâàíèåì ìàøèíû âñåãäà îòêëþ÷àéòå åå îò ýëåêòðîñåòè.
Óñòðàíåíèå íåèñïðàâíîñòåé Åñëè ñòèðàëüíàÿ ìàøèíà íå ðàáîòàåò, ïðåæäå ÷åì îáðàòèòüñÿ â Àâòîðèçîâàííûé ñåðâèñíûé öåíòð (ñì. "Ñåðâèñíîå îáñëóæèâàíèå"), ïðî÷èòàéòå ýòîò ðàçäåë - âîçìîæíî çäåñü Âû íàéäåòå ïðîñòîå ðåøåíèå ïðîáëåìû. Íåèñïðàâíîñòü: Âîçìîæíûå ïðè÷èíû / Ðåøåíèå: Ñòèðàëüíàÿ ìàøèíà íå âêëþ÷àåòñÿ. Âèëêà íå âñòàâëåíà â ðîçåòêó èëè âñòàâëåíà ïëîõî, íå îáåñïå÷èâàÿ êîíòàêòà. Ñáîé ýëåêòðîïèòàíèÿ. Öèêë ñòèðêè íå çàïóñêàåòñÿ. Äâåðöà ìàøèíû ïëîõî çàêðûòà.
Ñåðâèñíîå îáñëóæèâàíèå 195062428.00 04/2007 - Xerox Business Services Ïåðåä òåì, êàê îáðàòèòüñÿ â Àâòîðèçîâàííûé ñåðâèñíûé öåíòð: Óáåäèòåñü, ÷òî âû íå ìîæåòå óñòðàíèòü íåèñïðàâíîñòü ñàìîñòîÿòåëüíî (ñì.