
Service manual


c)
Raise the cabinet top
(see
step
3e
on
page
4-3
for the procedure).
d)
Loosen the clamp and disconnect the
end of the dispenser hose from its wa-
ter
intetrdispenser valve connector.
NOTE:
The dispenser hoses are per-
manently attached to the dispenser.
They are not intended to be removed.
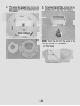
6)
Rern~ve the screw from the fresh
fill
inlet valve and remove
the
vafve
as-
sembly.
ik
I
Fresh
Fill
Inlet
Vaive
Screw
Fresh
Fill
Inle!
Vamve
nose
5.
To
remove
the
lid
lock
(see
the
lower
left
photo):
a)
Raise the cabinet top (see step
3e
on
page
4-3
for the procedure).
b)
Remove the
two
hex-head screws from
the
lid
lock
and remove the
lock.
c)
Gut
the indicated cable standoff
from
the cabinet
top.
d)
Unciip the
lid
lock
cable from the cabi-
net top flange.
-
Dispenser Hoses
4.
To
remove
the
fresh
fill
inlet
valve:
a) Raise the cabinet top
(see
step
3e
on
page
4-3
for the procedure).
Lic
,-A,
#C
.sr
+.
,&
Lid
Lock
Screws
""*,
r
I
""----YzY5*"""
I
""
%
Fresh
F
b)
Loosen
the
clamp and disconnect the
end
of
the fresh
filf
inlet valve hose
from
its water inletldispenser valve
connector
(see
the top right photo).
NOTE:
The fresh
fill
inlet valve hose
is
permanently attached
to
the inlet. It
is
Standoff
+,
I.
'?&
-
--
.
-
--
not intended
to
be
removed.