
Instruction for Use


EN9
INSERTING WIRE SHELVES AND OTHER ACCESSORIES IN THE OVEN
1. Insert the wire shelf horizontally, with the raised part “A” upwards (Fig. 1).
2. The other accessories, like the drip tray and baking tray, are inserted with the raised part on the flat
section “B” facing upwards (Fig. 2).
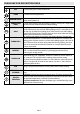
DESCRIPTION OF CONTROL PANEL
USING THE OVEN
Oven activation
When the oven is connected to the power supply for the first time, or after a power failure, the display
indicates "12:00”.
Selecting and changing the clock time:
1. Press button “-” or “+” to set the hour.
2. Press “set” and “-” or “+” to set the minutes.
3. Press “OK” to confirm.
To change the time:
Keep the “OK” button pressed for 3 seconds, until the time flashes on the display. Repeat the steps
described above.
Select Cooking Function
1. Turn knob 1 to the chosen function. The display shows the preset temperature for that function or the
power level in the grill and turbo grill functions.
2. Turn knob 5 to change the temperature or the power level.
3. To confirm the temperature or pre-set power level, press OK; the oven switches on; PRE appears on
the display (only for functions for which it is envisaged) and the led indicator next to lights up.
When the set temperature is reached, the corresponding value is shown on the display, an acoustic
signal sounds and the indicator led next to switches off. The food can now be placed in the oven
for cooking.
For the defrost function, press "OK".
Fig. 1 Fig. 2
1. Function selector knob
2. Programming button ("set")
3. Confirmation button (“ok”)
4. Buttons for changing time ("-" "+")
5. Thermostat knob
Minute Minder
Special functions
Child safety
Cooking function selection knob
Cooking time
End of cooking time
3 41 52