
Instruction for Use


GB
39
! Do not use the oven lamp as/for ambient lighting.
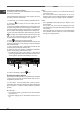
Sliding rack kit assembly
To assemble the sliding
racks:
1. Remove the two frames,
lifting them away from the
spacers A (see gure).
2. Choose which shelf to use
with the sliding rack. Paying
attention to the direction in
which the sliding rack is to
be extracted, position joint B
and then joint C on the
frame.
3. Secure the two frames
with the guide rails using the
holes provided on the oven
walls (see diagram). The
holes for the left frame are
situated at the top, while the
holes for the right frame are
at the bottom.
4. Finally, t the frames on
the spacers A.
! Do not place the sliding racks in position 5.
Automatic cleaning by PYROLYSIS
The cleaning cycle can cause the internal temperature of
the oven to reach 500°C. The pyrolytic cycle is activated,
burning away food and grime residues. Dirt is literally
incinerated.
Keep children away from the appliance during the automatic
cleaning cycle as surfaces may become very hot. Particles
may ignite inside the oven as a result of the combustion
process. There is no cause for concern: this process is both
normal and hazard-free.
Before initiating the PYROLYTIC cycle:
• clean the oven door;
• remove large or coarse food residues from the inside of
the oven using a damp sponge. Do not use detergents;
• remove all accessories and the sliding rack kit (where
present);
• do not place tea towels or pot holders over the oven
handle.
! If the oven is too hot, the pyrolytic cycle may not start.
Wait for the oven to cool down.
A
B
C
Left
guide rail
Right guide
rail
Direction
of extraction
D
! The programme may only be started once the oven door
has been closed.
To activate the cleaning cycle :
1. Press to switch on the control panel.
2. Press the icon.
3. Scroll through the menu commands using the control
dial, select PYROLYTIC and press .
4. The appliance suggests a “NORMAL” pyrolytic cycle, with
a duration of 1 hour 30 minutes. Other levels of cleaning
may be selected.
• Use the control dial to select one of the following:
- “ECONOMY”: duration 1 hour
- “NORMAL”: duration 1 hour and 30 minutes
- “INTENSIVE”: duration 2 hours.
• Press again.
5. Press to begin the PYROLYTIC cycle.
Safety devices
• The door locks automatically as soon as the temperature
reaches a high value; the icon lights up on the display.
• Pressing the icon cancels the cleaning cycle at any
time.
• If a malfunction occurs, the heating elements will be
switched off.
• Once the oven door has been locked, you cannot change
the duration and end time settings.
Programming delayed automatic cleaning
! Programming is possible only after selecting the cleaning
cycle.
1. Press the icon twice; the end of pyrolysis time will
begin to ash.
2. Turn the control dial to adjust the end of pyrolysis time;
hold the dial in this position to scroll through the numbers
more quickly and make the setting process easier. The
display will show a graphic indicating the delayed start in
bar format.
3. Once you have reached the desired end time, press the
icon again. The delayed start bar will show the current
time, the time remaining until the start of pyrolysis, the
duration and the end of pyrolysis time as a graphic.
4. Press to begin the pyrolysis schedule.
5. The display shows the remaining time, moving the
delayed start bar backwards.
6. Once pyrolysis has begun, the display will indicate the
remaining time by lling the duration bar.
7. When the time has elapsed, “CLEANING CYCLE
FINISHED” appears on the display and a buzzer sounds.
• For example: it is 9:00 a.m. and the Economy PYROLYTIC
cycle has been selected: default set time 1 hour. 12:30
is scheduled as the end time. The programme will start
automatically at 11:30 a.m.
To cancel a schedule, press the icon.