
User Manual


Elev. / Rudd.
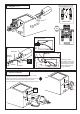
Plastic control horn
B
B’
B=
B’
Plastic control horn
and back plate
2x12mm screw
.....2
...........4
WARNING! Securely glue together. If coming
off during flights, you lose control of your
airplane which leads to accidents !
FUSELAGE BOTTOM-VIEW
HORIZONTAL STABILIZER
BOTTOM-VIEW
8- Horizontal stabilizer
FUSELAGE TOP-VIEW
A
B
10- Vertical stabilizer
...2
4x20mm screw
4mm washer
.............2
FUSELAGE TOP-VIEW
9- Vertical stabilizer
Trial fit the vertical fin in position. Using
a 90-degree triangle, ensure that the
vertical stabilizer is perpendicular to
the horizontal stabilizer.
Use a pencil, trace around the vertical
stabilizer where it meets the fuselage
Remove the vertical stabilizer from
the fuselage. Using s sharp hobby
knife, cut away both sides the covering
below the lines which were drawn in
the previous step. Do NOT cut into the
wood.
Spread epoxy (30 minute) onto the both sides
of the vertical stabilizer along the area where
the covering was removed and to the fuselage
where the vertical stabilizer mounts.
Install the vertictal stabilizer into the fuselage
and adust the alignment as described in steep
9.
Allow the epoxy to cure before proceeding to
next step.