
User Manual


A
B
A
B
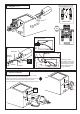
WING TOP-VIEW
3- Joining the wing
2- Aileron servo
1- Trial fit the wing joiner, into
one of the wing panels. It should
insert smoothly up to the center line
marked. Next, slide the other wing half
onto the dihedral brace until the wing panels
meet. If the fit is overly tight, it may be necessary to lightly sand the
dihedral brace.
2- Check for the correct dihedral angle
3- Apply a generous amount of epoxy into the wing joiner cavity of one wing
half. Next, Coat one half of the dihedral brace with epoxy up to the center
line. Install the epoxy-coated side of the dihedral brace into the wing joiner
cavity up to the center line.
4- Do the same way with the other wing half. Carefully slide the wing halves
together, ensuring that they are accurately aligned. Firmly press the two
halves together, allowing the excess epoxy to run out. Clean off the excess
epoxy with kerosene (do not use strong sloven or pure alcohol ).
5- Using the binder clip and rubber band to hold the wing together securely
while the epoxy cures.
Center line
Cut through both the covering and the balsa
wood of the wing bottom where the aileron
extension cord goes.
Install the servo extension cord in to the wing.
WING BOTTOM-VIEW
Included with the
radio set.
1- Aileron extension cord
WING BOTTOM-VIEW
Aileron extension cord
Cotton thread
(pre-installed in
each wing half)
Adhesive tape
Adhesive
tape
Binder clip
Nylon wing bolt
(in hardware bag)
Rubber band
(both the top
and bottom)
X