
Specification


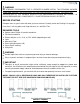


MODEL VG06051 5
PREPARATION STEPS TO FOLLOW BEFORE INSTALLATION
1. Remove the plastic layer from the base border (if needed). Do NOT remove the plastic layer
off the plastic platform of the base.
2. Properly apply silicone to the wall and base joints.
IMPORTANT
• Verify that the overall size of the shower door opening is appropriate for the shower enclosure.
If necessary, cut the structural rail to match the length of the opening (see page 3 diagram).
• Due to individual site variations, exact guidelines for every
situation cannot be supplied. The recommended framing
and dimensional requirements are shown for a typical
application and may vary depending on the site
requirements.
• To prevent damage to the finish, you should protect the
shower cabin bottom with a cardboard protector before
beginning the installation.
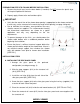
• Ensure that there is sufficient structural support behind the
shower wall to hold the weight of the shower door. If there is
not sufficient enough support, then reinforce the shower
walls with wooden studs prior to shower door installation.
[SEE FIG.1]
INSTALLATION STEPS
A . INSTALLING THE SIDE GLASS PANEL
1. Arrange the glass panel to the preferred
configuration (see diagram on pg. 3).
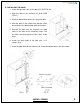
2. Slide the door stoppers (#13) to the structural rail
(#14). [SEE FIG.2]
3. Install the seal strip (#16) from the wall side of the
side glass panel (#6). [SEE FIG.3]
4. Screw the glass support (#18) to the side glass panel using the hex key (supplied). Use
a washer on each side of the panel.
5. Place the structural rail (#14) inside the wall mount bracket (#1). [SEE FIG.4 & FIG.5]
6. Place the structural rail screw (#15) into the side glass panel and screw together with
the structural rail.