Direct Vent Insert Models: RHEDV25 RHEDV32 RHEDV42 Installation Instructions & Homeowner's Manual WARNING! IF THE INFORMATION IN THIS MANUAL IS NOT FOLLOWED EXACTLY, A FIRE OR EXPLOSION MAY RESULT CAUSING PROPERTY DAMAGE,PERSONAL INJURY OR LOSS OF LIFE. FOR YOUR SAFETY What to Do if You Smell Gas: • • • • • Do not try to light any appliance. Do not touch any electric switch. Do not use any phone in your building. Immediately call your gas supplier from your neighbours phone.
Vermont Castings, Majestic Products RHEDV Direct Vent Insert Table of Contents PLEASE READ THE INSTALLATION & OPERATING INSTRUCTIONS BEFORE USING THIS APPLICANCE. Thank you and congratulations on your purchase of a Majestic fireplace. IMPORTANT - Read all instructions and warnings carefully before starting installation. Failure to follow these instructions may result in a possible fire hazard and will void the manufacturers' warranty. Installation Instruction Important Curing/Burning Instructions .........
Vermont Castings, Majestic Products RHEDV Direct Vent Insert Installation & Operating Instructions This gas appliance should be installed by a qualified installer in accordance with local building codes and with current CSAB149.1 Installation codes for Gas Burning Appliances and Equipment. FOR U.S. Installations follow local codes and/or the current National Fuel Gas Code ANSI Z223.1.
Vermont Castings, Majestic Products RHEDV Direct Vent Insert Fireplace & Trim Dimensions 3" (75mm) Dia.
Vermont Castings, Majestic Products RHEDV Direct Vent Insert Mantels High Elevations When the unit is installed into a woodburning fireplace, the minimum distance the mantel can be placed above the fireplace is governed by local building codes applicable to woodburning fireplaces. Consult local authorities having jurisdiction for these clearances. The underside of the mantel will become warm. Use only finishes which are heat resistant and do not discolor.
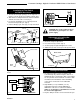
Vermont Castings, Majestic Products RHEDV Direct Vent Insert 1/2" Gas Supply 1/2" x 3/8" Reducer 3/8" x 3/8" Shut Off Valve 5. Once fan starts, adjust speed control to desired fan speed. The fan will now automatically come on every time the fireplace is in operation. Should the fan not be needed simply turn off the speed control. 3/8" Union The appliance, when installed must be electrically connected and grounded in accordance with local codes or, in the absence of local codes, with the current CSA C22.
Vermont Castings, Majestic Products RHEDV Direct Vent Insert Right Side Installation Left Side Installation TPTH 1. Thread wire through openings on the right side of fireplace. Do not cut wire or insulation on metal edges. 2. Slide switch assembly from the back, between subframe and trim, then fasten the screw. (Fig. 5) 3. For left side installation reverse switch position in bracket and repeat Step 2. (Fig. 6) 4. Connect wiring to gas valve (Fig. 7a & b) and switch.
Vermont Castings, Majestic Products RHEDV Direct Vent Insert 4. The chimney must be clean and in good working order and constructed of noncombustible materials. 5. Make sure that all chimney cleanouts fit properly so air cannot leak into the chimney. 6. Install the appliance without trim frame and make all gas fittings and electrical connections. 7. Install the decorative trim frame. Please refer to the Frame Assembly instructions.
Vermont Castings, Majestic Products RHEDV Direct Vent Insert Fastener Plate Fastener Plate Flue Collar Plate Flue Collar Plate Move Back 10/24" x 1¹⁄₂" Machine Screw FP1281 Fig. 10 Remove flue collar plate assembly. Damper Cabinet Top Cabinet Top Make sure the flue collar plate is in contact with the back edge of the cabinet top FP1284 Fig. 13 The flue collar plate must be completely in contact with back edge of cabinet top.
Vermont Castings, Majestic Products RHEDV Direct Vent Insert Venting Components 8" x 12" Vent Termination Kit B Model: HEDVT (8" x 12") (Fit typical 8" x 12" and 9" x 13" flue tile) A Kit Includes: C A - 8" x 12" Vent Termination (x1) B - Stainless Steel Clamps (x4) C - Hardware Package (x1) D - High Temperature Sealant (x1) High Temperature Sealant D 12" x 12" Vent Termination Kit B Model: HEDVT (12" x 12") (Fit typical 12"-13" x 12"-13" flue tile) Kit Includes: A C A - Vent Termination SL (x1)
Vermont Castings, Majestic Products RHEDV Direct Vent Insert Operating Instructions General Glass Information Only ceramic glass approved by Vermont Castings, Majestic Products may be used for replacement on this unit. 1. The use of substitute glass will void all product warranties. 2. Care must be taken to avoid breakage of the glass. 3. Under no circumstances should this appliance be operated without glass properly installed, or with any cracked or broken glass.
Vermont Castings, Majestic Products RHEDV Direct Vent Insert JR5 Flame Adjustment (RN/RP Models) JR6 JR4 JR3 JR2 For fireplaces equipped with HI/LO valves, flame adjustment is accomplished by rotating the HI/LO adjustment knob located near the center of the gas control. (Figs. 21 or 22) Burner Lava Rock Placement LG279 Turn counterclockwise to decrease flame height JR1 LO Honeywell Valve HI Turn clockwise to increase flame height Fig. 18 RHEDV25 log and lava rock placement. Fig.
Vermont Castings, Majestic Products RHEDV Direct Vent Insert First Firing PSE Pilot 3/8" - 1/2" Upon completing the gas line connection, a small amount of air will be in the lines. When first lighting unit with pilot light, it will take a few minutes to purge themselves of this air. Once the purging is complete, the pilot and burner will light and operate as indicated in the instruction manual. Subsequent lightings of the heater will not require such purging. SIT Pilot F584-703 Fig.
Vermont Castings, Majestic Products RHEDV Direct Vent Insert Lighting And Operating Instructions FOR YOUR SAFETY READ BEFORE LIGHTING WARNING:If you do not follow these instructions exactly, a fire or explosion may result causing property damage, personal injury or loss of life. A. This heater has a pilot which must be lit manually. When lighting the pilot follow these instructions exactly. B. BEFORE LIGHTING smell all around the heater area for gas.
Vermont Castings, Majestic Products RHEDV Direct Vent Insert Troubleshooting the Gas Control System SIT NOVA 820 Millivolt Valve NOTE: Before trouble shooting the gas control system, be sure external gas shut off is in the “On” position. WARNING: Before doing any gas control service work, remove glass front. SYMPTOM 1. Spark ignitor will not light 2. Pilot will not stay lit after carefully following lighting instructions. 3. Pilot burning, no gas to main burner 4. Frequent pilot outage problem.
Vermont Castings, Majestic Products RHEDV Direct Vent Insert Troubleshooting the Gas Control System Eurosit 630 Gas Valve NOTE: Before troubleshooting the gas control system, be sure external gas shut off is in the "On" position. WARNING: Before doing any gas control service work, remove glass front. Symptom 1. Spark ignitor will not light 2. Pilot will not stay lit after carefully following lighting ment instructions. 3. Pilot burning, no gas to burner, Valve knob "ON". 4.
Vermont Castings, Majestic Products RHEDV Direct Vent Insert Troubleshooting the Gas Control System Honeywell Millivolt Valve START CHECK Gas Supply On NO Supply Line Hooked Up Shutoff Valve Open YES Pilot Lights With Piezo Ignitor NO YES Pilot Stays Lit NO Lockout Has Engaged. Wait 60 Seconds And Try Again. For Spark At Electrode While Depressing Piezo 1/8" Gap To Pilot Hood Needed. All Wiring Connections Replace Piezo Ignitor For Air In The Lines Thermopile Needs A Minimum 325mv.
Vermont Castings, Majestic Products RHEDV Direct Vent Insert Maintenance Burner and Burner Compartment It is important to keep the burner and the burner compartment clean. At least once per year the logs and lava rock/ember material should be removed and the burner compartment vacuumed and wiped out. Remove and replace the logs as per the instructions in this manual. Always handle the logs with care as they are fragile and may also be hot if the fireplace has been in use.
Vermont Castings, Majestic Products RHEDV Direct Vent Insert 5 35 10a/b 12 19 4a/b 18 6/7a/b 30 15 16 31 14 20 24a/b 11 a/b 32 8a/b 28 25 27 36 9 a/b 17 13 18 34 26 29 21 3 2 22a/b 33 PI LO T O H PILOT ADJ ON L I OFF 23 a/b 1d 1d 1d 1f 1f 1e 1b 1c 1c 1b 1a 1e 1e 1a 1b 1f 1c 1a 0801 Vermont Castings, Majestic Products reserves the right to make changes in design, materials, specifications, prices and discontinue colors and products at any time, without notice.
Vermont Castings, Majestic Products RHEDV Direct Vent Insert RHEDV25/32/42 Series (continued) Ref. Description RHEDV25 RHEDV32 RHEDV42 1. Log Set Complete 10000199 57896 10000206 1a. Log Ember Front JR1 KR1 SR1 1b. Log Front Left JR2 KR2 SR2 1c. Log Front Right JR3 KR3 SR3 1d. Log Rear JR4 KR4 SR4 1e. Log Top Left JR5 KR5 SR5 1f. Log Top Right JR6 KR6 SR6 2. Lava Rock (Package) - 10001454 10001454 3. Burner Lava Rock (Package) 57897 57897 57897 4a.
Vermont Castings, Majestic Products RHEDV Direct Vent Insert RHEDV25/32/42 Series (continued) Ref. 28. 29. 30. 31. 32. 33. 34. 35. 36.
Vermont Castings, Majestic Products RHEDV Direct Vent Insert Optional Accessories Remote Controls A Trim Options for RHEDV25 Optional remote control units are available to control different functions of the appliance.
Vermont Castings, Majestic Products RHEDV Direct Vent Insert RHE25SSP & HE25LP Replacement Parts 5 6 4 6 4 3 1 4. Install the bottom louvre assembly by fastening the hinges with four screws to the pre-punched holes in the cabinet. 5. Re-install the front glass. 6. Install the top louvre by using the hooks to hang it in place.
Vermont Castings, Majestic Products RHEDV Direct Vent Insert HE25FP Replacement Parts 1 2 3 4 5 FP1293 2. Install the hanging brackets, as shown in Figure 33. 3. Install bracket on each side of the cabinet as shown in Figure 37. 4. Install the ceramic piece inside the bay window. 5. Install the bay window by hanging it onto the lower tabs of the hanging brackets, as shown in Figure 34. 6. Install top louvre by engaging the oblong holes with the upper tabs of the hanging brackets, as shown in Figure 35.
Vermont Castings, Majestic Products RHEDV Direct Vent Insert HE25BTKP Replacement Parts 1 11 HI LO 2 16 KT210a 6 9 Fig. 34 Hang the window grille or the steel frame onto the lower tabs of the hanging brackets. 15 10 7 5 3 4 13 12 8 Fig. 35 Engage the slots in the upper grille top louvre with the upper tabs of the hanging brackets.
Vermont Castings, Majestic Products RHEDV Direct Vent Insert A4 Riser Kits For use with RHEDV25 (Refer to Page 34, Figure 55) 1. Install the unit according to Homeowner’s Manual. 2. Install the trim according to Installation Instructions. 3. Remove the two (2) screws at the bottom of the trim. 4. Install the riser at the bottom of the trim. (Fig. 55) 5. Fasten the trim with the same two (2) screws removed on step 3. 3. Install the trim top deflector and use two screws to fasten it. (Fig. 39 & 40) 4.
Vermont Castings, Majestic Products RHEDV Direct Vent Insert Trim Top Channel Trim Side Channel Deflector Trim Top Trim Side Channel Screw Trim Framing Inner Sides FP1262 Fig. 41 RHESSD and RHESLD trim assembly. Screws Front View FP1263 Fig. 41 Frame mounting. A flat louvre kit OR a bay window kit need to be chosen to complete the installation. Frame Mounting General Information The Decorative Front Frame should be installed last after all other work, such as gas connections, venting, etc.
Vermont Castings, Majestic Products RHEDV Direct Vent Insert RHESS, RHESL, RHESSD, RHESLD, RHESXL Trim Replacement Parts 5 1 1 4 6 2 6 3 7 8 IMPORTANT: Only trim panel assemblies approved by Vermont Castings, Majestic Products can be used on these products. ALL repair parts will be available from your local dealer. When ordering, always give the following information: Model and serial number, part description with finish and part number.
Vermont Castings, Majestic Products RHEDV Direct Vent Insert RHEBXL B2 RHEBSL & RHEBXL Trims To install the kit you do not have to remove any piece of brass, you just add the external pieces. For use with RHEDV32 Remove the frame trim from the unit if it is already installed. Trim Assembly RHEBSL 1. Install trim channels (left and right sides). Use two screws to assemble each piece. 2. Slide on the trim top channel and fasten it from the back side. 3.
Vermont Castings, Majestic Products RHEDV Direct Vent Insert B3 RHEFA and RHEFP Trims RHEFA & RHEFP TrimReplacement Parts For use with RHEDV32 1 Trim Assembly 2 1. Remove the front glass (see "Glass Frame Removal" section). 2. Install support window trim channel, top and bottom brass trim by using the shortest black screw. (Fig.
Vermont Castings, Majestic Products RHEDV Direct Vent Insert B4 HEBTKP, HESBTKP, HECBTK, HECBTKMB & HEBTA Trims For use with RHEDV32 HECBTK HECBKMB HESBTKP HEBTKP Cast bay window and grilles in classic black trim kit Cast bay window and grilles in midnight black porcelain enamel trim kit Steel bay window with polished brass and cast grilles in classic black trim kit Steel bay window and bay louvres with polished brass trim kit Install the bay window after all other installation work has been completed, t
Vermont Castings, Majestic Products RHEDV Direct Vent Insert On units fitted with a Honeywell brand control valve the location of the control knobs and the ignitor button may vary slightly from those shown in Figure 49. The Honeywell extension pieces are visually different in design and are not interchangeable with the RN/RP knobs shown in Figure 49. 2. Install the hanging brackets, as shown in Figure 50. 3. Install bracket on each side of the cabinet as shown in Figure 54. 4.
Vermont Castings, Majestic Products RHEDV Direct Vent Insert HECBTK, HECBTKMB, HESBTKP, HEBTKP, HEBTA Trim Parts Replacement 1 3 14 3 13 6 9 7 10 2 8 4 6 5 7 11 5 20 16 12 15 18 HI LO 19 0801 Vermont Castings, Majestic Products reserves the right to make changes in design, materials, specifications, prices and discontinue colors and products at any time, without notice. IMPORTANT: Only Trim Panel Assemblies Approved by Vermont Castings, Majestic Products Can Be Used on These Products.
Vermont Castings, Majestic Products RHEDV Direct Vent Insert Riser Trim Dimensions B5 Cast Trim Options Length A Cast Surround and Flat Face HECBL HECBLUE HECCG HECGR CSSP CSLP Cast Surround Black Cast Surround Blue Cast Surround Charcoal Grey Cast Surround Green Polished Brass Small Trim for Cast Surround Polished Brass Large Trim for Cast Surround (to be used with CSSP) B6 Freestanding Kits Height B Depth C RHER1-Riser 1" 42" (1067mm) 1" (25.6mm) 2.55" (64.8mm) RHER2-Riser 2" 42" (1067mm) 2" (50.
Vermont Castings, Majestic Products RHEDV Direct Vent Insert 1. Install trim channels (left and right sides) by removing the two screws that hold the side brass trim and put them back to hold both parts. 2. Slide on the trim top channel and fasten it from the back side. 3. Remove the two screws that hold the top brass trim. 4. Install the two brackets to the studs in the bottom of the top channel. Use the nuts supplied with the kit. 5. Reinstall the two screws to hold the top trim channel.
Vermont Castings, Majestic Products RHEDV Direct Vent Insert C3 RHE42BTKP For use with RHEDV42 RHE42BTKP Bay window with polished brass trim Do not remove existing glass with frame. Bottom Decorative Plate Trim Assembly FP1292 Fig. 59 Slide bottom decorative plate under unit floor. RHE42FP Replacement Parts 1 1. Reposition controls. a. Remove the Fan Speed Control Box (Fig. 60) b. Attach the Fan Speed Control Box to the Bracket (Fig. 61 and install the Bracket into the Cabinet.
Vermont Castings, Majestic Products RHEDV Direct Vent Insert HE42BTKP Trim Replacement Parts 1 12 HI LO 2 Extension Knobs 15 14 KT204a 11 8 10 Fig. 62 Install the knob extensions. (Only for RN/RP models) Hanging Bracket 7 6 3 9 4 13 5 KT209a Fig. 63 Hanging bracket alignment. IMPORTANT: Only trim panel assemblies approved by Vermont Castings, Majestic Products can be used on these products. ALL repair parts will be available from your local dealer.
LIMITED LIFETIME WARRANTY PRODUCT COVERED BY THIS WARRANTY All Vermont Castings gas stoves, gas inserts, and gas fireplaces, and all Majestic or Northern Flame brand gas fireplaces equipped with an Insta-Flame Ceramic Burner, or standard steel tube burner.