
User's Manual


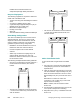
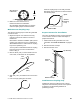
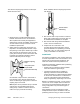
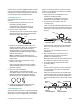

Table Of Contents
- Introduction
- Basic Functionality
- Planning
- Installation
- Service
- Asset Tag Installation
- Managing RF Passage Antenna Performance

C•CURE Watch Installation and Service Guide B-11
process. Once you have installed and fine tuned all
coils, recheck noise cancellation for each coil and
reposition it if necessary. Repeat this process until
you are satisfied with system performance.
Connecting One Coil
Follow these steps to connect one coil to an
antenna.
1. Verify that source of interference is in its
permanent operating position.
It is important to avoid moving source of
interference after installation is complete.
2. Connect coil to antenna wire.
Twist wire at one end of coil with either antenna
wire and secure it with a wire nut. Repeat with
remaining coil and antenna wires.
3. Determine most effective placement for coil.
Monitor cancellation effects as you experiment
with potential mounting locations. Start by
monitoring effects of gross position changes,
gradually making smaller and smaller changes
between test locations.
Note: If possible when multiple sources of
interference are involved, turn off all except one
being tested.
4. Attach coil to source of interference using
packing or duct tape.
Use only enough tape to hold coil in position
during installation process. You may need to
reposition coil later.
5. Fine tune noise cancellation.
Small changes in coil shape affect noise
cancellation results. Fine tune by making small
changes to shape of coil. Monitor effects of
these changes until cancellation is optimized.
6. Install all coils before proceeding to section,
Finish the Installation on page B-12 .
Connect Multiple Coils
When more than one source of interference affects
an antenna, you must connect coils to the antenna
wire in series. For this configuration, use separate
pieces of 2-conductor wire to connect one coil to
another. In the following steps this wire is referred
to as a connecting wire.
1. Verify that source of interference is in its
permanent operating position.
It is important to avoid moving sources of
interference after installation is complete.
2. Connect first coil to antenna wire and
connecting wire.
Twist one coil wire with white antenna wire and
secure with a wire nut. Twist other coil wire with
white wire of connecting wire and secure with a
wire nut.
Twist black wire of the antenna wire with black
wire of the connecting wire and secure with a
wire nut.
Set coil as close as possible to source of
interference.
3. Run connecting wire to second source of
interference and cut, leaving a generous
allowance for positioning coil.
Strip about 4cm (1.5in.) of outer sheath from cut
end. Strip 2cm (.75in.) at end of each wire.
4. If only two coils are required in this series,
proceed to Step 6.
Or…
If three coils are required, connect second coil
to connecting wire from first coil and another
connecting wire.
Twist one coil wire from second coil with white
connecting wire from first coil and secure with a
wire nut. Twist other coil wire with white wire of
another connecting wire and secure with a wire
nut.
Coil
Antenna Wire
Coil
Connecting Wire
Antenna Wire
Second
Coil
Second
Connecting Wire
Antenna Wire
First
Coil
First
Connecting Wire