User Guide
Table Of Contents
- About This Guide
- Get to Know About Your Router
- Connect the Hardware
- Log In to Your Router
- Set Up Internet Connection
- TP-Link Cloud Service
- Guest Network
- USB Settings
- HomeCare – Parental Controls, QoS, Antivirus
- Network Security
- NAT Forwarding
- VPN Server
- Customize Your Network Settings
- 12. 1. Change the LAN Settings
- 12. 2. Set Up Link Aggregation
- 12. 3. Configure to Support IPTV Service
- 12. 4. Specify DHCP Server Settings
- 12. 5. Set Up a Dynamic DNS Service Account
- 12. 6. Create Static Routes
- 12. 7. Specify Wireless Settings
- 12. 8. Use WPS for Wireless Connection
- 12. 9. Schedule Your Wireless Function
- Manage the Router
- 13. 1. Set Up System Time
- 13. 2. Control LEDs
- 13. 3. Test the Network Connectivity
- 13. 4. Test Your Internet Speed
- 13. 5. Upgrade the Firmware
- 13. 6. Backup and Restore Configuration Settings
- 13. 7. Set the Router to Reboot Regularly
- 13. 8. Change the Administrator Account
- 13. 9. Password Recovery
- 13. 10. Local Management
- 13. 11. Remote Management
- 13. 12. System Log
- 13. 13. Monitor the Internet Traffic Statistics
- 13. 14. System Parameters
- 13. 15. Log Out
- Work with Alexa and IFTTT
- FAQ

45
Chapter 8
HomeCare – Parental Controls, QoS, Antivirus
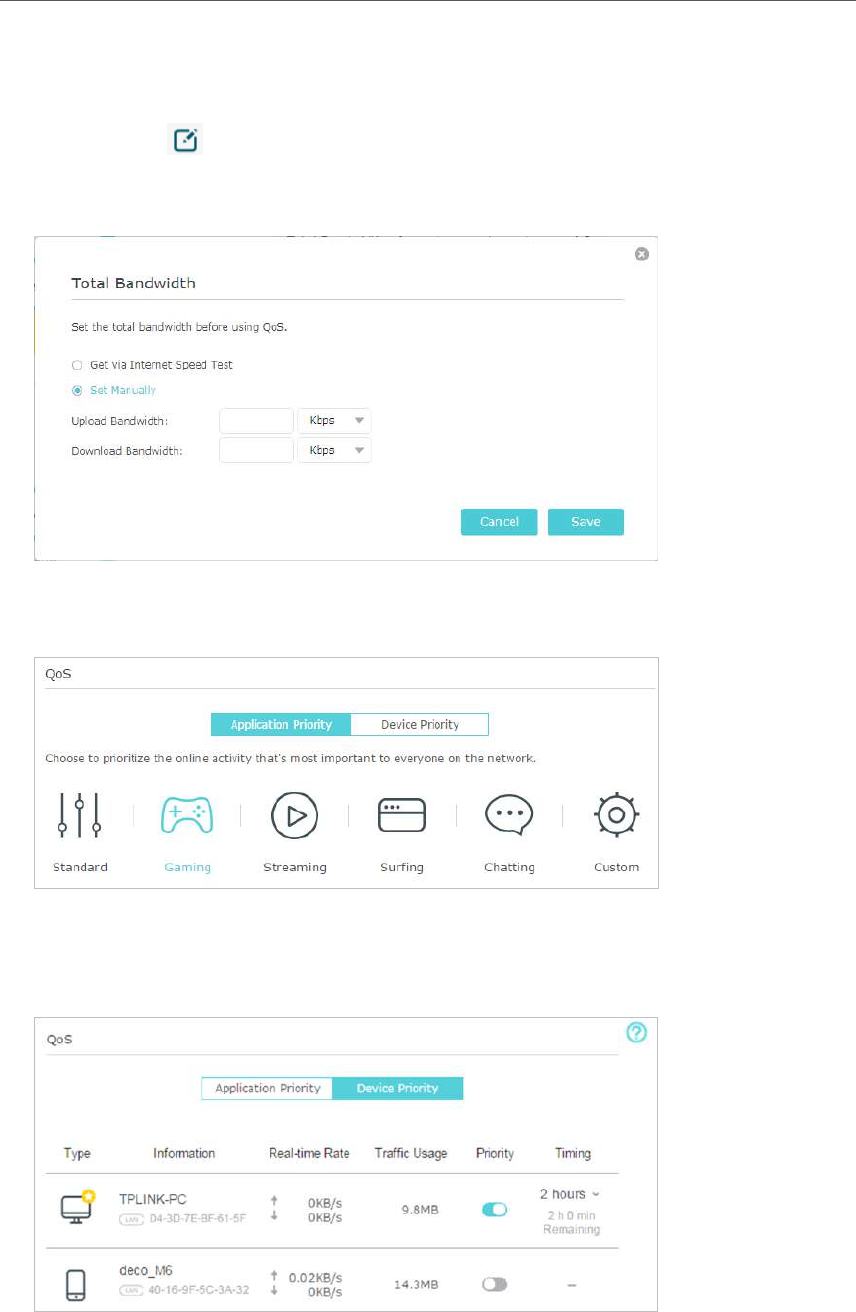
2. Go to Basic > HomeCare > QoS or Advanced > QoS.
3. If you already run a speed test and get the bandwidth value, just skip to step 4. If not,
click the edit
button to set the total bandwidth. You can choose to run a speed
test to get the value or manually enter the bandwidth provided by your internet
service provider.
4. In the Application Priority tab, click Gaming to prioritize this online activity. The
default is Standard, with no application prioritized.
5. In the Device Priority tab, find your computer and toggle on Priority. Click the entry
in the Timing column and select 2 hours as the duration you want the device to be
prioritized for.
Done!
You can now enjoy playing games without lag on your computer for the next 2 hours.


