
Computer Drive User Manual
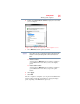


Table Of Contents
- Portégé® R700 Series User’s Guide
- Contents
- Introduction
- Chapter 1: Getting Started
- Selecting a place to work
- Setting up your computer
- Connecting to a power source
- Charging the main battery
- Using the computer for the first time
- Registering your computer with Toshiba
- Adding optional external devices
- Adding memory (optional)
- Recovering the Internal Storage Drive
- Erasing the Internal Storage Drive
- Checking the internal storage drive operating status
- Using the TouchPad™
- Using external display devices
- Using an external keyboard
- Using a mouse
- Connecting a printer
- Turning off the computer
- Customizing your computer’s settings
- Caring for your computer
- Chapter 2: Learning the Basics
- Chapter 3: Mobile Computing
- Chapter 4: Exploring Your Computer’s Features
- Chapter 5: Utilities
- TOSHIBA Assist
- TOSHIBA Application Installer
- Setting passwords
- TOSHIBA Face Recognition Utility
- TOSHIBA Security Assist
- TOSHIBA PC Diagnostic Tool Utility
- TOSHIBA HDD Protection Utility
- Mouse Utility
- TOSHIBA Hardware Setup
- USB Sleep and Charge Utility
- TOSHIBA Zooming Utility
- TOSHIBA Button Support
- TOSHIBA Accessibility
- Fingerprint Authentication Utility
- TOSHIBA eco Utility™
- TOSHIBA Service Station
- TOSHIBA PC Health Monitor
- Chapter 6: If Something Goes Wrong
- Problems that are easy to fix
- Problems when you turn on the computer
- The Windows® operating system is not working
- Fixing a problem with Device Manager
- Memory problems
- Power and the batteries
- Keyboard problems
- Display problems
- Disk or storage drive problems
- Optical disc drive problems
- Sound system problems
- ExpressCard® problems
- Printer problems
- Modem problems
- Wireless networking problems
- DVD operating problems
- Develop good computing habits
- If you need further assistance
- Other Toshiba Internet Web sites
- Toshiba’s worldwide offices
- Appendix A: Hot Keys/TOSHIBA Cards
- Appendix B: Power Cord/Cable Connectors
- Glossary
- Index

92
Getting Started
Turning off the computer
Starting again from Hibernation mode
To start up the computer from Hibernation mode, press the power
button until the ON/OFF light glows green. The computer returns to
the screen(s) you were using.
If you put the computer in Hibernation mode by closing the display
panel, you can start it again by opening the display panel.
Using and configuring Sleep mode
To turn off the computer using the Sleep command:
1 Click Start, and then click the arrow next to the Shut down
button in the lower-right corner of the Start menu.
(Sample Image) Shut down menu
2 Click Sleep in the pop-up menu.
The computer saves the status of all open programs and files to
the memory, turns off the display, and enters into a low-power
mode. The ON/OFF light blinks amber indicating the computer
is in Sleep mode.
Configuring Sleep mode options
You can place the computer into Sleep mode by either pressing the
power button or closing the display panel. You can also specify an
amount of time after which the computer automatically goes into
Sleep mode.
Arrow
Sleep
Start button