
Owner's Manual


2. PRINTER SETUP ENGLISH VERSION EO1-33058
2.9 Setting an Operating Environment
E2-25
2.9.1 Parameter Setting
(Cont.)
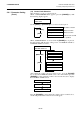
(18) Auto Print Head Check Selection
This parameter is to choose whether to perform the Auto Print Head
Check function at the power on time. When “<2>PARAMETER SET”
appears, press the [PAUSE] key until the following display appears.
Use the [FEED] or [RESTART] key to select a desired option.
After selecting auto print head check, press the [PAUSE] key.
(19) Centronics Interface ACK/BUSY Timing Selection
This parameter is to choose an ACK/BUSY timing of the Centronics
interface.
“TYPE1” has been chosen as default, but if a communication error occurs
or a communication is not properly made, change to “TYPE2”.
When “<2>PARAMETER SET” appears, press the [PAUSE] key until
the following display appears”.
Use the [FEED] or [RESTART] key to select a desired option.
After selecting an ACK/BUSY timing, press the [PAUSE] key.
NOTES:
1. It takes about 2 seconds to
perform an Auto Print Head
check.
2. It is recommended that this
function should be activated when
high quality printing such as bar
codes printing is required.
Otherwise, choose OFF.
3. When a broken element is found,
the printer stops, displaying
“HEAD ERROR”. The error
state can be cleared by pressing
the [RESTART] key, but if the
broken element affects bar code
readability or actual operations,
please replace the print head with
a proper one.
<2>PARAMETER SET
A
UTO HD CHK OFF
A
UTO HD CHK OFF
A
UTO HD CHK ON
[RESTART]
[FEED]
Auto print head broken element
check is not performed.
Auto print head broken element
check is performed.
<2>PARAMETER SET
A
CK/BUSY TYPE1
A
CK/BUSY TYPE1
A
CK/BUSY TYPE2
[RESTART]
[FEED]
A
rise of ACK signal and a release o
f
BUSY occur at the same time.
A
fall of ACK signal and a release o
f
BUSY occur at the same time.