
User's Manual


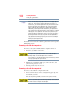
Table Of Contents
- Portégé® M700/M705 Series User's Guide
- Contents
- Introduction
- Chapter 1: Getting Started
- Selecting a place to work
- Setting up your computer
- Registering your computer with Toshiba
- Adding optional external devices
- Connecting to a power source
- Charging the battery
- Using the computer for the first time
- Adding memory (optional)
- Hard Drive Recovery Utilities
- Using the TouchPad™
- Using external display devices
- Using an external keyboard
- Using a mouse
- Connecting a printer
- Connecting an optional external diskette drive
- Turning off the computer
- Using your computer in tablet mode
- Caring for your computer
- Chapter 2: Learning the Basics
- Chapter 3: Mobile Computing
- Chapter 4: Exploring Your Computer’s Features
- Chapter 5: Utilities
- TOSHIBA Assist
- TOSHIBA Application Installer
- Setting passwords
- TOSHIBA PC Diagnostic Tool Utility
- TOSHIBA HDD Protection Utility
- Fn-esse®
- TOSHIBA SD™ Memory Card Format Utility
- TOSHIBA SD™ Memory Boot Utility
- TOSHIBA Power Saver
- Mouse Utility
- TOSHIBA Hardware Setup
- TOSHIBA Zooming Utility
- TOSHIBA Mobile Extension
- TOSHIBA Button Support
- CD/DVD Drive Acoustic Silencer
- TOSHIBA Rotation Utility
- Tablet and Pen Settings
- Cross Menu Utility
- Toshiba Tablet Access Code Utility
- TOSHIBA Accessibility
- Trusted Platform Module (TPM)
- Fingerprint Authentication Utility
- Important information for Wireless Key Logon
- Chapter 6: If Something Goes Wrong
- Appendix A: Hot Keys
- Appendix B: Power Cord/Cable Connectors
- Appendix C: Using ConfigFree® with your Toshiba Computer
- Glossary
- Index

91
Learning the Basics
Saving your work
Saving files
1 In your Windows
®
-based application, click File, and then Save.
If you are working with a document that already has a file
name, this is all you need to do. If you created a new document,
your program displays a Save As dialog box.
Use this dialog box to specify where to store the document and
to give it a file name.
(Sample Image) Save As dialog box
2 Choose the drive and folder where you want your file to be
stored.
3 Type a file name, then click Save.
HINT: To make another copy of the file you are currently working
with, click File, and then Save As, and give the new file a different
name.