ON-LINE MANUAL 40L153*DB LED Backlight LCD TV During the life of your TV firmware updates will be made available to ensure that your TV maintains optimum performance. You can download the latest version of firmware from www.toshiba-om.net/firmware.php Some features listed in this document are limited due to local legislation and may not be available in all countries.
English Get started with Freeview Freeview gives you over 50 TV channels to play with, not to mention 25 radio stations. Start watching all your favourite TV content today, just connect your aerial and tune in. Keep up-to-date New channels are launched on Freeview from time to time along with other updates to the service. So it pays to retune your digital TV periodically to make sure your Digital TV/Radio channels are up to date.
Contents Electronic Programme Guide............................ 21 Language Selection............................................... 22 Language Settings............................................. 22 Preferred........................................................ 22 Current........................................................... 22 Digital Settings - Parental Control, Menu Lock, Set PIN........................................................................ 23 Viewing Parental Control Menu..........
Contents English Editing a Timer................................................... 30 Deleting a Timer................................................ 30 Setting Date/Time.................................................. 31 Configuring Date/Time Settings......................... 31 Configuring Source Settings.............................. 31 Input Selection................................................... 31 Other Controls.......................................................
Safety Precautions Air Circulation Do not Leave more than 10cm around all edges when wall mounting the television to allow adequate ventilation. This will prevent overheating and possible damage to the television. Dusty places should also be avoided. DON’T remove any fixed cover as this may expose dangerous voltages. Heat Damage DON’T allow electrical equipment to be exposed to dripping or splashing or objects filled with liquids.
Installation and Important Information English Where to install * Button and stand style is dependent on model. Locate the television away from direct sunlight and strong lights. Soft, indirect lighting is recommended for comfortable viewing. Use curtains or blinds to prevent direct sunlight falling on the screen.
Important safety information • Even if the television conforms to the required DVB - T/C specifications, the compatibility with future digital DVB - T/C transmissions is not guaranteed. • Some digital television functions may not be available in certain countries. • The DVB - T/C system present in this device, allows reception of both FTA (Free To Air) and Encrypted channels. • Note; Encrypted channels require a specific encryption system to view, which may not be available in certain countries.
Fitting or Removing the stand English Fitting or Removing the stand (1) Carefully lay the front of the unit face down on a flat, cushioned surface with the stand hanging over the edge. (2) To fit the stand use the screws supplied. or (3) Remove the screws fixing the stand (4) After the screws are removed, hold the stand in place, then remove the stand and the plastic moulding from the TV. Note: Extreme care should always be used when removing the stand to avoid damage to the LCD panel.
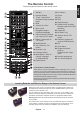
The Remote Control Simple at-a-glance reference of the remote control. 16. No function 2. Numeric buttons 17. Pause 18. Play 3. TV-AV / Channel list / Switches among broadcast 19. Stop types 20. Rapid advance 4. Mute 21. Subtitle on-off (in Media 5. Volume Up / Down Browser mode and in DVB channels) 6. Menu on-off 7. Navigation buttons (Up/Down/Left/Right) 22. Image size 8. Okay (Confirm) / Channel List / Hold (in TXT mode) 24. Teletext / Mix (in TXT mode) 9.
Connecting External Equipment Before connecting any external equipment, remove the mains plug from the wall socket. English (*) Number of these inputs may change according to the model of your TV. Before running first time installation, any connected devices need to be set to standby mode. Aerial cable:................................................................ Connect the aerial to the ANT. socket on the rear of the TV. SCART lead:..............................................................
Connecting an HDMI® or DVI Device to the HDMI Input English The HDMI inputs on your TV receive digital audio and uncompressed digital video from an HDMI source device or uncompressed digital video from a DVI (Digital Visual Interface) source device. These inputs are designed to accept HDCP (High-Bandwidth Digital-Content Protection) programme material in digital form from EIA/CEA-861-D–compliant [1] consumer electronic devices (such as a set-top box or DVD player with HDMI or DVI output).
Connecting a Computer Connecting a USB Memory English To Connect a Computer To Connect a USB Flash Drive With either an RGB/PC or an HDMI connection, you can watch your computer’s display on the TV and hear the sound from the TV’s speakers. • You can connect a USB Flash Drive to your TV by using the USB input/inputs on the TV. This feature allows you to display/play music, photo or video files stored in a USB stick.
Power Save Mode English Environmental Information This television is designed to be environment friendly. You not only help to save the environment but also you can save money by reducing electricity bills thanks to the energy efficiency feauture of this TV. To reduce energy consumption, you should take the following steps: You can use Power Save Mode setting, located in the Picture Settings menu.
Controlling the TV English A wide variety of external equipment can be connected via the sockets located on the side and back of the TV. Whilst all the necessary adjustments and controls for the TV are made using the remote control, the buttons on the Back of the TV may be used for some functions.
Initial Installation IMPORTANT: Ensure that the aerial is connected and a Common Interface module is not inserted before switching on the TV for the first time installation. 1. Connect the mains plug and switch the TV on using the button. If the TV does not switch on, press any numbered or button on the remote control, then the language selection menu will be displayed. This screen will appear the first time that the TV is switched on and each time the TV is reset.
Initial Installation - continued English You can select Network, Frequency, Network ID and Search Step from this screen. For highlighting lines you see, use Up or Down button. You can set Search Step as 8000 kHz or 1000 kHz. If you select 1000 kHz, the TV will perform search process in a detailed way. Searching duration will thus increase accordingly. When finished, press OK button to start automatic search. Note: You can press MENU button to cancel.
Auto Tuning English Auto Tuning As new services are broadcast, it will be necessary to retune the television in order to view them. Note: Menu list of available features may change depending on the model. • It is recommended to run Auto Tuning periodically to ensure that all new services are added. Please be aware that Auto Tuning will completely retune the television and all current channels and settings will be lost.
Manual Tuning, Analogue Fine Tuning The television can be tuned-in manually using Manual Search feature. English Digital Aerial Manual Search Analogue Manual Search The feature is available for service engineers or can be used for direct channel entry if the multiplex channel is known. The television can be tuned-in manually. For example: if the television cannot be connected to a media recorder/decoder with a SCART lead or to tune-in a station on another System.
General Operation English Stereo and Bilingual Transmissions Standby Notifications If stereo or dual language broadcasts are transmitted, the word Stereo or Dual will appear on the screen each time positions are changed, disappearing after a few seconds. If the broadcast is not in stereo, the word Mono will appear. If the TV switches off while in No Signal mode, the following on-screen message will be displayed on the next switch-on: Stereo… Press “LANG - ” to select Stereo or Mono.
Channel List, Sorting Programmes, Programme Locking You can view stored channels and sort them by using the Channel List feature. English Viewing Channel List Deleting a Channel The channel order may be changed to suit your personal preference. • Select Channel List from the main menu and press OK button. The following menu will be displayed: You can press GREEN button to tag/untag all channels; YELLOW button to tag/untag channel.
Viewing Info Banner, Electronic Programme Guide English Viewing Info Banner • Press YELLOW button for zooming to a programme. • Press “INFO ” button. The information screen will appear giving details of the channel and programme currently being viewed. • Press SUBTITLE button to sort channels by a genre. • Whenever you change channel, the TV displays the broadcast picture along with an information banner at the bottom of the screen. This will remain on the screen for a few seconds.
Language Selection English Language Settings Using this menu you can adjust the preferred language settings. Some features may not be available. • Press MENU button and select Settings by using Left or Right button. • Select Language and press OK to view this menu. Select the desired language by using Left or Right button. Press the MENU button on the remote control to exit. Preferred These settings will be used if available. Otherwise the current settings will be used.
Digital Settings - Parental Control, Menu Lock, Set PIN You can view or set parental preferences of your TV. English Viewing Parental Control Menu Set PIN Press MENU button and select the Settings by using Left or Right button. Press OK button to view Settings menu. Use Up or Down button to highlight Parental and press OK to continue: • Use Up or Down buttons to select Set PIN option. Press OK to display the Set PIN window. • Use numeric buttons to enter new pin number.
Configuring Picture Settings You can configure picture settings of your TV by using Picture Settings menu. English Configuring Picture Settings Colour You can use different picture settings in detail. You can customize current picture mode settings as desired. For example, you can change items such as, Brightness, Contrast, Colour and Sharpness. Sets the colour value, adjusting the colours. Press Left or Right button to adjust the colour.
Configuring Picture Settings - continued English Picture Zoom: Sets the picture size to Auto, Full, 16:9, Subtitle, 14:9, 14:9 Zoom, 4:3 or Cinema. Press Left or Right button to change the setting. Film Mode (optional): Films are recorded at a different number of frames per second to normal television programmes. Press Left or Right button to set this feature to Auto or Off. Turn this feature to Auto when you are watching films to see the fast motion scenes clearly. Skin Tone: Adjust the desired skin tone.
Changing Picture Format English Press “SCREEN ” button repeatedly to select between Auto(*), Full(**), 16:9, Subtitle, 14:9, 14:9 Zoom, 4:3 or Cinema. Using the special functions to change the size of the displayed image (i.e. changing the height/width ratio) for the purposes of public display or commercial gain may infringe on copyright laws. You can shift to screen up or down by pressing “ ”/“ ” buttons while picture zoom is selected as 14:9 Zoom, Cinema or Subtitle.
Configuring PC Picture Settings English PC Picture Settings (*) Dot Clock (*) While in VGA/PC mode, some items in Picture menu will be unavailable. Instead, VGA mode settings will be added to the Picture Settings while in VGA/ PC mode. Dot Clock adjustment corrects the interference that appear as vertical banding in dot intensive presentations like spreadsheets or paragraphs or text in smaller fonts. Press Down button until Dot Clock is highlighted.
Configuring Sound Settings You can configure sound settings of your TV by using Sound Settings menu. English Configuring Sound Settings Balance (Only for speaker) Sound settings can be configured according to your personal preferences. This setting is used for emphasizing left or right speaker balance. Press MENU button and select Sound by using Left or Right button. Press OK button to view Sound Settings menu. • Press Left or Right button to change the level of the balance.
Settings Menu Operation, Conditional Access English Configuring Your TV’s Settings Using a Conditional Access Module Detailed settings can be configured to suit your personal preferences. Viewing Settings Menu Press MENU button and select Settings by using Left or Right button. Press OK button to view Settings menu. Press Up or Down button to highlight a menu item. Press OK button to select an item. Press MENU button to exit.
Setting Timers English Timers To view Timers menu, press MENU button and select Settings by using Left or Right button. Press OK button to view Settings menu. Use Up or Down button to highlight Timers and press OK to continue: Setting Sleep Timer The television can be set to turn itself off after a certain length of time. • Highlight Sleep Timer by using Up or Down button. • Use Left or Right button to set. The timer can be set to Off or between 30 minutes and 2 hours (120 minutes) in steps of 30 minutes.
Source Settings Setting Date/Time English Configuring Date/Time Settings Configuring Source Settings You can configure date/time preferences by using this menu screen. You can enable or disable selected source options. The TV will not switch to the disabled source options when the “SOURCE - ” button is pressed. • Select Date/Time in the Settings menu to configure Date/Time settings. Press OK button. Use Up or Down button to highlight the Time Settings Mode. It can be set to Auto or Manual.
Other Controls English Configuring Other Settings - General Blue Background You can configure the settings of your TV. Select Settings from main menu and press OK to view the Settings menu. Press the MENU button on the remote control to exit. If the signal is weak or absent, the TV will automatically change to a blue screen. To enable this, set Blue Background to On. To view general configuration preferences, select Other Settings in the Settings menu and press OK button.
Other Controls - continued English Audio Description Audio description refers to an additional narration track for blind and visually impaired viewers of visual media, including television and movies. The description narrator talks through the presentation, describing what is happening on the screen during the natural pauses in the audio (and sometimes during dialogue, if deemed necessary). You can use this feature, only if the broadcaster supports that additional narration track.
Using Media Browser This TV allows you to enjoy photo, music or video files stored on a USB device. English Manual Start To display Media Browser window, press the “ ” button on the remote control. The Media Browser menu is also accessable from the main menu. Press the MENU button on the remote. Select Media Browser by pressing Left or Right button and press OK. Select the media type to be listed and press OK. If there is more than one media source available, a list of devices will be displayed.
Using Media Browser - continued This TV allows you to enjoy photo, music or video files stored on a USB device. English Playing MP3 Files Viewing JPEG Files To play mp3 files from a USB memory, you can use this menu screen. To view photo files from a USB Memory, you can use this menu screen. When you select Photos in the main Media Browser menu, available image files will be filtered and listed on this screen. • / : Navigate menu.
Using Media Browser - continued This TV allows you to enjoy photo, music or video files stored on a USB device. English Slideshow Feature You can use this feature to display all images automatically on your USB device. • Pause ( button): Pause the slideshow. • Continue ( button): Continue the slideshow. • Loop/Shuffle (Green button): Press once to enable Loop. Press again to enable both Loop and Shuffle. Press once more to disable Loop. Press again to disable Shuffle.
Using Media Browser - continued This TV allows you to enjoy photo, music or video files stored on a USB device. English Note: You can set subtitles by using “LANG ” button during the playback. Selected subtitles may not be displayed correctly in some cases. In order to display movie subtitles correctly, you should set a subtitle language. See the section, Media Browser Settings for selecting movie subtitle language.
Analogue Only Text Services This television has a multi-page text memory, which takes a few moments to load. English Analogue Text Services To display an initial page Before using the text services, the required language region must be chosen. Press RET/BACK to access an initial page. The one displayed is dependant on the broadcaster. • Select Language from the Settings menu. • Highlight Teletext in the Language Settings menu and press Left or Right button to choose the required language region.
The following table is an illustration of some of the typical video display modes. Some, due to the display native resolution, are scaled automatically to enable correct image to be displayed. Your TV may not support different resolutions. Supported resolution modes are listed below. If you switch your PC to an unsupported mode, a warning OSD will appear on the screen.
Appendix C: PIN Information English Before connecting any external equipment, turn off all main power switches. If there is no switch, remove the mains plug from the wall socket. Signal information for Mini D-sub 15 pin connector Pin No. Signal name Pin No. Signal name Pin No.
Appendix D: Supported File Formats for USB Mode Extension Format Notes Video .mpg, .mpeg MPEG1-2 MPEG1: 768x576 @ 30P, MPEG2:1920x1080 @ 30P Audio .vob MPEG2 .mp4 MPEG4, Xvid, H.264 .mkv H.264, MPEG4,VC-1 .avi MPEG2, MPEG4, Xvid, H.264 .flv H.264/VP6/ Sorenson 1920x1080 @ 30P H.264/VP6: 1920x1080 @ 30P Sorenson: 352x288 @ 30P .3gp MPEG4 , H.264 1920x1080 @ 30P .mp3 MPEG1 Layer 2/3 Layer2: 32Kbps ~ 448Kbps (Bit rate) / 32kHz, 44.1kHz, 48kHz, 16kHz, 22.
Re-tune Section English Re-tuning: TOSHIBA Freeview Products Toshiba Digital TV This guide can be used to help you re-tune the following product with the remote control below. Make sure your TV is on and a digital channel is selected 1 ) Press MENU and press ◄ or ► to select Install and Retune and press OK. Press ▲ or ▼ to select Automatic channel scan (Retune) to start the process. 2 ) Select the desired search mode using ► and press OK button.
Specifications and Accessories 40” L Energy Efficiency Class A+ Visible Screen Size (approx.) 102cm / 40” On Mode Power Consumption (approx.) (*) 46 W Annual Power Consumption (approx.) (**) 67 kWh Standby Power Consumption (approx.) < 0.50 W Screen Resolution (pixels) 1920 x 1080 Display 16:9 Sound Output (at 10% distortion) 2x8 Power Consumption Model (approx.) 75W Weight TV with stand 10.0 kg Gross weight 14.0 kg TV without stand 9.
License Information English • The terms HDMI and High-Definition Multimedia Interface, and the HDMI Logo are trademarks or registered trademarks of HDMI Licensing LLC in the United States and other countries. • DVB is a registered trademark of the DVB Project. • [1] EIA/CEA-861-D compliance covers the transmission of uncompressed digital video with high-bandwidth digital content protection, which is being standardized for reception of high-definition video signals.
Q & A Section Sound Picture General Answer Why is there no sound or picture? Check if the TV is not in standby mode Check the mains plug and all mains connections Why is there a picture but no sound? Check if the volume has not been turned off or sound mute has not been selected Why does the sound come only from one speaker when stereo sound is selected? Check the balance in the SOUND menu if it has been set to one side or not Why is the soundtrack in English when a different audio language has b
English REACH information The European Union (EU) chemical regulation, REACH (Registration, Evaluation, Authorization and Restriction of Chemicals), entered into force on 1 June 2007, with phased deadlines to 2018. Toshiba will meet all REACH requirements and is committed to provide our customers with information about the presence in our articles of substances included on the candidate list according to REACH regulation. Please consult the following website www.toshiba.
CONSUMER PRODUCTS – EUROPEAN STANDARD WARRANTY – ENGLISH 1 WARRANTY COVERAGE English CONSUMER PRODUCTS EUROPEAN STANDARD WARRANTY WARRANTY EXCLUSIONS AND DISCLAIMER EN a. System Warranty The Toshiba Limited Warranty is applicable to all “Systems” sold since 01.01.2013.
CONSUMER PRODUCTS – EUROPEAN STANDARD WARRANTY – ENGLISH 2 Toshiba is not liable for any transport/delivery/insurance costs, import duties, taxes, licensing fees and any charges from telephone/fax communication as consequence of the failure of the System. b. Disclaimer of Warranty The warranty service will be subject to the following terms and conditions: 1.
CONSUMER PRODUCTS – EUROPEAN STANDARD WARRANTY – ENGLISH 3 English 7. Secure proper packing of the unit if you send it in or in case of pick up through Toshiba. Damages caused by improper packing by the end user will not be covered by Toshiba. EN REGISTRATION Please register your warranty now at: www.toshiba-europe.