MULTIFUNCTIONELE DIGITALE SYSTEMEN Kopieerhandleiding
©2009 TOSHIBA TEC CORPORATION Alle rechten voorbehouden Volgens de copyrightwet mag deze handleiding niet worden gereproduceerd, in welke vorm dan ook, zonder voorafgaande schriftelijke toestemming van TOSHIBA TEC CORPORATION. Er wordt echter aangenomen dat er geen patentverplichting bestaat met betrekking tot het gebruik van de hierin opgenomen informatie.
Voorwoord Gebruik van deze handleiding Hartelijk dank voor de aanschaf van het multifunctionele digitale systeem van TOSHIBA. In deze handleiding wordt het gebruik van de kopieerfuncties beschreven. Lees deze handleiding vóór gebruik van dit multifunctionele systeem. Houd deze handleiding binnen handbereik, en gebruik die om een omgeving te configureren waarin de functies van de eSTUDIO optimaal benut worden. Bij dit multifunctionele systeem is de scanfunctie als optie beschikbaar.
Displays y Displays in deze handleiding kunnen afwijken van de actuele displays, afhankelijk van hoe het multifunctionele systeem wordt gebruikt, zoals de status van de geïnstalleerde opties. y De in deze handleiding gebezigde afbeeldingsdisplays zijn voor papier in het A/B-formaat. Als u papier in het LT-formaat gebruikt, dan kan het display of de volgorde van toetsen in de afbeeldingen verschillen van die van uw multifunctionele systeem.
INHOUD Voorwoord................................................................................................................................. 1 Hoofdstuk 1 VÓÓR GEBRUIK VAN HET MULTIFUNCTIONELE SYSTEEM Basismenu voor de kopieerfuncties....................................................................................... 8 Papier plaatsen ....................................................................................................................... 11 Geschikt kopieerpapier....................
Stand nieten en sorteren ..................................................................................................... 72 Brochure sorteren / Rughechten ......................................................................................... 74 Perforatie-modus ................................................................................................................. 77 Handmatig nieten ...........................................................................................................
Hoofdstuk 6 TEMPLATES Templates.............................................................................................................................. 136 Weergave templatemenu .................................................................................................. 136 Gebruik van “Praktische templates" .................................................................................. 137 Templates vastleggen .................................................................................
6 INHOUD
VÓÓR GEBRUIK VAN HET MULTIFUNCTIONELE SYSTEEM 1. In dit hoofdstuk wordt beschreven wat u moet weten voordat u dit multifunctionele systeem gebruikt, zoals de samenstelling van het basismenu voor de kopieerfuncties en de wijze waarop het kopieerpapier wordt geplaatst. Basismenu voor de kopieerfuncties....................................................................................... 8 Papier plaatsen........................................................................................................
1 VÓÓR GEBRUIK VAN HET MULTIFUNCTIONELE SYSTEEM Basismenu voor de kopieerfuncties Enkele seconden na het inschakelen van de stroomvoorziening verschijnt het basismenu voor de kopieerfuncties op het aanraakscherm. Het basismenu toont de volgende informatie: 19 18 17 16 15 14 1 2 13 12 3 4 5 6 7 8 9 10 11 1. Gebied voor meldingen Hier verschijnt een korte beschrijving van de functies of de huidige status van dit multifunctionele systeem in de vorm van een melding. 2.
1 VÓÓR GEBRUIK VAN HET MULTIFUNCTIONELE SYSTEEM 1.VÓÓR GEBRUIK VAN HET MULTIFUNCTIONELE SYSTEEM 11. [TAAKSTATUS] toets ( P.156) Deze toets is voor het bevestigen van de verwerkingsstatus van kopieer-, fax-, scan- of afdruktaken, en ook voor het bekijken van de geschiedenis van de resultaten ervan. 12. [PROEFKOPIE] toets ( P.33) Deze dient voor het maken van een proefkopie ter controle van een afdruk voordat een groot aantal afdrukken wordt gemaakt. 13. Toetsen voor de densiteitaanpassing ( P.
1 VÓÓR GEBRUIK VAN HET MULTIFUNCTIONELE SYSTEEM Meldingsgebied systeemstatus In het meldingsgebied voor de status van het systeem wordt de volgende informatie getoond: 1 5 4 3 2 1. Weergave kopieopvangbak ( P.35) Deze toont de bak waarheen de afdrukken worden afgevoerd. 2. [UITVOERBAK] toets ( P.35) Deze dient voor het selecteren van de kopieopvangbakken (uitvoer). 3. Papierladetoetsen ( P.
1 VÓÓR GEBRUIK VAN HET MULTIFUNCTIONELE SYSTEEM Papier plaatsen Geschikt kopieerpapier Het volgende papier kan worden geplaatst en gebruikt voor het kopiëren. De waarden zijn alleen van toepassing als door Toshibaaanbevolen papier wordt gebruikt. Voor het aanbevolen papier zie de Snelstartgids. y Plaats geen papier van verschillend formaat of van verschillende soort in dezelfde papierlade. y Zorg ervoor dat de papierstapel niet hoger is dan de lijn op de geleidingen. Toevoermagazijn Papierladen incl.
1 VÓÓR GEBRUIK VAN HET MULTIFUNCTIONELE SYSTEEM Ongeschikt kopieerpapier Gebruik geen van de onderstaande soorten papier. Dit kan een papierstoring veroorzaken. y Vochtig papier y Gevouwen papier y Gekruld of gekreukt papier y Papier met een extreem glad of ruw oppervlak Gebruik geen van de onderstaande soorten papier. Dit kan een storing in het multifunctionele systeem veroorzaken.
1 VÓÓR GEBRUIK VAN HET MULTIFUNCTIONELE SYSTEEM 1.VÓÓR GEBRUIK VAN HET MULTIFUNCTIONELE SYSTEEM 4 Verplaats de eindgeleiding naar de achterrand van het papier terwijl u het onderste gedeelte ervan in de richting van de pijlen duwt. 5 Houd de groene hendel van de voorste papiergeleider vast en pas de papiergeleiders aan het papierformaat aan. Verstel de papiergeleiders met twee handen. 6 Controleer of er niet te veel ruimte tussen het papier en de papiergeleiders of eindgeleiding zit.
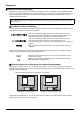
1 VÓÓR GEBRUIK VAN HET MULTIFUNCTIONELE SYSTEEM 9 Onderstaand menu verschijnt. Als het papierformaat of de papiersoort afwijkt van het tevoren in de papierlade gebruikte formaat, druk dan op [JA] op het aanraakscherm. Als ze hetzelfde zijn, druk dan op [NEE]. y Het kan zijn dat bovenstaand menu - afhankelijk van de instelling van het multifunctionele systeem - niet verschijnt. Zie in dat geval de volgende pagina's om de instelling van het papierformaat en de papiersoort te wijzigen: P.
1 VÓÓR GEBRUIK VAN HET MULTIFUNCTIONELE SYSTEEM 1.VÓÓR GEBRUIK VAN HET MULTIFUNCTIONELE SYSTEEM Papierformaat vastleggen Wanneer u voor het eerst papier plaatst of het papier door een ander formaat vervangt, dient u het formaat in dit multifunctionele systeem vast te leggen. 1 Druk op de [USER FUNCTIONS] toets op het bedieningspaneel. 2 Druk op het tabblad [GEBRUIKER] op het aanraakscherm om het instellingenmenu op te roepen en druk vervolgens op [PAPIERLADE].
1 VÓÓR GEBRUIK VAN HET MULTIFUNCTIONELE SYSTEEM Instelling papiersoort Wanneer u speciaal papier anders dan normaal papier of een soort dat niet voor normaal kopiëren wordt gebruikt plaatst, dient u de dikte en het kenmerk op het multifunctionele systeem in te stellen. y De dikte en het kenmerk kunnen tegelijkertijd worden ingesteld.
1 VÓÓR GEBRUIK VAN HET MULTIFUNCTIONELE SYSTEEM 1.VÓÓR GEBRUIK VAN HET MULTIFUNCTIONELE SYSTEEM 2 Druk op het tabblad [GEBRUIKER] op het aanraakscherm om het instellingenmenu op te roepen en druk vervolgens op [PAPIERLADE]. 3 Druk op [PAPIERSOORT]. 4 Selecteer de papiersoort. 5 Druk op de [USER FUNCTIONS] of [COPY] toets op het bedieningspaneel. 1) Selecteer de papierlade waarin het papier is geplaatst. 2) Selecteer de papiersoort. Het menu keert terug naar het basismenu.
1 VÓÓR GEBRUIK VAN HET MULTIFUNCTIONELE SYSTEEM Papier in het extra grote papierinvoermagazijn (optie) plaatsen 1 Trek de papierlade van het extra grote papierinvoermagazijn voorzichtig uit tot deze niet verder kan. A Pas op dat u niet aan de geleiderails komt (A in de figuur). Hierdoor kunt u letsel oplopen. 2 Plaats 2 stapels papier in de betreffende rechter- en linkerbak. Waaier het papier goed los en stoot het gelijk voordat u het in de bak legt.
1 VÓÓR GEBRUIK VAN HET MULTIFUNCTIONELE SYSTEEM 1.VÓÓR GEBRUIK VAN HET MULTIFUNCTIONELE SYSTEEM Het extra grote papierinvoermagazijn tijdens het kopiëren bijvullen Wanneer het papier in de linkerbak van het extra grote papierinvoermagazijn op is geraakt tijdens het kopiëren, dan verschijnt de melding “Linkerpapierlade kan worden bijgevuld”. U kunt het extra grote papierinvoermagazijn uittrekken en de linkerbak bijvullen zonder het kopieerproces te stoppen.
2. HET MAKEN VAN AFDRUKKEN In dit hoofdstuk worden de basiskopieerprocedures toegelicht. Originelen plaatsen ................................................................................................................ 22 Aanvaardbare originelen ......................................................................................................................................22 Originelen plaatsen op de glasplaat voor originelen........................................................................
2 HET MAKEN VAN AFDRUKKEN Originelen plaatsen Aanvaardbare originelen Wanneer het automatische documentinvoersysteem (optie) wordt gebruikt, kunnen dubbelzijdige originelen automatisch vel voor vel worden gescand. Wanneer de glasplaat voor originelen wordt gebruikt, kunnen originelen zoals overhead transparanten, calqueerpapier, boekjes of 3-D voorwerpen worden gescand die niet op het automatische documentinvoersysteem kunnen worden geplaatst, alsmede ook normaal papier.
2 HET MAKEN VAN AFDRUKKEN Originelen plaatsen op de glasplaat voor originelen De glasplaat voor originelen kan worden gebruikt voor originelen zoals overhead transparanten of calqueerpapier alsmede normale papiervellen die niet op het automatische documentinvoersysteem (optie) kunnen worden geplaatst. Plaats geen zware voorwerpen (4 kg of meer) op de glasplaat voor originelen en oefen er geen kracht op uit. Door het breken van de glasplaat kunt u letsel oplopen.
2 HET MAKEN VAN AFDRUKKEN Boeken U kunt boeken op de glasplaat voor originelen plaatsen. Plaats geen zware voorwerpen (4 kg of meer) op de glasplaat voor originelen en oefen er geen kracht op uit. Door het breken van de glasplaat kunt u letsel oplopen. 1 Til de afdekklep (optie) of het automatische documentinvoersysteem (optie) op. 2 Zoek de gewenste pagina in het origineel en leg deze met de te kopiëren zijde naar beneden op de glasplaat. Leg het origineel tegen de linkerbovenhoek op de glasplaat.
2 HET MAKEN VAN AFDRUKKEN Gebruik van het automatische documentinvoersysteem (optie): Aanwijzingen Gebruik geen originelen zoals onder punt 1 tot 8 aangegeven omdat dergelijke originelen papierfouten of beschadiging van het multifunctionele systeem kunnen veroorzaken. 1. Erg gekreukelde, gevouwen of omgekrulde originelen 2. Originelen met carbonpapier 3. Originelen met plakband, met opgeplakte teksten of geknipte originelen 4. Originelen met paperclips of nietjes 5. Originelen met gaten of scheuren 6.
2 HET MAKEN VAN AFDRUKKEN Continue invoer De invoer is standaard op "continue invoer" ingesteld. Zodra u de originelen hebt ingesteld en daarna op de [START] toets drukt, worden ze continu pagina voor pagina gescand. Dit is handig als u meerdere originelen in één keer wilt kopiëren. 1 Leg alle originelen netjes tegen de aanleglijst. 2 Plaats de originelen met de te kopiëren zijde naar boven en pas de papiergeleiders aan de lengte van het origineel aan.
2 HET MAKEN VAN AFDRUKKEN Enkelvoudige invoer Als de invoer is ingesteld op "enkelvoudige invoer" wordt een origineel automatisch ingevoerd wanneer het op het automatische documentinvoersysteem (optie) wordt gelegd. Dit is handig wanneer u slechts 1 vel wilt kopiëren. P.125 “ADF -> SADF” 1 Pas de papiergeleiders aan de lengte van het origineel aan. 2 Plaats het origineel met de te kopiëren zijde naar boven en recht tegen de papiergeleiders.
2 HET MAKEN VAN AFDRUKKEN Afdrukken maken Basiskopieerprocedure Maak afdrukken zoals hieronder beschreven. 2 RADF (optioneel) Glasplaat voor originelen OF 1 4 28 3 5 1 Controleer of er (voldoende) papier in de papierlade(n) zit. 2 Plaats de originelen. 3 Toets het gewenste aantal afdrukken in wanneer u meer dan één afdruk wilt maken. 4 Selecteer de kopieerinstellingen naar behoefte. Voor de geschikte papiersoorten en -formaten alsmede het plaatsen ervan zie: P.
2 HET MAKEN VAN AFDRUKKEN 5 Druk op de [START] toets op het bedieningspaneel. Het kopiëren begint. De afdrukken worden uitgevoerd met de gekopieerde zijde naar beneden. Wees voorzichtig omdat de papieruitvoer en omgeving ervan en het papier zelf na het kopiëren heet zijn. Het onderstaande menu kan verschijnen wanneer speciale programma's worden gebruikt.
2 HET MAKEN VAN AFDRUKKEN Kopiëren stoppen en opnieuw starten 1 Druk op de [STOP] toets op het bedieningspaneel. 2 Druk op [GEHEUGEN WISSEN] op het aanraakscherm om het kopiëren te beëindigen. Druk op de [START] toets op het bedieningspaneel om het kopiëren opnieuw te starten. Het kopiëren of scannen wordt onderbroken. Wanneer u op [GEHEUGEN WISSEN] drukt, worden de gescande gegevens gewist en worden eventuele afdruktaken in de wachtrij uitgevoerd.
2 HET MAKEN VAN AFDRUKKEN Volgend origineel tijdens het kopiëren scannen Zelfs tijdens het uitvoeren van de kopieerfunctie of terwijl “BEDRIJFSKLAAR (OPWARMFASE)” op het display wordt weergegeven, kan het volgende origineel worden gescand (automatische start). Er kunnen maximaal 10 taken in het geheugen worden opgeslagen. 1 Plaats de originelen. 2 Stel het aantal afdruksets en de kopieerinstellingen naar wens in.
2 HET MAKEN VAN AFDRUKKEN Kopiëren onderbreken en andere afdrukken maken U kunt de huidige afdruktaak onderbreken voor het maken van andere afdrukken (kopiëren met onderbreking). Wanneer de onderbroken taak weer wordt gestart, hoeven de kopieerinstellingen niet opnieuw te worden geselecteerd omdat deze in het geheugen van het multifunctionele systeem zijn opgeslagen.
2 HET MAKEN VAN AFDRUKKEN Proefkopie Wanneer u een groot aantal afdrukken gaat maken, kunt u controleren of deze precies aan uw wensen voldoen door eerst één pagina te kopiëren (proefkopie). Dan kunt u de standen of instellingen wijzigen (bijv. het aantal afdruksets, kopieopvangbak, paginanummer, tijdstempel, sorteren/nieten, perforeren) na controle van de proefkopie.
2 HET MAKEN VAN AFDRUKKEN 6 Wijzig het aantal afdruksets en kopieerinstellingen naar wens na controle van de proefkopie. Standen of instellingen zoals aantal afdruksets, de kopieopvangbak, paginanummer, tijdstempel, sorteren/nieten en perforeren kunnen worden gewijzigd. Indien u instellingen zoals de reproductiefactor, de densiteit, de modus voor originelen of enkel/dubbelzijdig kopiëren wilt wijzigen, moet u de proefkopie eerst voltooien. Wijzig deze instellingen en scan het origineel opnieuw.
2 HET MAKEN VAN AFDRUKKEN Uitvoerbak selecteren U kunt de uitvoerbak selecteren indien er een optionele finisher of de binnenbak is geïnstalleerd. y De beschikbare uitvoerbak kan onderhevig zijn aan beperkingen, afhankelijk van kopieerinstellingen en papierformaten. y De uitvoerbakselectie is standaard op automatische selectie ingesteld. De uitvoerbak wijzigen De momenteel geselecteerde uitvoerbak wordt weergegeven in het meldingsgebied voor de status van het systeem.
2 HET MAKEN VAN AFDRUKKEN Kopiëren met handinvoer Bij het maken van afdrukken op overhead transparanten, etiketten, enveloppen of niet-standaard formaat papier, legt u het kopieerpapier in de handinvoerbak. Kopiëren met handinvoer is ook raadzaam voor het kopiëren op standaard papierformaat dat niet in een van de papierladen aanwezig is. Wanneer u het papierformaat selecteert, kunt u verschillende functies gebruiken zoals de automatische papierselectie (APS) of de automatische zoomselectie (AMS).
2 HET MAKEN VAN AFDRUKKEN Papierformaat Standaardformaat Anders dan Noord-Amerika: A3, A4, B4, B5 Noord-Amerika: LD, LT, LG, ST-R Werkwijze P.37 “Kopiëren op A3-, A4-, B4- en B5-formaat (op multifunctioneel systeem behalve voor Noord-Amerika) / LD-, LT-, LG- en ST-R-formaat (op multifunctioneel systeem voor Noord-Amerika)” Behalve bovenstaande P.41 “Kopiëren op andere dan bovenstaande standaard papierformaten” Envelop P.43 “Een afdruk maken op een envelop” Overige (niet-standaardformaten) P.
2 HET MAKEN VAN AFDRUKKEN y De papierstapel mag niet hoger zijn dan de aanduiding op de papiergeleiders. y Wanneer meer dan één vel wordt gebruikt, waaier de vellen dan goed los voordat deze in de handinvoerbak worden gelegd. Pas op dat u zich hierbij niet in uw vingers snijdt. y Duw het papier niet in de invoeropening van de handinvoer. Dit kan een papierstoring veroorzaken. 3 Pas de papiergeleiders aan de lengte van het papier aan terwijl de tab wordt vastgehouden.
2 HET MAKEN VAN AFDRUKKEN 6 39 Selecteer de papiersoort en druk vervolgens op [OK].
2 HET MAKEN VAN AFDRUKKEN y Indien u een verkeerde papiersoort selecteert, kunnen papierstoringen of aanzienlijke afdrukproblemen ontstaan. y Wanneer u een papiersoort selecteert, kunt u deze bevestigen door middel van de pictogrammen zoals weergegeven in het onderstaande meldingsgebied voor de status van het systeem. Papiersoort NORMAAL Pictogram — Papiersoort Pictogram DIK 3 DUN OHP-FOLIE DIK 1 ENVELOP DIK 2 y Automatisch dubbelzijdig afdrukken kan op normaal papier en DIK 1 worden toegepast.
2 HET MAKEN VAN AFDRUKKEN Kopiëren op andere dan bovenstaande standaard papierformaten 1 Plaats de originelen en het papier zoals beschreven in stap 1 t/m 3 in “Kopiëren op A3-, A4-, B4- en B5-formaat (op multifunctioneel systeem behalve voor Noord-Amerika) / LD-, LT-, LG- en ST-R-formaat (op multifunctioneel systeem voor Noord-Amerika)” ( P.37) 2 Druk op [INSTELLING FORMAAT] op het aanraakscherm. 3 Druk op de toets voor hetzelfde formaat als dat van het papier dat in de handinvoerbak is geplaatst.
2 HET MAKEN VAN AFDRUKKEN 5 Druk op [PAPIERSOORT] als het papier in de handinvoerbak geen normaal papier is. 6 Druk op de toets voor dezelfde papiersoort als het papier in de handinvoerbak. Druk daarna op [OK]. y Indien u een verkeerde papiersoort selecteert, kunnen papierstoringen of aanzienlijke afdrukproblemen ontstaan. y Wanneer u een papiersoort selecteert, kunt u deze bevestigen door middel van de pictogrammen zoals weergegeven in het meldingsgebied voor de status van het systeem.
2 HET MAKEN VAN AFDRUKKEN Een afdruk maken op een envelop y Dit zijn de geschikte envelopformaten: DL (110 mm x 220 mm), COM10 (4 1/8" x 9 1/2"), Monarch (3 7/8" x 7 1/2"), CHO-3 (120 mm x 235 mm), YOU-4 (105 mm x 235 mm) y Voor de aanbevolen enveloppen zie de Snelstartgids. Opmerkingen m.b.t. het gebruik van enveloppen Gebruik de volgende enveloppen niet aangezien die een papierophoping of schade aan het multifunctionele systeem kunnen veroorzaken. 1.
2 HET MAKEN VAN AFDRUKKEN 2 Leg de envelop op een plat en schoon oppervlak en druk er met uw handen op in de richting van de pijl om alle lucht eruit te krijgen. Druk er stevig op om te voorkomen dat de klep omhoog krult. Corrigeer omgebogen hoekjes op de envelop. 3 Beweeg de papieropsluithendel naar de buitenzijde toe. Plaats de envelop met de afdrukzijde onder op de handinvoerbak. 1 Plaats de envelop met de klepzijde aan de voorzijde. Maak geen afdruk op de achterzijde van de envelop.
2 HET MAKEN VAN AFDRUKKEN 6 Druk op de toets voor hetzelfde formaat als dat van de envelop die in de handinvoerbak is geplaatst. 7 Druk op [ANDERS] onder KOPIËREN. De papiersoort wordt automatisch op [ENVELOP] ingesteld. 8 Selecteer naargelang nodig andere kopieerinstellingen en druk vervolgens op de [START] toets op het bedieningspaneel. Het afdrukken begint. De envelop wordt uitgevoerd naar de uitvoerbak van het multifunctionele systeem, zelfs al is er een finisher geïnstalleerd.
2 HET MAKEN VAN AFDRUKKEN Afdrukken met handinvoer op niet-standaard papierformaat U kunt niet-standaard papierformaten gebruiken zoals aan de rechterzijde weergegeven. 148 - 432 mm (5.8" - 17") 100 - 297 mm (3.9" - 11.7") 1 Leg het origineel op de glasplaat. 2 Verplaats de papieropsluithendel naar de buitenzijde toe. Leg papier met de kopieerzijde naar beneden in de handinvoerbak. 1 2 y De papierstapel mag niet hoger zijn dan de aanduiding op de papiergeleiders.
2 HET MAKEN VAN AFDRUKKEN 5 Toets de afmeting in. 1) Druk op [Lengte] en toets de waarde in (100 mm tot 297 mm). 2) Druk op [Breedte] en toets de waarde in (148 mm tot 432 mm). 3) Druk op [OK]. Lengte en breedte worden aangeduid zoals aan de rechterzijde weergegeven: Breedte Lengte Druk, om de eerder opgeslagen afmetingsgegevens op te roepen, op de betreffende toets [GEHEUGEN 1] t/m [GEHEUGEN 4] en druk vervolgens op [OK]. Voor het opslaan in het geheugen van afmetingsgegevens zie: P.
2 HET MAKEN VAN AFDRUKKEN Niet-standaardformaat in het geheugen opslaan 48 1 Ga te werk zoals beschreven in stap 1 t/m 4 in “Afdrukken met handinvoer op nietstandaard papierformaat”( P.46). 2 Sla afmetingen in het geheugen op. 1) 2) 3) 4) Selecteer een gewenst geheugennummer. Druk op [Lengte] en toets de waarde in (100 mm tot 297 mm). Druk op [Breedte] en toets de waarde in (148 mm tot 432 mm). Druk op [OPSLAAN].
2 HET MAKEN VAN AFDRUKKEN 49 Kopiëren met handinvoer
2 HET MAKEN VAN AFDRUKKEN 50 Kopiëren met handinvoer
3. BELANGRIJKSTE KOPIEERFUNCTIES In dit hoofdstuk worden de belangrijkste kopieerfuncties, zoals wijziging van de reproductiefactor, instelling van de sorteerstanden en uitvoering van dubbelzijdig kopiëren, beschreven. Vóór gebruik Kopieerfuncties ............................................................................................... 52 Standaardinstellingen ...........................................................................................................................................
3 BELANGRIJKSTE KOPIEERFUNCTIES Vóór gebruik Kopieerfuncties Standaardinstellingen Dit multifunctionele systeem start op met de “standaardinstellingen” wanneer de stroomvoorziening wordt ingeschakeld. Maar als er nog geen wijziging in instellingen is toegepast, komen de instellingen van het multifunctionele systeem weer op de standaardwaarden te staan wanneer de energiebesparingsstand wordt gewist of de [FUNCTION CLEAR] toets op het bedieningspaneel wordt ingedrukt.
3 BELANGRIJKSTE KOPIEERFUNCTIES 3.BELANGRIJKSTE KOPIEERFUNCTIES Ingestelde functies annuleren Wanneer u een van de instellingen van het menu BEWERKEN wilt annuleren, drukt u op de toets van de gewenste functie. P.89 “BEWERKEN-FUNCTIES” Wanneer u een van de instellingen van het menu BEELD wilt annuleren, moet u de instelwaarde in het instellingenmenu van de gewenste functie resetten. P.
3 BELANGRIJKSTE KOPIEERFUNCTIES Papierselectie Automatische papierselectie (APS) Het multifunctionele systeem detecteert het formaat van het origineel en selecteert automatisch hetzelfde formaat kopieerpapier. Deze functie heet automatische papierselectie (APS). y Voor de origineelformaten die kunnen worden gedetecteerd zie: P.22 “Aanvaardbare originelen” y Sommige origineelformaten kunnen niet met deze functie worden gedetecteerd. Selecteer het gewenste formaat in dat geval handmatig. P.
3 BELANGRIJKSTE KOPIEERFUNCTIES 3.BELANGRIJKSTE KOPIEERFUNCTIES Gewenste papier handmatig selecteren U dient het papier zelf te selecteren als de volgende originelen worden gekopieerd waarvan de formaten niet correct kunnen worden gedetecteerd: y Zeer transparante originelen (bijv. overhead transparanten, calqueerpapier) y Geheel donkere originelen of originelen met donkere randen y Originelen met niet-standaard formaat (bijv.
3 BELANGRIJKSTE KOPIEERFUNCTIES Originelen met verschillende formaten in één keer kopiëren U kunt een set originelen met verschillende formaten met behulp van het automatische documentinvoersysteem (optie) kopiëren. De volgende origineelformaten kunnen worden gecombineerd: Noord-Amerika: LD, LG, LT, LT-R, COMP Anders dan Noord-Amerika: A3, A4, A4-R, B4, B5, FOLIO 1 Vul de papierlade(n) met papier.
3 BELANGRIJKSTE KOPIEERFUNCTIES 3.BELANGRIJKSTE KOPIEERFUNCTIES 4 Druk op [GEMENGDE ORIG. FORMATEN]. 5 Druk op [AMS] om afdrukken te maken op papier van één formaat. Om afdrukken te maken op papier van hetzelfde formaat als de originelen drukt u op [SLUITEN] zodat het menu terugkeert naar het basismenu en druk vervolgens op [APS].
3 BELANGRIJKSTE KOPIEERFUNCTIES Instellen van Modi voor originelen U kunt afdrukken met de optimale afdrukkwaliteit maken door de volgende modi voor uw origineel te selecteren. TEKST/FOTO:Originelen met zowel tekst als foto's TEKST:Originelen met alleen tekst (of tekst en lijntekeningen) FOTO:Originelen met foto's KLEURENDOCUMENT: Originelen in kleur, zoals presentatiedocumenten Wanneer “KLEURENDOCUMENT” is ingesteld, kan de reproductiefactor van 25 tot 400% worden gewijzigd.
3 BELANGRIJKSTE KOPIEERFUNCTIES Densiteitaanpassing Het multifunctionele systeem detecteert het densiteitniveau van originelen en past het densiteitniveau van het gekopieerde beeld automatisch voor een optimaal resultaat aan. Ook kunt u het handmatig aan het gewenste niveau aanpassen. Automatisch instellen (automatische densiteitaanpassing) Druk op [AUTO] op het aanraakscherm. De automatische densiteitaanpassing is standaard ingesteld bij het installeren.
3 BELANGRIJKSTE KOPIEERFUNCTIES Vergroten en verkleinen U kunt de reproductiefactor van gekopieerde beelden als volgt wijzigen: Automatische zoomselectie (AMS): Specificeer vooraf het formaat van het kopieerpapier dat wordt gebruikt. Het multifunctionele systeem bepaalt het origineelformaat en selecteert automatisch de optimale reproductiefactor voor het formaat van het kopieerpapier.
3 BELANGRIJKSTE KOPIEERFUNCTIES 3.BELANGRIJKSTE KOPIEERFUNCTIES 3 Selecteer het gewenste papierformaat en druk vervolgens op [AMS]. y Indien u een ander papierformaat wilt selecteren dan hieronder aangegeven, moet u het formaat als “ANDERS” vastleggen. Zodra u dit formaat heeft vastgelegd, wordt het geactiveerd telkens wanneer u op [ANDERS] op het aanraakscherm drukt. Noord-Amerika: LD, LG, LT, ST Anders dan Noord-Amerika: A3, A4, B4, B5 Voor de werkwijze bij het vastleggen zie: P.
3 BELANGRIJKSTE KOPIEERFUNCTIES Zowel het origineelformaat als het kopieerpapierformaat afzonderlijk specificeren 1 Vul de papierlade(n) met papier. 2 Plaats de originelen. 3 Druk op [ZOOM] op het aanraakscherm. 4 Selecteer de gewenste formaten voor origineel en kopieerpapier. y Indien u een ander formaat wilt selecteren dan hieronder voor origineel en kopieerpapier aangegeven, moet u het formaat als “ANDERS” vastleggen.
3 BELANGRIJKSTE KOPIEERFUNCTIES 3.BELANGRIJKSTE KOPIEERFUNCTIES Papierformaten onder “ANDERS” formaat vastleggen Indien u een ander formaat wilt selecteren dan hieronder voor origineel en kopieerpapier aangegeven, moet u het formaat op de volgende wijze als “ANDERS” vastleggen. Zodra u dit formaat heeft vastgelegd, wordt het geactiveerd telkens wanneer u op [ANDERS] op het aanraakscherm drukt.
3 BELANGRIJKSTE KOPIEERFUNCTIES De reproductiefactor handmatig specificeren 1 Vul de papierlade(n) met papier. 2 Plaats de originelen. 3 Druk op [ZOOM] op het aanraakscherm. 4 Druk op de hieronder weergegeven toetsen voor het selecteren van de gewenste reproductiefactor. [ OMHOOG] en [ OMLAAG] toetsen De reproductiefactor verandert telkens 1% wanneer een van de toetsen wordt ingedrukt. Wanneer een van beide ingedrukt wordt gehouden, wordt de factor automatisch verhoogd resp. verlaagd.
3 BELANGRIJKSTE KOPIEERFUNCTIES 3.BELANGRIJKSTE KOPIEERFUNCTIES 5 Selecteer het gewenste formaat. y Indien u een ander papierformaat wilt selecteren dan hieronder aangegeven, moet u het formaat als “ANDERS” vastleggen. Zodra u dit formaat heeft vastgelegd, wordt het geactiveerd telkens wanneer u op [ANDERS] op het aanraakscherm drukt. Noord-Amerika: LD, LG, LT, ST Anders dan Noord-Amerika: A3, A4, B4, B5 Voor de werkwijze bij het vastleggen zie: P.
3 BELANGRIJKSTE KOPIEERFUNCTIES Selecteren van Afwerkfunctie Afwerkfuncties en als optie leverbare afwerkapparaten Zie onderstaande tabel voor elke afwerkfunctie. Afwerkfunctie Omschrijving Sorteren uit nieten uit Afdrukken worden zonder te sorteren of te nieten uitgevoerd. Sorteren ( Afdrukken worden in dezelfde paginavolgorde als de originelen set voor set uitgevoerd. Groep ( P.69) P.69) Afdrukken worden per pagina gegroepeerd uitgevoerd. Roteren en sorteren ( P.
3 BELANGRIJKSTE KOPIEERFUNCTIES 3.BELANGRIJKSTE KOPIEERFUNCTIES Naam van elk onderdeel van de finishers (optie) MJ-1101 1 6 2 5 3 1. 2. 3. 4. 5. 6. Bovenste kopieopvangbak Onderste kopieopvangbak Secundaire bak Deksel voorzijde Perforatie-unit MJ-6101 Bedieningseenheid voor nieten 1. 2. 3. 4. 5. 6. 7. Bak 1 Secundaire bak Bak 2 Bak voor rughechten Deksel voorzijde Perforatie-unit MJ-6004 Deksel bovenzijde 1. 2. 3. 4. 5. 6.
3 BELANGRIJKSTE KOPIEERFUNCTIES MJ-1031 3 1. Bak 2. Secundaire bak 3. Deksel (nietjesmagazijn) 1 2 Naam van elk onderdeel van de binnenbak (optie) MJ-5004 1 1. Bak 2. Papieropvang 2 MJ-5005 1 1. Bak MJ-5006 1 68 Selecteren van Afwerkfunctie 1.
3 BELANGRIJKSTE KOPIEERFUNCTIES 3.BELANGRIJKSTE KOPIEERFUNCTIES Sorteren/Groep-stand Wanneer u meer dan één set afdrukken maakt, kunnen deze in dezelfde paginavolgorde als die van de originelen worden uitgevoerd. Deze modus heet de sorteren-stand. Afdrukken kunnen ook per pagina gegroepeerd worden uitgevoerd. Deze modus heet de groep-stand.
3 BELANGRIJKSTE KOPIEERFUNCTIES 70 4 Druk op [SORTEREN] of [GROEP]. 5 Selecteer naargelang nodig andere kopieerinstellingen en druk vervolgens op de [START] toets op het bedieningspaneel.
3 BELANGRIJKSTE KOPIEERFUNCTIES 3.BELANGRIJKSTE KOPIEERFUNCTIES Stand roteren en sorteren Wanneer u meer dan één set afdrukken maakt, kan elke set bovenop een andere set afwisselend in staande en liggende richting worden uitgevoerd. Deze modus heet roteren en sorteren. Gebruik 2 papierladen en 2 stapels papier van hetzelfde formaat. Leg één stapel papier in staande richting in de ene papierlade en de andere stapel in liggende richting in de andere lade voordat met kopiëren wordt begonnen.
3 BELANGRIJKSTE KOPIEERFUNCTIES Stand nieten en sorteren Wanneer meer dan één set afdrukken wordt gemaakt, kan het gekopieerde papier automatisch set voor set geniet worden. Deze modus heet nieten en sorteren. Als de finisher MJ-1101 (optie) of de finisher voor rughechten MJ-1024/ 1025 (optie) wordt gebruikt, kunt u uit 3 verschillende posities voor de nietjes kiezen.
3 BELANGRIJKSTE KOPIEERFUNCTIES 3.BELANGRIJKSTE KOPIEERFUNCTIES Alleen [VOORZIJDE NIETEN] kan worden geselecteerd als de zwevende finisher MJ-1031 (optie) is geïnstalleerd. 5 Selecteer naargelang nodig andere kopieerinstellingen en druk vervolgens op de [START] toets op het bedieningspaneel. Wanneer het aantal vellen het maximale aantal mogelijke vellen voor nieten overschrijdt, schakelt het multifunctionele systeem automatisch over op de Sorteren-stand.
3 BELANGRIJKSTE KOPIEERFUNCTIES Brochure sorteren / Rughechten U kunt meer dan één origineel kopiëren en de afdrukken tot een boekje samenvoegen. Deze modus heet Brochure sorteren. U kunt het gekopieerde boekje laten vouwen en in het midden nieten. Deze modus heet rughechten.
3 BELANGRIJKSTE KOPIEERFUNCTIES 3.BELANGRIJKSTE KOPIEERFUNCTIES 2 Selecteer het gewenste papierformaat. 3 Haal voor het hechten van grote formaten zoals A3, B4, LD en LG met de finisher voor rughechten MJ1024 (optie), de opvang van de bak voor rughechten af. 4 Plaats de originelen. 5 Druk op [FINISHING] op het aanraakscherm. 6 Selecteer de gewenste modus: [BROCHURE], [BROCHURE & RUGHECHTEN] en [RUGHECHTEN].
3 BELANGRIJKSTE KOPIEERFUNCTIES 7 Selecteer naargelang nodig andere kopieerinstellingen en druk vervolgens op de [START] toets op het bedieningspaneel. Eisen met betrekking tot rughechten Finisher voor rughechten MJ-1024 Papierformaat Papiergewicht *1 64 - 80 g/m2 (17 - 20 lb. Bond) A3, A4-R, B4, LD, LT-R, LG 81 - 105 g/m2 (21 - 28 lb.
3 BELANGRIJKSTE KOPIEERFUNCTIES 3.BELANGRIJKSTE KOPIEERFUNCTIES Perforatie-modus Afdrukken kunnen worden geperforeerd als de perforatie-unit (optie) op een finisher is geïnstalleerd. y Er is papier waarvan het formaat welke van A3, A4, A4-R, B4, B5, B5-R, FOLIO, LD, LG, LT, LT-R, ST-R en COMP ook is, en waarvan het gewicht 64 tot 256 g/m2 (17 lb. Bond tot 140 lb. Index) (MJ-6101/MJ-6004) is en 64 tot 80 g/ m2 (17 tot 20 lb. Bond) (MJ-6005), beschikbaar.
3 BELANGRIJKSTE KOPIEERFUNCTIES Handmatig nieten U kunt afdrukken handmatig nieten zonder te kopiëren. Dit is handig wanneer u vóór het kopiëren vergeten bent de modus nieten en sorteren in te stellen of wanneer u originelen wilt nieten. (Alleen mogelijk met de finisher MJ-1101) Maximaal aantal vellen voor handmatig nieten Papiergewicht Papierformaat g/m2 64 - 80 (17 - 20 lb. Bond) 81 - 90 g/m2 (21 - 24 lb. Bond) 91 - 105 g/m2 (25 - 28 lb.
3 BELANGRIJKSTE KOPIEERFUNCTIES Dubbelzijdig kopiëren U kunt een enkelzijdig origineel naar een dubbelzijdige afdruk kopiëren en omgekeerd of een dubbelzijdig origineel naar een dubbelzijdige afdruk. Dit is handig wanneer u papier wilt besparen of wanneer u een boek met behoud van de juiste paginavolgorde wilt kopiëren. Enkelzijdig origineel -> enkelzijdige afdruk ( P.80) Dubbelzijdig origineel -> enkelzijdige afdruk ( P.80) Enkelzijdig origineel -> dubbelzijdige afdruk ( P.
3 BELANGRIJKSTE KOPIEERFUNCTIES Een enkelzijdige afdruk maken Bij het kopiëren van dubbelzijdige staande originelen die maar aan één zijde van het papier naar links/rechts zijn geopend, moet de functie beeldrichting in het menu BEWERKEN worden gebruikt zodat alle afdrukken in de juiste richting worden uitgevoerd. P.122 “Beeldrichting” “AFDRUKRICHTING” instellen 80 Geen instelling 1 Plaats papier in de papierlade(n). 2 Plaats de originelen. 3 Druk op [2-ZIJDIG] op het aanraakscherm.
3 BELANGRIJKSTE KOPIEERFUNCTIES 3.BELANGRIJKSTE KOPIEERFUNCTIES Een dubbelzijdige afdruk maken Wanneer enkelzijdige staande originelen in liggende richting zijn geplaatst en op beide zijden van het papier worden gekopieerd, zijn de afdrukken meestal in naar boven/beneden geopende richting. U kunt afdrukken maken in naar links/rechts geopende richting met behulp van de functie beeldrichting. P.122 “Beeldrichting” “AFDRUKRICHTING” instellen Geen instelling 1 Plaats papier in de papierlade(n).
3 BELANGRIJKSTE KOPIEERFUNCTIES Een dubbelzijdige afdruk van een boek maken U kunt dubbelzijdige afdrukken maken van boeken of catalogi in de juiste paginavolgorde. A4-, B5- en LT-formaat zijn mogelijk. 82 1 Plaats papier in de papierlade(n). 2 Druk op [2-ZIJDIG] op het aanraakscherm. 3 Druk op [BOEK -> 2] op het aanraakscherm. Stel bij gebruik van de functie kopiëren met handinvoer het papierformaat in.
3 BELANGRIJKSTE KOPIEERFUNCTIES 3.BELANGRIJKSTE KOPIEERFUNCTIES 4 Selecteer de boekkopieerfunctie. Voorbeeld: Wanneer pagina 2 t/m 6 van een boek geopend naar links moeten worden gekopieerd, selecteer [LINKS -> LINKS]. 2 3 6 7 5 Druk op de toets voor de papierlade met het gewenste papierformaat. 6 Selecteer naargelang nodig andere kopieerinstellingen. 7 Leg het origineel op de glasplaat. Alleen A4-, B5- en LT-formaat zijn mogelijk.
3 BELANGRIJKSTE KOPIEERFUNCTIES Plaats geen zware voorwerpen (4 kg of meer) op de glasplaat voor originelen en oefen er geen kracht op uit. Door het breken van de glasplaat kunt u letsel oplopen. 8 Druk op de [START] toets op het bedieningspaneel. Leg de volgende op de glasplaat voor originelen zodra de pagina's zijn gescand. Herhaal deze stap totdat alle gewenste pagina's zijn gescand.
3 BELANGRIJKSTE KOPIEERFUNCTIES Opslaan als bestand uitvoeren Met de functie Opslaan als bestand kunt u de gekopieerde gegevens in de gedeelde map van de harde schijf van het multifunctionele systeem of een opgegeven pc in een netwerk opslaan. De gegevens kunnen als PDF-, TIFF- of XPSbestand worden opgeslagen. y De functie “OPSLAAN ALS BESTAND” is alleen beschikbaar als de scannerset of printer-/scannerset (beide optioneel) is geïnstalleerd.
3 BELANGRIJKSTE KOPIEERFUNCTIES 4 Druk op de desbetreffende toetsen voor de invoer van informatie over de gegevens die moeten worden opgeslagen. Druk daarna op [OK]. DOC.NAAM: Druk hierop voor de weergave van het bedieningspaneel op het scherm. Toets daarna de doc.naam met maximaal 45 letters in. MFP LOKAAL: Druk hierop om de gegevens in de gedeelde map van het multifunctionele systeem op te slaan.
3 BELANGRIJKSTE KOPIEERFUNCTIES 3.BELANGRIJKSTE KOPIEERFUNCTIES 7 Als alle originelen zijn gescand, drukt u op [GEREED] op het aanraakscherm. Het kopiëren en opslaan begint. Instellen van gedeelde map Wanneer een gebruiker die gemachtigd is een gedeelde map te wijzigen, op [NETWERK 1] of [NETWERK 2] heeft gedrukt, verschijnt het menu voor het opgeven van een index. De instellingsitems verschillen afhankelijk van het te gebruiken bestandsoverdrachtsprotocol.
3 BELANGRIJKSTE KOPIEERFUNCTIES SMB Door op een van de onderstaande toetsen te drukken verschijnt het toetsenbord op het scherm. Voer in met de toetsen op het aanraakscherm of de numerieke toetsen op het bedieningspaneel. Druk na beëindiging van de invoer op [OK]. NETWERKPAD: Druk hierop voor de invoer van een netwerkpad voor de map waarin de gegevens moeten worden opgeslagen. GEBR.NAAM LOGIN: Druk hierop voor de invoer van een gebruikersnaam voor de toegang tot de netwerkmap. Voer zoals vereist in.
4. BEWERKEN-FUNCTIES In dit hoofdstuk wordt het gebruik van de verschillende kopieerfuncties in het menu BEWERKEN beschreven. Weergave Menu BEWERKEN ................................................................................................ 90 Beeld verplaatsen................................................................................................................... 91 Marge boven/onder of marge links/rechts creëren ............................................................................
4 BEWERKEN-FUNCTIES Weergave Menu BEWERKEN U kunt het menu BEWERKEN oproepen door te drukken op het tabblad [BEWERKEN] op het aanraakscherm wanneer u de verschillende bewerken-functies wilt gebruiken. Het menu BEWERKEN omvat 2 pagina's. Om tussen de pagina's te schakelen druk op 90 Weergave Menu BEWERKEN of .
4 BEWERKEN-FUNCTIES Beeld verplaatsen U kunt een inbindruimte creëren door een beeld naar de linker-, rechter-, boven- of onderzijde van het kopieerpapier te verplaatsen. Deze functie heet “beeld verplaatsen”. Dit is handig wanneer u een stapel papier na het kopiëren wilt perforeren of nieten. Met deze functie kunt u eenvoudig een inbindruimte creëren wanneer u een boek op beide zijden van het papier kopieert.
4 BEWERKEN-FUNCTIES 5 Stel de breedte van de inbindruimte in. 1) Druk op [VOOR] en stel de breedte van de inbindruimte aan de voorzijde in met behulp van [ 2 mm] en [ 100 mm]. 2) Druk op [ACHTER] en stel de breedte van de inbindruimte aan de achterzijde in met behulp van [ 2 mm] en [ 100 mm]. 3) Druk op [OK]. Let op dat bij dubbelzijdig kopiëren een inbindruimte links/rechts aan de tegenoverliggende zijde op de achterzijde van het papier wordt gecreëerd.
4 BEWERKEN-FUNCTIES 4.BEWERKEN-FUNCTIES Inbindruimte creëren U kunt eenvoudig een inbindruimte creëren bij het kopiëren van een boek op beide zijden van het papier. P.82 “Een dubbelzijdige afdruk van een boek maken” 1 Druk op [BEELD VERPL.] in het menu BEWERKEN. 2 Druk op [BOEK]. 3 Stel de breedte van de inbindruimte in. 1) Druk op [ 2 mm] of [ 2) Druk op [OK]. 30 mm].
4 BEWERKEN-FUNCTIES 4 Druk op [OK]. Selecteer ook “Boek -> dubbelzijdige afdruk". P.
4 BEWERKEN-FUNCTIES Rand wissen U kunt de rand van een gekopieerd beeld wit maken wanneer een schaduwachtig donker gedeelte erop verschijnt. Deze functie heet “rand wissen”. Dit is handig wanneer u het gekopieerde beeld netjes en schoon wilt maken als de rand van het origineel vuil of gescheurd is. Alleen originelen met standaardformaat zijn mogelijk. 1 Vul de papierlade(n) met papier. 2 Plaats de originelen. 3 Druk op [RAND WISSEN] in het menu BEWERKEN.
4 BEWERKEN-FUNCTIES Boekmidden wissen U kunt het midden van het gekopieerde beeld wit maken wanneer een schaduwachtig gedeelte erop verschijnt. Deze functie heet “boekmidden wissen”. Dit is handig bij het kopiëren van boeken. Boekmidden wissen instellen 96 1 Vul de papierlade(n) met papier. 2 Selecteer de papierlade voor het gewenste papierformaat. 3 Druk op [WISSEN FOR BLANK] in het menu BEWERKEN. Stel bij gebruik van de functie kopiëren met handinvoer het papierformaat in.
4 BEWERKEN-FUNCTIES 4.BEWERKEN-FUNCTIES 4 Stel de breedte van het te wissen gedeelte in. 5 Leg het origineel op de glasplaat. 1) Druk op [ 2 mm] of [ 2) Druk op [OK]. 50 mm]. Plaats het origineel met de onderzijde naar u toe gekeerd en leg het midden ervan op de gele lijn onder de glasplaat. Plaats geen zware voorwerpen (4 kg of meer) op de glasplaat voor originelen en oefen er geen kracht op uit. Door het breken van de glasplaat kunt u letsel oplopen.
4 BEWERKEN-FUNCTIES Dubbele pagina U kunt de 2 tegenoverliggende pagina's van een boek of 2 originelen naast elkaar op 2 aparte vellen of op beide zijden van 1 vel papier kopiëren. Deze functie heet “dubbele pagina”. U hoeft het origineel op de glasplaat niet te verschuiven. -12- -13- -12- -13- Alleen A4-, B5- en LT-formaat zijn mogelijk. 98 1 Vul de papierlade(n) met papier. 2 Druk op [TWEE PAG.] in het menu BEWERKEN. 3 Druk op [1-ZIJDIG] of [2-ZIJDIG].
4 BEWERKEN-FUNCTIES 4.BEWERKEN-FUNCTIES 5 Druk op het tabblad [BASIS] voor de weergave van het basismenu en selecteer vervolgens A4, B5 of LT als kopieerpapierformaat. Stel bij gebruik van de functie kopiëren met handinvoer het papierformaat in. 6 Open de gewenste pagina en leg deze op de glasplaat voor originelen. Plaats het origineel met de onderzijde naar u toe gekeerd en leg het midden ervan op de gele lijn onder de glasplaat.
4 BEWERKEN-FUNCTIES 2IN1/4IN1 U kunt 2 of 4 originelen op 1 vel papier kopiëren door deze te verkleinen. Deze functie heet “2IN1” of “4IN1”. Bij het gebruik van deze functie in combinatie met dubbelzijdig kopiëren kunt u in totaal 8 afdrukken op 1 vel papier maken. De onderstaande afbeeldingen tonen hoe u de afdrukken kunt rangschikken.
4 BEWERKEN-FUNCTIES 4.BEWERKEN-FUNCTIES 1 Vul de papierlade(n) met papier. Stel bij gebruik van de functie kopiëren met handinvoer het papierformaat in. Als u een papierformaat selecteert dat afwijkt van dat van het origineel, druk dan op [ZOOM] in het basismenu. Selecteer daarna het gewenste papierformaat en druk op [AMS] in het onderstaande menu. 2 Plaats de originelen. 3 Druk op [2IN1 / 4IN1] in het menu BEWERKEN. 4 Voer instelling 2IN1 / 4IN1 uit.
4 BEWERKEN-FUNCTIES 5 Selecteer naargelang nodig andere kopieerinstellingen en druk vervolgens op de [START] toets op het bedieningspaneel. Als de originelen op het automatische documentinvoersysteem (optie) zijn geplaatst, start het scannen en kopiëren. Voer stap 6 en 7 uit als deze op de glasplaat voor originelen zijn geplaatst. 6 Plaats het volgende origineel en druk vervolgens op de [START] toets op het bedieningspaneel. Het scannen van het volgende origineel begint.
4 BEWERKEN-FUNCTIES Brochure sorteren U kunt meer dan één origineel kopiëren in boekpaginavolgorde. Deze modus heet Brochure sorteren. Deze functie kan worden gecombineerd met het vouwen en nieten van de gekopieerde pagina's in het midden. Deze modus heet Brochure sorteren & rughechten. Brochure sorteren 1 6 2 7 4 3 2 12 9 11 Brochure sorteren & rughechten 1 2 6 3 7 12 Brochure sorteren kan ook in het basismenu worden geselecteerd. Zie de volgende pagina voor meer informatie: P.
4 BEWERKEN-FUNCTIES 4 Druk op [BROCHURE] in het menu BEWERKEN. 5 Stel de functie rughechten en de inbindruimte naar wens in. 1) Druk bij de instelling van rughechten op [NIETEN AAN]. Hoeft er niet geniet te worden, druk dan op [NIETEN UIT]. 2) Druk op [ 2 mm] of [ 30 mm] voor de instelling van de breedte van de inbindruimte. 3) Druk op [OK]. Voor het maximale aantal mogelijke vellen voor rughechten zie: P.
4 BEWERKEN-FUNCTIES Beeld Bewerken U kunt de verschillende hieronder weergegeven bewerken-functies voor gescande beelden selecteren. Trimmen: U kunt een bepaald gebied van een origineel selecteren en alleen dit kopiëren. Maskeren: U kunt een bepaald gebied van een origineel maskeren en alleen het ongemaskeerde gebied kopiëren. Spiegelbeeld: U kunt een pagina in spiegelbeeld afdrukken. Negatief/positief-omkering: U kunt het zwart en wit van een pagina omkeren.
4 BEWERKEN-FUNCTIES 3 Druk op [TRIM] of [MASK]. 4 Leg het origineel met de af te drukken zijde naar boven op de glasplaat. Plaats het met de onderzijde naar u toe gekeerd. Plaats de linkerbovenhoek op die van de glasplaat zodat het origineel tegen de aanleglijst ligt. Plaats geen zware voorwerpen (4 kg of meer) op de glasplaat voor originelen en oefen er geen kracht op uit. Door het breken van de glasplaat kunt u letsel oplopen.
4 BEWERKEN-FUNCTIES 4.BEWERKEN-FUNCTIES 6 Toets de afgelezen waarden in. 1) Druk op [X1], [X2], [Y1] en [Y2] en toets vervolgens de bijbehorende afgelezen waarden in. 2) U kunt maximaal 4 gebieden op 1 pagina aangeven. Als u meer dan één gebied wilt aangeven, druk dan op of om van gebied te wisselen en toets vervolgens de bijbehorende waarden in. 3) Druk op [OK] nadat u alle gebieden hebt aangegeven. 7 Leg het origineel weer op de glasplaat met de af te drukken zijde naar beneden.
4 BEWERKEN-FUNCTIES Spiegelbeeld / Negatief/positief-omkering U kunt een pagina zoals een spiegel (spiegelbeeld) omkeren of u kunt het zwart en wit van een pagina omkeren (negatief/ positief-omkering). Spiegelbeeld 108 Negatief/positief-omkering 1 Vul de papierlade(n) met papier. 2 Plaats de originelen. 3 Druk op [BEWERKEN] in het menu BEWERKEN. 4 Druk op [SPIEGEL] of [NEG/POS].
4 BEWERKEN-FUNCTIES XY-zoom U kunt de reproductiefactor zowel in verticale als in horizontale richting afzonderlijk wijzigen. Deze functie heet “XY-zoom”. 100% 200% 100% 200% De reproductiefactor kan worden ingesteld van 25 tot 400%. In de volgende gevallen is dit bereik echter 25 tot 200%. y Wanneer de modus voor originelen KLEURENDOCUMENT is y Wanneer het origineel op het automatische documentinvoersysteem (optie) is geplaatst 1 Vul de papierlade(n) met papier. 2 Plaats de originelen.
4 BEWERKEN-FUNCTIES Kaftblad U kunt een speciale papiersoort zoals gekleurd papier voor het voorkaft of het achterkaft toevoegen. Deze functie heet “kaftblad”. De modus kaftblad heeft de volgende 4 mogelijkheden: 3 2 1 BLANCO VOORKAFT: Voegt een leeg vel als voorkaft toe. RE P 20 ORT 03 3 2 1 RE P 20 ORT 03 GEKOPIEERD VOORKAFT: Voegt een gekopieerd vel als voorkaft toe. 3 2 1 BEIDE BLANCO: Voegt 2 blanco pagina's als voorkaft en achterkaft toe.
4 BEWERKEN-FUNCTIES 4.BEWERKEN-FUNCTIES 3 Plaats de originelen. 4 Druk op [VOORBLAD] in het menu BEWERKEN. 5 Selecteer de gewenste kaftbladen-functie. Bij het plaatsen ervan op de glasplaat voor originelen moet dit vanaf de eerste pagina gebeuren. Wanneer [GEKOPIEERD VOORKAFT] of [GEKOPIEERD VOORKAFT BLANCO ACHTERKAFT] en [1->2 DUBBELZIJDIG] (dubbelzijdig kopiëren) gelijktijdig worden geselecteerd, is het voorkaft een enkelzijdige afdruk.
4 BEWERKEN-FUNCTIES 7 Selecteer naargelang nodig andere kopieerinstellingen en druk vervolgens op de [START] toets op het bedieningspaneel. Als de originelen op het automatische documentinvoersysteem (optie) zijn geplaatst, begint het scannen en kopiëren. Voer na het plaatsen op de glasplaat voor originelen stap 8 en 9 uit. 8 Plaats het volgende origineel en druk vervolgens op de [START] toets op het bedieningspaneel. Het scannen van het volgende origineel begint.
4 BEWERKEN-FUNCTIES Invoegvel U kunt een speciale papiersoort zoals gekleurd papier bij de gewenste pagina invoegen. Deze functie heet “invoegvel”. U kunt maximaal 2 soorten vellen voor in totaal 50 pagina's invoegen. De stand invoegen speciaal tussenlegvel heeft de volgende 2 mogelijkheden: 1 2 3 4 RE P 20 ORT 03 RE P 20 ORT 03 4 3 2 1 KOPIE: Voegt een gekopieerd vel in plaats van de aangegeven pagina in. 3 2 1 BLANCO: Voegt een leeg vel vóór de aangegeven pagina in.
4 BEWERKEN-FUNCTIES 5 Druk op [KOPIE] of [BLANK]. 6 Selecteer de pagina waarbij het invoegvel wordt ingevoegd. 1) Selecteer het soort invoegvel ([TUSSENLEG LADE 1] of TUSSENLEG LADE 2]). 2) Toets paginanummers (1 tot 1000) in waar de invoegvellen zullen worden ingevoegd en druk vervolgens op [SET]. Herhaal stap 1) en 2) indien u invoegvellen bij meer dan één pagina wilt invoegen. 3) Druk op [OK] nadat u de paginanummers hebt ingetoetst.
4 BEWERKEN-FUNCTIES 4.BEWERKEN-FUNCTIES 8 Selecteer naargelang nodig andere kopieerinstellingen en druk vervolgens op de [START] toets op het bedieningspaneel. Als de originelen op het automatische documentinvoersysteem (optie) zijn geplaatst, begint het scannen en kopiëren. Voer na het plaatsen op de glasplaat voor originelen stap 9 en 10 uit. 9 Plaats het volgende origineel en druk vervolgens op de [START] toets op het bedieningspaneel. Het scannen van het volgende origineel begint.
4 BEWERKEN-FUNCTIES Tijdstempel U kunt de datum en de tijd op het kopieerpapier afdrukken. Onderaan op een staande afdruk Bovenaan op een liggende afdruk MM.DD.YYYY 14:54 MM.DD.YYYY 14:54 116 1 Vul de papierlade(n) met papier. 2 Plaats de originelen. 3 Druk op [TIJDSTEMPEL] in het menu BEWERKEN. 4 Selecteer de richting en de plaats van de tijdstempel. 5 Selecteer naargelang nodig andere kopieerinstellingen en druk vervolgens op de [START] toets op het bedieningspaneel.
4 BEWERKEN-FUNCTIES Paginanummer U kunt een paginanummer op het kopieerpapier afdrukken. Middenonder op een staande afdruk Rechtsboven op een liggende afdruk 1 2 3 1 2 3 1 Vul de papierlade(n) met papier. 2 Plaats de originelen. 3 Druk op [PAGINANUMMER] in het menu BEWERKEN. 4 Selecteer de richting en de plaats van een paginanummer. 1) Selecteer de richting ([KORTE ZIJDE] of [LANGE ZIJDE]). 2) Selecteer de plaats ([LINKSBOVEN], [MIDDEN BOVEN], enz.).
4 BEWERKEN-FUNCTIES 118 5 Geef de pagina op waarop de nummering moet beginnen. 6 Selecteer naargelang nodig andere kopieerinstellingen en druk vervolgens op de [START] toets op het bedieningspaneel. 1) Toets het paginanummer in. 2) Druk op [OK].
4 BEWERKEN-FUNCTIES Taakopbouw U kunt meerdere stapels originelen waarvan de instellingen verschillend zijn, scannen en daarna in één keer kopiëren of opslaan. Deze functie heet “taakopbouw”. Bijvoorbeeld tekstfragmenten (in de TEKST-stand) en foto's in tijdschriften (in de FOTO-stand) in A3-formaat en foto's in A4-formaat kunnen met de optimale instelling voor elk origineel worden gescand en in één keer worden gekopieerd. y Er kunnen maximaal 1000 pagina's originelen in één keer worden gekopieerd.
4 BEWERKEN-FUNCTIES 2 Druk op [OK]. Taakopbouw is nu ingesteld en de onderstaande melding verschijnt. 3 Plaats de eerste stapel originelen en selecteer daarna de instellingen. y Denk eraan dat bij het plaatsen van het origineel op de glasplaat 1 pagina overeenkomt met 1 taak. y Zie voor het plaatsen van originelen met verschillende formaten op het automatische documentinvoersysteem (optie): P.
4 BEWERKEN-FUNCTIES 4.BEWERKEN-FUNCTIES 4 Druk op de [START] toets op het bedieningspaneel. 5 Plaats de volgende stapel originelen en selecteer daarna de instellingen. Het scannen begint. Wanneer het scannen van alle originelen is voltooid, verschijnt de onderstaande melding. Herhaal stap 4 en 5 totdat alle gewenste pagina's zijn gescand. Indien u geen instellingen wijzigt, zijn die voor de laatste taak van toepassing.
4 BEWERKEN-FUNCTIES Beeldrichting Wanneer u enkelzijdige staande originelen naar dubbelzijdige afdruk kopieert terwijl deze in liggende richting worden geplaatst, zijn de gekopieerde pagina's normaal gesproken “naar boven geopend”. Met deze functie kan dit worden gewijzigd in “naar links geopend”. Deze functie heet “beeldrichting”.
4 BEWERKEN-FUNCTIES 4.BEWERKEN-FUNCTIES 5 Druk op [OK]. Beeldrichting is nu ingesteld. 6 Selecteer naargelang nodig andere kopieerinstellingen en druk vervolgens op de [START] toets op het bedieningspaneel.
4 BEWERKEN-FUNCTIES Boek - kalender Met betrekking tot de richting van originelen of gekopieerde beelden wordt “naar links geopend” “boek” en “naar boven geopend” “kalender" genoemd. Met deze functie kunt u dubbelzijdige originelen naar dubbelzijdige afdruk kopiëren waarbij alleen de achterzijde van de gekopieerde pagina 180° wordt gedraaid zodat u “boek” originelen naar “kalender” kunt kopiëren en omgekeerd. 1 Vul de papierlade(n) met papier. 2 Plaats de originelen.
4 BEWERKEN-FUNCTIES ADF -> SADF U kunt de invoermodus bij gebruik van het automatische documentinvoersysteem (optie) van “automatisch documentinvoersysteem (ADF)” naar “enkelvoudige invoer (SADF)” omschakelen. De papierinvoermodus heeft de volgende 2 functies: Automatisch documentinvoersysteem (continue invoer): Continue invoer van originelen bij het indrukken van de [START] toets op het bedieningspaneel terwijl originelen op het automatische documentinvoersysteem (optie) worden geplaatst.
4 BEWERKEN-FUNCTIES 5 Plaats de originelen vel voor vel op het automatische documentinvoersysteem (optie). Het origineel wordt automatisch in het automatische documentinvoersysteem (optie) getrokken, waarna het onderstaande menu verschijnt. Herhaal stap 5 voor een volgend origineel. Het geplaatste origineel wordt automatisch in het automatische documentinvoersysteem (optie) getrokken, zelfs wanneer u niet op [JA] op het aanraakscherm drukt.
4 BEWERKEN-FUNCTIES Geen blanco pagina U kunt blanco pagina's van de gescande originelen verwijderen voordat het kopiëren begint. Deze functie heet “geen blanco pagina”. y Deze functie detecteert blanco pagina's van de onderstaande originelen mogelijk niet op de juiste wijze: - Halftoon-originelen - Originelen met bijna blanco pagina's (bijv.
4 BEWERKEN-FUNCTIES 5 Selecteer naargelang nodig andere kopieerinstellingen en druk vervolgens op de [START] toets op het bedieningspaneel. Het scannen en kopiëren begint. Er verschijnt gedurende ca. 5 seconden een melding met het aantal blanco pagina's.
4 BEWERKEN-FUNCTIES Buitenkant wissen U kunt een schaduwachtig donker gedeelte aan de buitenzijde van het gekopieerde beeld wit maken; deze 'schaduw' komt door de tussenruimte tussen de glasplaat voor originelen en de witte plaat. Deze functie heet “buitenkant wissen”. Dit is handig wanneer u dikke originelen zoals boekjes op de glasplaat voor originelen plaatst.
4 BEWERKEN-FUNCTIES 4 Stel “buitenkant wissen” in. 1) Stel de breedte van de rand rondom het origineel naar wens in door op of te drukken. Wanneer u naar de zijde instelt, wordt het gebied dat als niet tot het origineel behorend moet worden gedetecteerd verbreed. Wanneer u naar de zijde instelt, wordt het gebied dat als niet tot het origineel behorend moet worden gedetecteerd versmald. 2) Druk op [OK]. 5 Leg het origineel op de glasplaat.
5. BEELDCORRECTIE In dit hoofdstuk worden de beeldcorrectiefuncties van dit multifunctionele systeem beschreven. Weergave Menu BEELD....................................................................................................... 132 Gebruik van de beeldcorrectiefuncties .............................................................................. 133 Achtergrondinstelling ..............................................................................................................................
5 BEELDCORRECTIE Weergave Menu BEELD U kunt het menu BEELD oproepen door te drukken op het tabblad [BEELD] op het aanraakscherm wanneer u de verschillende beeldcorrectiefuncties wilt gebruiken.
5 BEELDCORRECTIE Gebruik van de beeldcorrectiefuncties Achtergrondinstelling Deze functie dient voor de aanpassing van de densiteit van de achtergrond van het origineel. Hiermee wordt voorkomen dat de achterzijde van een dubbelzijdig origineel op de voorzijde ervan zichtbaar wordt. Vóór Achter Aangepast voor een lichtere achtergrond Niet aangepast Deze functie kan niet samen met de automatische densiteitaanpassing worden gebruikt. P.
5 BEELDCORRECTIE Scherpte Deze functie dient voor het verscherpen of vervagen van de contouren van het beeld. 1 Druk op [SCHERPTE] in het menu BEELD. 2 Druk op [ZACHT] of [SCHERP] voor de instelling van de scherpte en druk vervolgens op [OK]. Wanneer het scherpteniveau naar de [ZACHT] zijde wordt ingesteld, worden de gevlamde randen op de afgedrukte foto's enz. verzacht. Bij de instelling naar de [SCHERP] zijde worden de letters en dunne lijnen scherper.
6. TEMPLATES In dit hoofdstuk wordt het gebruik van templates beschreven. Templates.............................................................................................................................. 136 Weergave templatemenu ...................................................................................................................................136 Gebruik van “Praktische templates" .......................................................................................................
6 TEMPLATES Templates U kunt een template aanmaken met meerdere functies die vaak worden gebruikt zodat deze desgewenst kan worden opgevraagd en u niet telkens ingewikkelde instellingen hoeft uit te voeren. Templates kunnen worden gebruikt voor het kopiëren, het scannen en het versturen van een fax-bericht. Fax-functies zijn alleen beschikbaar als de fax-unit (optie) is geïnstalleerd. 2009.5.5 + = 1 1 Draaien_Afdruk Tijd_Pagina 2009.5.5 + 2009.5.5 2009.5.
6 TEMPLATES 6.TEMPLATES Gebruik van “Praktische templates" Dit multifunctionele systeem beschikt over 12 standaardtemplates, die direct kunnen worden gebruikt. Deze zijn vastgelegd onder groepsnummer 001 “Praktische templates”. Voor het oproepen ervan zie: P.
6 TEMPLATES Templates met e-Filing-functies Toets Functie *1 Modus voor originelen: TEKST/FOTO Enkelzijdig/dubbelzijdig: 1 -> 1 ENKELZIJDIG Opslagmethode: opgeslagen in de e-Filing-box (openbare box) Modus voor originelen: TEKST/FOTO Enkelzijdig/dubbelzijdig: 2 -> 1 DUBBELZ. NAAR 2 ENKELZ.
6 TEMPLATES Templates vastleggen Templates moeten worden vastgelegd in de “openbare templategroep” of in de “persoonlijke groepen”. U kunt een wachtwoord instellen om het gebruik van vastgelegde templates te beperken. Openbare templategroep: Dit is de standaardinstelling. Templates in deze groep kunnen door iedereen worden gebruikt. Het is handig meerdere combinaties van functies die vaak in het gehele kantoor of in een afdeling worden gebruikt vast te leggen.
6 TEMPLATES 4 Druk op [WACHTWOORD]. Het toetsenbord op het scherm verschijnt. 5 Geef het Admin-wachtwoord op met behulp van het toetsenbord op het scherm of de numerieke toetsen. Druk daarna op [OK]. Wanneer drie keer achter elkaar het verkeerde Admin-wachtwoord wordt ingevoerd, wordt het multifunctionele systeem gedurende 30 seconden geblokkeerd. Wacht in dat geval totdat het wordt gedeblokkeerd en toets het juiste wachtwoord in. 6 Selecteer een template. 1) Druk op een lege toets.
6 TEMPLATES 6.TEMPLATES 7 Voer de benodigde gegevens over de template in. NAAM 1 & 2: Toets de naam van de template in. NAAM 1 verschijnt boven de templatetoets en NAAM 2 verschijnt eronder. Voer ten minste een ervan in. Wanneer u op een van beide drukt, verschijnt het toetsenbord op het scherm. Toets maximaal 11 letters in. De onderstaande tekens mogen niet worden gebruikt. ;:/\"=|*<>?+[],. GEBRUIKERSNAAM: Toets zo nodig de naam van de template-eigenaar in.
6 TEMPLATES Zelfs wanneer de automatische startfunctie is ingeschakeld, moet u in de volgende gevallen de gebruikersnaam en het wachtwoord opgeven voor het oproepen van de template. Informeer bij uw beheerder voor meer informatie over de gebruikersverificatie voor Scannen naar e-mailbericht en de gebruikersbeheerfunctie.
6 TEMPLATES 6.TEMPLATES 3 Voer de benodigde gegevens over de groep in. NAAM: Toets de naam van de groep in. Wanneer u erop drukt, verschijnt het toetsenbord op het scherm. Toets maximaal 20 letters in. Zorg ervoor dat deze wordt ingevoerd. GEBRUIKERSNAAM: Toets zo nodig de naam van de groepseigenaar in. Wanneer u erop drukt, verschijnt het toetsenbord op het scherm. Toets maximaal 30 letters in.
6 TEMPLATES 2 Druk op [TEMPLATE] op het aanraakscherm. Het templatemenu verschijnt. 3 Selecteer de gewenste groep. 1) Druk op het tabblad [REGISTRATIE]. 2) Druk op de toets van de gewenste groep. 3) Druk op [OPENEN]. Tussen menu's schakelen y Druk op of . y Toets het groepsnummer in (3 cijfers). 4 Toets het wachtwoord voor de geselecteerde groep in. (Als er geen wachtwoord is ingesteld, gaat u verder met stap 5.) 1) Toets het wachtwoord in. 2) Druk op [OK].
6 TEMPLATES Templates oproepen Wanneer u een template oproept, worden de daarin ingestelde functies automatisch geactiveerd. Als de automatische startfunctie is ingeschakeld, start het multifunctionele systeem de uitvoering van elke functie automatisch wanneer u de toets voor de betreffende template indrukt. 1 Vul de papierlade(n) met papier. 2 Plaats de originelen. 3 Druk op [TEMPLATE] op het aanraakscherm. Het templatemenu verschijnt.
6 TEMPLATES 5 Toets het wachtwoord in wanneer u de persoonlijke groep heeft geselecteerd. (Als er geen wachtwoord is ingesteld, gaat u verder met stap 6.) 1) Toets het wachtwoord in. 2) Druk op [OK]. 6 Druk op de toets van de gewenste template. Tussen menu's schakelen Druk op of . Templates met ingeschakelde automatische startfunctie kunnen worden aangeduid met .
6 TEMPLATES 6.TEMPLATES 8 Controleer of “Update van de template-instelling” wordt weergegeven op het aanraakscherm. De melding wordt ca. 3 seconden weergegeven. 9 Selecteer naargelang nodig andere kopieerinstellingen en druk vervolgens op de [START] toets op het bedieningspaneel.
6 TEMPLATES Gegevens wijzigen U kunt de gegevens wijzigen van reeds vastgelegde templates of persoonlijke groepen zoals templatenaam, gebruikersnaam, wachtwoord en instelling van de automatische startfunctie. De gegevens van de openbare templategroep kunnen worden gewijzigd vanuit het TopAccess-menu maar niet vanaf het bedieningspaneel. Voor de wijziging ervan vanuit het TopAccess-menu zie de Handleiding voor TopAccess.
6 TEMPLATES 6.TEMPLATES Templategegevens wijzigen 1 Selecteer in het templatemenu de groep waarin de gewenste template is vastgelegd. 1) Druk op het tabblad [REGISTRATIE]. 2) Druk op de toets van de gewenste groep. 3) Druk op [OPENEN]. Tussen menu's schakelen y Druk op of . y Toets het groepsnummer in (3 cijfers). 2 Toets het wachtwoord als volgt in en druk vervolgens op [OK].
6 TEMPLATES 3 Selecteer de gewenste template. 1) Druk op de toets van de betreffende template. 2) Druk op [BEWERKEN]. Tussen menu's schakelen Druk op 4 of . Toets het wachtwoord voor de geselecteerde template in. (Als er geen wachtwoord is ingesteld, gaat u verder met stap 5.) 1) Toets het wachtwoord in. 2) Druk op [OK]. 5 150 Wijzig de gegevens zoals beschreven in stap 7 op templategroep vastleggen”. Gegevens wijzigen P.
6 TEMPLATES Groepen of templates verwijderen U kunt persoonlijke groepen of templates die niet meer worden gebruikt verwijderen. Als een persoonlijke groep wordt verwijderd, gebeurt dit ook met alle templates in deze groep. De openbare templategroep kan niet worden verwijderd. Persoonlijke groepen verwijderen 1 Selecteer de gewenste persoonlijke groep in het templatemenu. 1) Druk op het tabblad [REGISTRATIE]. 2) Druk op de toets van de gewenste groep. 3) Druk op [WISSEN].
6 TEMPLATES 3 Druk op [WISSEN]. De persoonlijke groep is nu verwijderd.
6 TEMPLATES 6.TEMPLATES Templates verwijderen 1 Selecteer in het templatemenu de groep waarin de gewenste template is vastgelegd. 1) Druk op het tabblad [REGISTRATIE]. 2) Druk op de toets van de gewenste groep. 3) Druk op [OPENEN]. Tussen menu's schakelen y Druk op of . y Toets het groepsnummer in (3 cijfers). 2 Toets het wachtwoord als volgt in en druk vervolgens op [OK].
6 TEMPLATES 3 Selecteer de gewenste template. 1) Druk op de toets van de gewenste template. 2) Druk op [WISSEN]. Tussen menu's schakelen y Druk op of . y Toets het groepsnummer in (3 cijfers). 4 Toets het wachtwoord voor de geselecteerde template in. (Als er geen wachtwoord is ingesteld, gaat u verder met stap 5.) 1) Toets het wachtwoord in. 2) Druk op [OK]. 5 Druk op [WISSEN]. De template is nu verwijderd.
7. TAAKSTATUS BEVESTIGEN In dit hoofdstuk wordt beschreven hoe de verwerkingsstatus en de geschiedenis van uitgevoerde afdruktaken wordt bevestigd. Bevestiging afdruk Taakstatus ........................................................................................... 156 Taken in uitvoering of in de wachtrij bevestigen .................................................................................................156 Taakgeschiedenis bevestigen .........................................................
7 TAAKSTATUS BEVESTIGEN Bevestiging afdruk Taakstatus U kunt taken die in uitvoering zijn of zich in de wachtrij bevinden op het aanraakscherm bevestigen. U kunt taken in de wachtrij ook annuleren, onderbreken of hervatten alsmede de volgorde ervan wijzigen. Ook kunt u de geschiedenis van uitgevoerde afdruktaken en de status van de papierladen bevestigen.
7 TAAKSTATUS BEVESTIGEN 7.TAAKSTATUS BEVESTIGEN Taken annuleren U kunt taken die niet meer hoeven te worden uitgevoerd annuleren. 1 Selecteer de gewenste taak in de afdruktakenlijst en druk vervolgens op [WISSEN]. 2 Druk op [WISSEN]. De taak is nu geannuleerd.
7 TAAKSTATUS BEVESTIGEN Taken onderbreken U kunt taken in de wachtrij onderbreken. Alleen de 11e en erop volgende taken (gerekend vanaf de taak in uitvoering) kunnen worden onderbroken. Selecteer de gewenste taak in de afdruktakenlijst en druk vervolgens op [PAUZE]. De taak is nu onderbroken. De onderbroken taak wordt niet afgedrukt, zelfs niet wanneer die aan de beurt komt. Het afdrukken van de volgende taak begint. Onderbroken taak hervatten Selecteer de gewenste taak en druk vervolgens op [HERVAT].
7 TAAKSTATUS BEVESTIGEN 7.TAAKSTATUS BEVESTIGEN Taken verplaatsen U kunt de volgorde van de taken in de wachtrij wijzigen door deze in de lijst te verplaatsen. Alleen de 11e en erop volgende taken (gerekend vanaf de taak in uitvoering) kunnen worden verplaatst. Deze kunnen naar de 11e en de erop volgende posities worden verplaatst. 1 Selecteer de gewenste taak in de afdruktakenlijst en druk vervolgens op [VERPLAATSEN]. 2 Selecteer de positie waarheen u de taak wilt verplaatsen.
7 TAAKSTATUS BEVESTIGEN Taakgeschiedenis bevestigen U kunt de geschiedenis van de uitgevoerde afdruktaken op het aanraakscherm bevestigen. 1 Druk op [TAAKSTATUS] op het aanraakscherm. 2 Druk op het tabblad [LOG]. 3 Druk op [PRINT]. Het afdruklogboek verschijnt. Kopieeropdrachten verschijnen in het afdruklogboek alsmede afdruktaken.
7 TAAKSTATUS BEVESTIGEN 7.TAAKSTATUS BEVESTIGEN Papierladen bevestigen U kunt de instelling van papierformaat en -soort of het aantal resterende vellen in de papierladen bevestigen. Tijdens het afdrukken kunt u bevestigen welke papierlade voor de papierinvoer zorgt. 1 Druk op [TAAKSTATUS] op het aanraakscherm. 2 Druk op het tabblad [PAPIER]. Tijdens het afdrukken is de toets voor de papierlade waaruit papier wordt aangevoerd gemarkeerd. Druk op [SLUITEN] om de bevestiging te beëindigen.
8. OVERIGE INFORMATIE Continue kopieersnelheid ................................................................................................... 164 Combinatiematrix kopieerfunctie ....................................................................................... 166 Combinatiematrix 1/2 .........................................................................................................................................166 Combinatiematrix 2/2 .....................................................
8 OVERIGE INFORMATIE Continue kopieersnelheid Kopieersnelheden zijn afhankelijk van de wijze waarop originelen op de glasplaat worden geplaatst en enkelzijdige afdrukken worden continu gemaakt met een reproductiefactor van 100% in de stand sorteren-uit (eenheid: vel/minuut). e-STUDIO205L Papierformaat Toevoermagazijn Papiersoort NORMAAL DIK1 DIK2 Papierlade 20.3 19.7 — — Handinvoerbak 20.3 19.7 19.7 19.7 Papierlade 16.9 16.5 — — Handinvoerbak 16.9 16.5 16.5 16.5 Papierlade 14.
8 OVERIGE INFORMATIE 8.OVERIGE INFORMATIE e-STUDIO455 Papierformaat A4, A5-R, B5, LT, ST-R, 8.5"SQ A4-R, B5-R, LT-R B4, FOLIO, LG, COMP, 13"LG A3, LD Toevoermagazijn Papiersoort NORMAAL DIK1 DIK2 Papierlade 45.3 43.4 — DIK3 — Handinvoerbak 45.3 43.4 43.4 43.4 Papierlade 35.0 33.9 — — Handinvoerbak 35.0 33.9 33.9 33.9 Papierlade 29.5 28.7 — — Handinvoerbak 29.5 28.7 28.7 28.7 Papierlade 25.4 24.8 — — Handinvoerbak 25.4 24.8 24.8 24.
166 Combinatiematrix kopieerfunctie *4 Ja Ja Ja Ja Ja *3 Ja *4 Ja Ja Ja Ja Ja Ja Ja Nee Beeldrichting Boek <-> kalender ADF->SADF Geen blanco pagina Buitenkant wissen Scherpte Achtergrondinstelling Opslaan als bestand Opslag e-Filing *3 *3 Blanco Taakopbouw *3 *3 Gekopieerd Paginanummer *3 *3 Gekopieerd voorkaft Blanco achterkaft *3 *3 *3 Beide blanco *3 *3 *3 Gekopieerd voorkaft *3 *3 *3 Ja Ja *3 Ja Neg/Pos Ja Ja Ja Spiegel Blanco voorkaft Ja Ja
Ja Ja Ja Ja Ja Ja Ja Ja Ja Ja *3 *3 Tekst/foto Modus Tekst voor originelen Foto Kleurendocument 1 - 1 enkelzijdig 1 - 2 dubbelzijdig Ja Ja Ja Ja Groep Nieten en sorteren Afwerking Brochure sorteren Ja Nee Ja Nee Rand wissen Boekmidden wissen Blanco Gekopieerd Gekopieerd voorkaft Blanco achterkaft Beide blanco Gekopieerd voorkaft Blanco voorkaft Neg/Pos Spiegel Maskeren Trimmen *1 *1 *1 *1 *1 *2 Ja Ja *3 Ja Ja Ja Ja Ja Ja Ja Ja Ja Ja Opslag e-Filing O
TREFWOORDENREGISTER Numerics 2IN1/4IN1 ................................................................100 [2-ZIJDIG] ...................................................................8 A A/B-formaat ...............................................................11 Aanbevolen papier .....................................................11 Aanraakscherm ...........................................................8 Aantal afdrukken .............................................
KLEURENDOCUMENT ....................................... 58 modus voor originelen ................................... 52, 58 TEKST .............................................................. 58 TEKST/FOTO .................................................... 58 G Gebied voor meldingen .................................................8 Gebied voor waarschuwingsmeldingen ...........................8 Gebruikersbeheerfunctie ...............................................8 Gedeelde map .......................
S SADF .....................................................................125 SCHERPTE .............................................................134 SMB .........................................................................88 Sorteren ............................................................. 66, 69 Sorteren uit nieten uit .................................................66 Standaardinstellingen .................................................52 [START] toets ....................................
172 TREFWOORDENREGISTER
e-STUDIO255/305/355/455
MULTIFUNCTIONELE DIGITALE SYSTEMEN Kopieerhandleiding 2-17-2, HIGASHIGOTANDA, SHINAGAWA-KU, TOKYO, 141-8664, JAPAN Ver01 2009-06 ©2009 TOSHIBA TEC CORPORATION Alle rechten voorbehouden