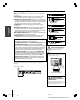
E F: FRANÇAIS F S: ESPAÑOL S Introduction E: ENGLISH Connecting your TV OWNER'S MANUAL #01E01_2632HL84 1 Black Model number: Serial number: Index 26HL84 32HL84 Owner's Record The model number and serial number are on the back of your TV. Record these numbers in the spaces below. Refer to these numbers whenever you communicate with your Toshiba dealer about this TV.
Dear Customer, Thank you for purchasing this Toshiba TV. This manual will help you use the many exciting features of your new TV. Before operating the TV, please read this manual completely, and keep it nearby for future reference. SAFETY WARNINGS AND INSTRUCTIONS It is important that you read and understand the Safety Warnings and Instructions that appear below before you use your TV. These instructions should be retained and kept in a convenient location for easy reference.
Important Safety Instructions 1) Read these instructions. 2) Keep these instructions. 3) Heed all warnings. 4) Follow all instructions. 5) Do not use this apparatus near water. 6) Clean only with dry cloth. 7) Do not block any ventilation openings. Install in accordance with the manufacturer’s instructions. 8) Do not install near any heat sources such as radiators, heat registers, stoves, or other apparatus (including amplifiers) that produce heat.
24) Always operate this equipment with a 120V AC, 60Hz power source only. 120V AC CAUTION: To reduce the risk of electric shock, do not use the polarized plug with an extension cord, receptacle, or other outlet unless the blades can be inserted completely to prevent blade exposure. 25) Always make sure the antenna system is properly grounded to provide adequate protection against voltage surges and built-up static charges (see Section 810 of the National Electric Code).
Introduction ................................................................ 6 Welcome to Toshiba ......................................................... 6 Supplied accessories ......................................................... 6 Note Regarding Quick Connect Guide ........................ 6 Exploring your new TV ................................................... 7 Connecting your TV .................................................. 8 Connecting a VCR ............................................
Note Regarding Quick Connect Guide Introduction Introduction Welcome to Toshiba Congratulations! You have purchased one of the finest LCD TVs on the market. The goal of this manual is to guide you through setting up and operating your Toshiba TV as quickly as possible. The model and serial numbers are on the back of your TV. Write these numbers in the space provided on the front cover of this manual for your records. Instructions in this manual are based on using the remote control.
E Exploring your new TV F You can operate your TV using the buttons on the top panel or the remote control. The A/V terminals for connecting other equipment to your TV are on the back panel and side panel (see illustrations below). Also see “Connecting your TV” on pages 8-17. The illustrations represent 32HL84.
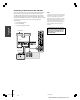
Connecting your TV Connecting your TV Note: One TheaterLink cable is provided with your TV. No other cables are provided. Coaxial cable is the cable that comes in from your antenna, cable TV service, or cable converter box. Coaxial cable has “F” connectors. Standard A/V (audio/video) cables usually come in sets of three, and are typically color-coded according to use: yellow for video, red for stereo right audio, and white for stereo left (or mono) audio.
E Connecting a VCR F This connection allows you to watch local channels and video programs, watch video tapes, and record one channel while watching another channel. You will need: • two coaxial cables • one set of standard A/V cables Note: If you have a mono VCR, connect L/Mono to VCR Audio OUT using only one audio cable.
Connecting a cable converter box and VCR Connecting your TV This connection allows you to watch and record basic and premium cable channels, watch videotapes, and record one channel while watching another channel. To use the TV’s features, select ANT-1. To view premium channels or record with the VCR, select ANT-2, tune the TV and VCR to channel 3 or 4 (whichever channel is vacant in your area), and use the converter box to change channels.
E Connecting a DVD player or satellite receiver and a VCR S Introduction Note: For the highest possible picture quality from a DVD player/satellite receiver without component video or DVI/HDCP, use an S-video cable between the TV and DVD player/satellite receiver. (If your DVD player/ satellite receiver is compatible with component video, see page 12. If your DVD player/satellite receiver is compatible with DVI/HDCP, see page 15.
Connecting a DVD player with ColorStream® (component video) and a VCR Connecting your TV This connection allows you to watch DVD, VCR, and TV programs, and record TV programs. You can record one channel while watching another channel. Your TV has ColorStream® (component video) inputs. Connecting your TV to a DVD player with component video (such as a Toshiba DVD player with ColorStream®) can greatly enhance picture quality and realism.
E Connecting a DTV receiver/set-top box with ColorStream® (component video) and a VCR From Antenna Stereo VCR AUDIO L IN from ANT OUT to TV Introduction The ColorStream HD-1 and HD-2 terminals can be used with Progressive (480p, 720p) and Interlaced (480i,1080i) scan systems. If your DTV receiver is not compatible with component video (or DVI/HDCP), use an S-video cable (plus an audio connection) instead. To record from the DTV receiver, set the VCR to Line IN.
Connecting two VCRs This connection allows you to record (dub/edit) from one VCR to another VCR while watching a videotape. You also can record one channel while watching another channel. You will need: • two coaxial cables • two sets of standard A/V cables Do not connect the same VCR to the output and input terminals on the TV at the same time.
E Connecting a device to the DVI/HDCP IN Note: This TV is not intended for connection to and should not be used with a PC (personal computer). You will need: • one DVI-D digital single-link cable † transmission of uncompressed digital video with high-bandwidth digital content protection, which is being standardized for future reception of high-definition video signals. Consult your consumer electronics dealer for availability.
Connecting your TV Connecting a device to the TheaterLink The TheaterLink allows you to remotely operate (through the TV) most infrared-controlled devices* (such as a Toshiba infraredcontroled VCR or DVD player) enclosed within an entertainment center or similar cabinet. Without the TheaterLink, the device typically would need to be visible to operate it remotely. You can use the TV’s remote control (programmed to operate the device; see pages 18–24) or the device’s remote control.
E Connecting an audio system S Introduction Note: If the volume of either the TV or the amplifier is set to 0 (or OFF), you will not hear any sound. Connecting your TV This connection allows you to hear the TV sound through external speakers connected to an audio amplifier. To control the audio through the amplifier, turn on the TV and the amplifier, set the volume of both to a moderate level, and turn off the TV’s built-in speakers (see “Turning off the built-in speakers” on page 57).
Using the remote control Your Toshiba TV remote control has one dedicated TV mode and five universal modes: VCR, Cable/SAT, DVD, Audio1, and Audio2. The target devices and default devices being programmed for each mode are as follows: Target device/Mode mapping Mode TV CABLE/SAT VCR DVD AUDIO1 AUDIO2 Device Toshiba TV Universal Cable, Satellite Universal VCR, DVD, LD, Cassette Universal DVD, VCR, LD, Cassette Universal Audio: Amp., Tuner, Misc.Audio, CD/MD Universal Audio: CD/MD, Amp., Tuner, Misc.
E Remote Control functional key chart F S Cassette (VCR) Connecting your TV Introduction --Power Digit 1 Digit 2 Digit 3 Digit 4 Digit 5 Digit 6 TV Using the Remote Control Digit 7 Digit 8 Digit 9 ----Digit 0 --------- Setting up your TV ------- Using the TV’s Features ----Volume up/down* ----TV Appendix Sound mute* ------------Rewind Pause Play Fast FWD Index Toshiba TV Cable Satellite VCR DVD/LD Receiver CD/MD (TV) (CBL/SAT) (CBL/SAT) (AUDIO) (AUDIO) LIGHT Lights the remote key, and toggles
Key Label TV/VCR AM/FM DISC Toshiba TV Cable Satellite VCR (TV) (CBL/SAT) (CBL/SAT) VCR --TV/SAT TV/VCR --------- STOP REC** PIP CH yz VCR VCR VCR VCR POP channel up/down SPLIT POP Split POP DIRECT CH POP Direct ch FREEZE POP Freeze SWAP POP Swap CH SCAN POP Ch scan SOURCE POP Source TV Receiver CD/MD Cassette (AUDIO) (AUDIO) (VCR) ------Reverse Disc shift AM/FM Disc shift Deck side A/B switch Stop Stop --Stop Stop Record** ----Record** Record** TV TV TV TV TV TV TV TV TV TV TV TV TV TV TV TV TV TV
E Introduction • Some newer VCRs are capable of working on either of two remote codes.These VCRs have a switch labeled “VCR1/VCR2.” Using the Remote Control Connecting your TV If your VCR has this kind of switch and does not respond to any of the codes for your VCR brand, set the switch to the other position (VCR1 or VCR2) and reprogram the remote control.
POWER TV CABLE/SAT LIGHT SLEEP 1 2 3 4 5 6 7 8 9 VCR DVD AUDIO1 AUDIO2 MODE PIC SIZE ACTION MENU S IDE GU ET Number MODE +10 0 100/ FA V O R I T INFO T IT L E UP SUB TITL E FAV ENT E THE LI N A T E R K AU DI O Using the volume lock feature (8000) For the TV, CABLE/SAT, VCR, and DVD modes, the volume controls (VOL yz and MUTE) can be programmed (locked) to the selected device mode. This feature does not apply to the AUDIO1/2 modes.
E Device code table F Code ABC ARCHER CABLEVIEW CITIZEN CURTIS DIAMOND EAGLE EASTERN GCBRAND GEMINI G.I.
Device code table CD Player setup codes Brand Code ADMIRAL AIWA CARVER DENON EMERSON FISHER GARRARD HARMAN KARDON 6126 6133, 6135 6129 6142, 6151 6139 6105, 6106 6117 6120, 6121, 6123, 6119 6107 6134 6140, 6141, 6145, 6148, 6151 6100, 6101, 6111, 6145 6136 6129, 6132 6129 6121 6110 6114, 6115 6108, 6118, 6120, 6122 6124, 6125, 6127, 6150 6129, 6130, 6149 6108 6125, 6127, 6124 6147, 6137, 6138, 6131, 6152 6110, 6146, 6113 6105 6110, 6146 6142, 6143 6120 6128 6144 6112, 6116, 6118 6127, 6124, 6125 6140, 61
E F The buttons used for operating the TV only are described here. For a complete list of the remote control’s functions, see the “Remote Control functional key chart” on pages 19–20. S Introduction Learning about the remote control POWER turns the TV on and off SLEEP allows access to the automatic TV shut-off function (page 53) LIGHT The first press of the LIGHT button lights the keypad and turns Connecting your TV on the Illumination mode.
Setting up your TV Learning about the menu system After you have installed the batteries and programmed the remote control, you will need to set some preferences on the TV using the menu system. You can access the menu using the buttons on your TV or remote control. 1. Press MENU to display the menu system. 2. Press x or • to select a menu. 3. Press y or z to select an item. 4. Press x or • to select or adjust a setting.
E Using the Quick Connect Guide F S POWER TV CABLE/SAT LIGHT SLEEP 1 2 3 4 5 6 DVD AUDIO1 AUDIO2 MODE 7 PIC SIZE IDE GU 9 ENT F A V O RI T INFO T IT L E UP SUB TITL E FAV E THE LI N A T E R K AU DI O ET 8 0 +10 100/ MENU ENTER yzx • SET UP Connecting your TV ACTION MENU ENTER ENGL I SH LANGUAGE ANT 1 / ANT 2 ANT 1 / 2 CABLE TV / CABLE CH PROGRAM ADD / ERASE ADD QU I CK CONNECT GU I DE GRAY LEVEL 1 15 BACK L I GHT I NG Introduction VCR S The Quick Connect Guide automatical
Changing the on-screen display language You can choose from three different languages (English, French and Spanish) for the on-screen display of adjustment menus and messages. To select a language: 1. Press MENU, and then press x or • until the SET UP menu appears. 2. Press y or z to highlight LANGUAGE. TV control panel TV/VIDEO MENU POWER LIGHT CABLE/SAT SLEEP VCR DVD 1 2 3 4 5 6 AUDIO1 AUDIO2 MODE 7 PIC SIZE 3. Press x or • to highlight your desired language.
E Adding channels to the TV’s memory CABLE/SAT LIGHT SLEEP 1 2 3 4 5 6 7 8 9 VCR DVD AUDIO1 AUDIO2 MODE PIC SIZE ACTION MENU ET +10 100/ T IT L E UP 0 FA V O R I T INFO SUB TITL E FAV ENT E THE LI N A T E R K MENU AU DI ENTER SET UP Channel Number O S IDE GU LANGUAGE ENGL I SH ANT 1 / 2 ANT 1 TV / CABLE TV / CABLE CH PROGRAM ADD / ERASE ADD QU I CK CONNECT GU I DE GRAY LEVEL 1 15 BACK L I GHT I NG Introduction POWER TV Connecting your TV Programming channels automatica
Adding and erasing channels manually After you have automatically programmed the active channels into the TV’s channel memory, you can manually add or erase specific channels. To add or erase channels: 1. Select the channel you want to add or erase. If you are adding a channel, you must select the channel using the Channel Number buttons. 2. Press MENU, and then press x or • until the SET UP menu appears. 3. Press y or z to highlight ADD/ERASE.
E F Using the TV’s features S CABLE/SAT LIGHT SLEEP 1 2 3 4 5 6 VCR DVD AUDIO1 AUDIO2 MODE 7 PIC SIZE S IDE GU ET 8 9 0 ENT +10 100/ FA V O R I T INFO UP E SUB TITL E T IT L E Connecting your TV ACTION MENU Channel Number THE LI N A T E R K AU DI FAV ENTER FAV VOL DVD RTN CH RTN EXIT DVD CLEAR MUTE SKIP/SEARCH INPUT RECALL SLOW/DIR CH RTN INPUT (Video mode selection) Using the Remote Control CH POWER TV CABLE/SAT LIGHT SLEEP 1 2 3 4 5 6 VCR DVD AUDIO1 A
3. Press x or • to display the FAVORITE CH1 menu, for example. CH INPUT will be highlighted. CUSTOM T I MER 00h00m ON 0h00m SLEEP CC OFF CH I NPUT FAVOR I TE CH1 0 0 0 FAVOR I TE CH 2 0 0 0 CH L A B E L I NG 0 V I DEO L A B E L TV CABLE BACKGROUND CLEAR ALL Note: • The FAV yz buttons operate as menu x • buttons when a menu display is on-screen. • The favorite channel feature is not available in ANT2 mode. 4. Press the Channel Number buttons to enter one of your favorite channels. 5. Press ENTER. 6.
E F S POWER TV CABLE/SAT LIGHT SLEEP 1 2 3 4 5 6 DVD AUDIO1 AUDIO2 MODE 7 PIC SIZE ACTION MENU IDE GU 9 ENT Channel Number +10 100/ FA V O R I T INFO T IT L E UP SUB TITL E FAV E THE LI N A T E R K AU DI O ET 8 0 Introduction VCR S Labeling channels Channel labels appear above the on-screen channel number display each time you turn on the TV, change the channel, or press RECALL. You can choose any four characters to identify a channel. To create channel labels: 1.
5. Press z or y to highlight CLEAR. 6. Press x or • to erase the channel label. 7. Repeat steps 4–6 to erase other channel labels.
E Introduction • If you select Theater Wide 2 or 3, the top and bottom edges of the picture may be hidden. To see the hidden edges, either scroll the picture (see page 36) or try viewing the program in Full picture size.
Scrolling the Theater Wide picture (Theater Wide 2 and 3 only) 1. Press PIC SIZE to select either Theater Wide 2 or 3 mode. 2. Press MENU, and then press x or • until the THEATER menu appears. 3. Press y or z to highlight PICTURE SCROLL.
E F Note: This feature does not operate for the antenna (cable) and DVI input sources. S Introduction Using the auto aspect feature When receiving a 480i signal, the TV will automatically change the picture size by reading aspect information (ID-1 data) from the input signal. If the signal does not include aspect information (ID-1 data), the picture size mode you set is selected. To turn on the auto aspect: 1. Press MENU, and then press x or • until the THEATER menu appears.
Using the POP double-window feature The POP (picture-out-picture) feature splits the screen into a double window that allows you to watch two programs at the same time. The POP program can come from a TV broadcast or an external source, such as a VCR. To display a TV broadcast in the POP window: 1. Press SPLIT to display the POP window. Main window POP window Note: • The SPLIT buttons on the remote control operate the TV’s POP features. • You cannot access POP features when viewing DVI input..
E Switching the main and POP pictures Press SWAP while you are using the POP feature to switch the main and POP pictures. F UP SUB TITL E FAV AU DI O S T IT L E ET ENTER Freezing the POP picture 1. Press FREEZE while the POP is not on the screen. The POP window will appear with a still picture. 2. Press FREEZE again to renew the still picture.
Double-Window aspect ratio The Double-Window feature displays each picture according to its input signal aspect ratio, as illustrated below. 480i 480p/720p/1080i 480i T IT L E ET UP SUB TITL E FAV AU DI O S 480i Note: The AUTO ASPECT feature (page37) does not operate in the Double-Window mode.
E 4 5 6 S POWER TV CABLE/SAT 1 2 3 4 5 6 7 8 9 DVD AUDIO1 AUDIO2 MODE PIC SIZE ACTION MENU ET +10 0 100/ FA V O R I T INFO T IT L E UP SUB TITL E FAV 8 THE LI N A T E R K AU DI ENTER 9 FAVORITE ENTER yzx • FAV 6 VOL CH 2. Press yzx • to select one of the seven pictures (becomes a moving picture). The main picture is always a moving picture. 3. Press ENTER to display the channel you selected in step 2 as a normal picture.
Using the LOCKS menu The LOCKS menu includes the V-Chip, CH Lock, Video Lock, and New PIN Code functions. You can use these functions after entering the correct PIN code. Note: The V-Chip function is available only for the U.S. V-Chip system. The Canadian V-Chip system is not supported. Entering the PIN code 1. Press MENU, and then press x or • until the LOCKS menu appears.
E LOCKS menu LOCKS V CH I P ENABLE BLOCK I NG TV RAT I NG MPAA RAT I NG BLOCK I NG OPT I ON CH LOCK V I DEO LOCK GAME TIMER FRONT PANEL LOCK NEW P I N CODE POWER TV CABLE/SAT G Parental Guidance Suggested (This program contains material that parents may find unsuitable for younger children.) D) Some suggestive dialog L) Infrequent coarse language S) Some sexual situations V) Moderate violence General Audience (Most parents would find this program suitable for all ages.
MPAA RATING (Independent rating system for movies) 1. From the LOCKS menu, select MPAA RATING. 2. Press x or • to display the MPAA RATING menu, and then press z or y to highlight MPAA RATING. LOCKS menu LOCKS V CH I P ENABLE BLOCK I NG TV RAT I NG MPAA RAT I NG BLOCK I NG OPT I ON CH LOCK V I DEO LOCK GAME T I MER FRONT PANEL LOCK NEW P I N CODE LOCKS MPAA RAT I NG X NC1 7 R PG1 3 PG G ON OFF OFF OFF V CH I P MENU To select each item: Press z or y . 3.
E 5 THIS PROGRAM HAS BEEN BLOCKED! TV–PG L EXCEEDS SET L I M I TS 6 7 TH I S PROGRAM HAS BEEN BLOCKED! V CABLE/SAT 1 2 3 4 5 6 7 8 9 AUDIO1 AUDIO2 PIC SIZE ACTION MENU S 8 ET +10 100/ T IT L E UP 0 FA V O R I T INFO SUB TITL E FAV THE LI N A T E R K AU DI PUSH MUTE TO ENTER PI N 9 CABLE ENTER 9 Channel Number ENT E O CABLE SLEEP DVD IDE GU L V TV– PG EXCEEDS SET L I M I TS PUSH MUTE TO ENTER P I N LIGHT VCR Introduction 4 S POWER TV MODE After 4 seconds 3
To unlock channels: 1. From the LOCKS menu, select CH LOCK. 2. Press x or • to display the CH LOCK menu. 3. Press yzx • to highlight the channel you want to unlock, and then press ENTER.
E Using the game timer F 1 2 3 4 5 6 7 8 S Note: To deactivate the game timer, set VIDEO LOCK to OFF (see “Locking the video inputs” on page 46). Introduction You can use the game timer to set a limit for playing a video game (30120 minutes). When the game timer expires, the TV enters VIDEO LOCK mode, and locks the input source for the video game device, preventing the game from being played. To set the game timer: 1. From the LOCKS menu, select GAME TIMER. 2.
Adjusting the picture Selecting the picture mode You can select from four picture modes: Sports, Standard, Movie, and Preference. Mode Picture Quality Sports Standard Movie Preference Bright and dynamic picture (factory setting) Standard picture setting (factory setting) Movie-like picture setting (factory setting) Your personal preferences* *(see “Saving your new preferences” on page 49.) To select the picture mode: 1. Press MENU, and then press x or • until the PICTURE menu appears. 2.
E F S POWER TV CABLE/SAT LIGHT SLEEP 1 2 3 4 5 6 DVD Introduction VCR AUDIO1 AUDIO2 MODE 7 PIC SIZE ACTION MENU IDE GU ET 8 9 0 ENT +10 100/ FA V O R I T INFO T IT L E UP SUB TITL E FAV E THE LI N A T E R K MENU AU DI O S Saving your new preferences You can save the picture qualities you adjusted (contrast, brightness, color, tint, and sharpness) in the PICTURE menu PREFERENCE mode. To save your new preferences: 1.
CABLE/SAT LIGHT SLEEP 1 2 3 4 5 6 7 8 9 VCR DVD AUDIO1 AUDIO2 MODE PIC SIZE +10 ACTION MENU E SUB TITL E T IT L E UP ENT FA V O R I T INFO IDE GU ET 0 100/ THE LI N A T E R K MENU AU DI FAV O To reset your picture quality adjustments: 1. Press MENU, and then press x or • until the PICTURE menu appears. 2. Press y or z to highlight RESET. 3. Press x or •. The menu displays “DONE.
E Labeling the video input sources F S POWER TV CABLE/SAT LIGHT SLEEP 1 2 3 4 5 6 DVD Introduction VCR AUDIO1 AUDIO2 MODE 7 PIC SIZE IDE GU S FA V O R I T INFO UP E SUB TITL E T IT L E ET 9 ENT THE LI N A T E R K MENU AU DI FAV ENTER yzx • Connecting your TV ACTION MENU 8 0 +10 100/ O The video label feature allows you to label each input source for your TV from the following preset list of labels: – : Uses the default label name VCR : Video cassette recorder DVD : DVD v
Using the closed caption feature The closed caption feature has two options: • Captions—An on-screen display of the dialogue, narration, and sound effects of TV programs and videos that are closed captioned (usually marked as “CC” in TV listings). • Text—An on-screen display of information not related to the current program, such as weather or stock data (when provided by individual stations). To view captions or text: 1. Tune the TV to the desired program. 2.
E Setting the ON timer F POWER TV CABLE/SAT S SLEEP POWER LIGHT SLEEP 1 2 3 4 5 6 DVD AUDIO1 AUDIO2 Introduction VCR Number MODE 7 PIC SIZE S IDE GU ET 8 9 0 ENT +10 100/ FA V O R I T INFO T IT L E UP SUB TITL E FAV E THE LI N A T E R K AU DI ENTER MENU ENTER yzx • Connecting your TV ACTION MENU O To set the ON timer to turn the TV on automatically: 1. Press MENU, and then press x or • until the CUSTOM menu appears. 2. Press y or z to highlight ON. 3.
Adjusting the sound → Normal → 1/2 MUTE → MUTE Selecting stereo/SAP broadcasts The multi-channel TV sound (MTS) feature allows you to listen to high-fidelity stereo sound while watching TV. MTS can also transmit a second audio program (SAP) containing a second language, music, or other audio information (when provided by individual stations).
E F Note: The Dolby Virtual and WOW SRS 3D features cannot be on at the same time. Introduction S POWER TV CABLE/SAT LIGHT SLEEP 1 2 3 4 5 6 7 8 9 0 ENT VCR DVD AUDIO1 AUDIO2 Connecting your TV Enjoying the Dolby Virtual sound feature The Dolby* Virtual sound feature allows you to enjoy virtual surround sound from the TV’s speakers. • If you connect a device (a game console, a DVD player or a DTV receiver, etc.
Adjusting the sound quality You can change the quality of your TV’s sound by adjusting the bass, treble, and balance. To adjust the sound quality: 1. Press MENU, and then press x or • until the AUDIO menu appears. 2. Press y or z to highlight the item you want to adjust (BASS, TREBLE, or BALANCE).
E F S Introduction Using the sub-bass system (SBS) The sub-bass system allows you to enhance bass performance, even when the volume is low. To turn on the SBS and adjust the level: 1. Press MENU, and then press x or • until the AUDIO menu appears. 2. Press y or z to highlight SBS. 3. Press x or • to highlight ON.
Selecting the Audio OUT sound This feature allows you to select the sound source (MAIN or POP) that is output from the AUDIO OUT terminals (for example, see “Connecting two VCRs” on page14). This is useful when amplifying or recording the POP sound with external equipment while listening to the sound of the main picture through the built-in speakers. See “Connecting an audio system” on page 17. To select the Audio OUT sound: 1. Press MENU, and then press x or • until the AUDIO menu appears. 2.
E F Select the gray level of the boundary lines between the side panels and picture in 4:3 mode. To select the gray level: 1. Press MENU, and then press x or • until the SET UP menu appears. 2. Press y or z to highlight GRAY LEVEL.
Displaying on-screen information Press RECALL to display the following information on-screen: • Antenna mode (when in TV mode) • Channel number or video mode selected • Remaining time of ON/SLEEP time (if set) • Channel label (if set) • Stereo or SAP audio status • V-CHIP rating status • Picture size CABLE/SAT 6 PIC SIZE CABLE 6 5 6 7 8 9 +10 100/ ACTION MENU S UP ENT E SUB TITL E T IT L E ET 0 FA V O R I T INFO IDE GU THE LI N A T E R K AU DI FAV 1 2 3 TV – PG L ON T I MER S L E
E F Appendix S Introduction Specifications • Design and specifications are subject to change without notice. WARNING: RISK OF ELECTRIC SHOCK ! Never attempt to service the TV yourself. Opening and removing the covers may expose you to dangerous voltage or other hazards. Refer all servicing to a Toshiba Authorized Service Center. Audio Power 10 W + 10 W Speaker Type Two 2-3/8 × 4-3/4 inches (60 × 120 mm) Video/Audio Terminals S-VIDEO INPUT Y : 1 V(p-p), 75 ohms, negative sync. C : 0.
Troubleshooting Appendix Before calling a service technician, please check the following table for a possible cause of the symptom and some solutions. Symptom TV will not turn on Solution • Make sure the power cord is plugged in, then press POWER. • The remote control batteries may be dead. Replace the batteries. No picture, no sound • Check the antenna/cable connections. No sound, picture OK • The sound may be muted. Press VOLUME. • The station may have broadcast difficulties. Try another channel.
E Limited United States Warranty F for LCD TV S Introduction How to Obtain Warranty Services If, after following all of the operating instructions in this manual and checking the “Troubleshooting” section, you find that service is needed: (1) To find the nearest TACP Authorized Service Station: Visit TACP’s web site at www.toshiba.com/tacp, or call toll free 1-800-631-3811. (2) Present your bill of sale or other proof of purchase to the Authorized Service Station.
Limited Canada Warranty for LCD TV Toshiba of Canada Limited (“TCL”) makes the following limited warranties to original consumers in Canada. THESE LIMITED WARRANTIES EXTEND TO THE ORIGINAL CONSUMER PURCHASER OR ANY PERSON RECEIVING THIS LCD TV AS A GIFT FROM THE ORIGINAL CONSUMER PURCHASER AND TO NO OTHER PURCHASER OR TRANSFEREE. PRODUCTS PURCHASED IN THE U.S.A. AND USED IN CANADA ARE NOT COVERED BY THESE WARRANTIES. PRODUCTS PURCHASED IN CANADA AND USED IN THE U.S.A. ARE NOT COVERED BY THESE WARRANTIES.
E F Index OPQ ANT 1/2 ...................................................................................28 Antenna cables ...................................................................... 8 AUDIO OUT sound, selecting ....................................... 58 Audio system connection ................................................. 17 Auto aspect ............................................................................ 37 Auto power off ............................................................
Note 66 #01E65-67_2632HL84 66 6/4/04, 6:03 PM Black 26HL84/32HL84 (E/F/ES) size:213*276
Note 67 #01E65-67_2632HL84 67 6/4/04, 6:03 PM Black 26HL84/32HL84 (E/F/ES) size:213*276
HEAD OFFICE:82 TOTOWA ROAD, WAYNE, NEW JERSEY 07470, U.S.A. NATIONAL SERVICE DIVISION:1420B TOSHIBA DRIVE, LEBANON, TN. 37087, U.S.A. HEAD OFFICE/191 McNABB STREET MARKHAM, ONTARIO L3R 8H2, CANADA TEL: (905) 470-5400 SERVICE CENTERS: TORONTO: 191 McNABB STREET MARKHAM, ONTARIO L3R 8H2, CANADA TEL: (905) 470-5400 MONTREAL: 18050 TRANS CANADA, KIRKLAND, QUEBEC, H9J-4A1, CANADA TEL:(514)390-7766 VANCOUVER: 22171 FRASERWOOD WAY, RICHMOND, B.C.