
Operator's Manual


1
2
3
4
5
6
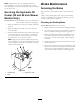
g015240
Figure65
1.Handlever
4.Frontofslot
2.Frontofhandlever
5.Brakebar
3.3/4inch(19mm)gap
6.Brakebarjusttouching
thetire
AdjustingtheBrakes
Iftheparkingbrakedoesnotholdsecurely,anadjustment
isrequired.
1.Checkthebrakebeforeyouadjustit;refertoChecking
theBrakes.
2.Parkthemachineonalevelsurface,disengagethe
PTO,andsettheparkingbrake.
3.Stoptheengine,removethekey,andwaitforallmoving
partstostopbeforeleavingtheoperatingposition.
4.Releasetheparkingbrake;refertoReleasingthe
ParkingBrakeOperation.
5.Toadjustthebrake,removethehairpincotter
andclevispinfromthelowerbrakeleverandyoke
(
Figure66).
6.Loosenthejamnut(
Figure66).
7.Rotatetheyoke.Totightenthebrake,rotatethe
yokeup.Toloosenthebrake,rotatetheyokedown
(Figure66).
8.Securetheyoketolowerbrakeleverwiththehairpin
cotterpinandclevispin(Figure66).
9.Tightenthejamnut(Figure66).
10.Checkthebrakeoperationagain;refertoCheckingthe
Brake.
g015371
1
2
3
4
5 6
Figure66
1.JamNut4.Hairpincotterpin
2.Yoke5.Flatwasher
3.Clevispin
6.Lowerbrakelever
11.Afterthebrakeisadjusted,theleverswitchneedsto
bechecked.
12.Checkthegapbetweenthebrakeleverandthefaceof
theswitchasshowninFigure67.Thegapneedstobe
an1/8inch(3mm)withthebrakeengaged.
13.Ifneeded,loosenthescrewsholdingtheswitchand
adjusttheswitch.
44