
Operator's Manual


CheckingforBentBlades
1.DisengagethePTO,movethemotion-control
leverstotheNEUTRAL-LOCKposition,andsetthe
parkingbrake.
2.Shutofftheengine,removethekey,andwait
forallmovingpartstostopbeforeleavingthe
operatingposition.
3.Rotatethebladesuntiltheendsfaceforward
andbackward.
4.Measurefromalevelsurfacetothecutting
edge,positionA,oftheblades(Figure73).
g000975
Figure73
1.Measureherefromblade
tohardsurface
2.PositionA
5.Rotatetheoppositeendsofthebladesforward.
6.Measurefromalevelsurfacetothecuttingedge
ofthebladesatthesamepositionasinstep4
above.
Note:Thedifferencebetweenthedimensions
obtainedinsteps4and5mustnotexceed3mm
(1/8inch).
Note:Ifthisdimensionexceeds3mm
(1/8inch),replacetheblade.
WARNING
Abladethatisbentordamagedcould
breakapartandcouldcriticallyinjure
youorbystanders.
•Alwaysreplaceabentordamaged
bladewithanewblade.
•Donotleorcreatesharpnotchesin
theedgesorsurfacesoftheblade.
RemovingtheBlades
Replacethebladesiftheyhitasolidobject,ifa
bladeisoutofbalance,orifabladeisbent.T o
ensureoptimumperformanceandcontinuedsafety
conformanceofthemachine,usegenuineT oro
replacementblades.Replacementbladesmadeby
othermanufacturersmayresultinnonconformance
withsafetystandards.
1.Holdthebladeendusingaragorathickly
paddedglove.
2.Removethebladebolt,thecurvedwasher,and
thebladefromthespindleshaft(Figure74).
g004536
Figure74
1.Sailareaoftheblade3.Curvedwasher
2.Blade4.Bladebolt
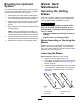
SharpeningtheBlades
1.Usealetosharpenthecuttingedgeatboth
endsoftheblade(Figure75).
Note:Maintaintheoriginalangle.
Note:Thebladeretainsbalanceifthesame
amountofmaterialisremovedfrombothcutting
edges.
g000276
Figure75
1.Sharpenattheoriginalangle
52