
Operator's Manual


Note:Determinetheleftandrightsidesofthemachinefromthenormaloperatingposition.
1
PreparingtheMower
NoPartsRequired
Procedure
Performthefollowingproceduretopreparethemower
forattachingtheblowerandnishingkit.
1.DisengagethePTO,movethemotion-control
leverstotheNEUTRAL-LOCKEDpositionandset
theparkingbrake.
2.Stoptheengine,removethekey,andwait
forallmovingpartstostopbeforeleavingthe
operatingposition.
3.Repairallbentordamagedareasofmower
deckandreplaceanymissingparts.
4.Cleanthemowerofanydebrisonthedeckor
rearpartofthemowertoeaseinstallation.
2
InstallingtheBagger
MountingBracket
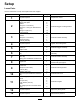
Partsneededforthisprocedure:
1Baggermountingbracket
2Baggersideplate
2
Spacer
14
Bolt(3/8x1-1/2inches)
2
Bolt(3/8x1inch)(forZ593mowersonly)
14
Flangenut(3/8inch)
14
Curvedwasher
Procedure
Important:Donottightenanyboltsuntilboth
sidebracketsandbaggermountingbracketaret
looseonthemachine.
RefertoTighteningtheMountingBoltsforthe
correctproceduretotightenthebolts.
1.Removethebolts,nuts,andwashersholding
therollbartoonesideofthemachine.Discard
thenuts,bolts,andwashers(Figure4,Figure
5,andFigure6).
2.Installthebaggersideplateandtherollbar
sectiontothesideofthemachineusing4bolts
(3/8x1-1/2inches),4curvedwashers(3/8
inch),and4angenuts(3/8inch)(Figure4,
Figure5,andFigure6).
3.Repeatthestepsabovefortheoppositeside
(Figure4,Figure5,andFigure6).
Note:Makesurethecurvedwashersare
installedasshowninFigure4,Figure5,and
Figure6.
4.Installthebaggermountingbrackettotheleft
andrightsidebaggerbracketswith4bolts(3/8
x1-1/2inches),4curvedwashers(3/8inch),
and4angenuts(3/8inch)(Figure4,Figure
5,andFigure6).
5.Installthebaggermountingbrackettothe
rearframeofthemachinewith2bolts(3/8x
1-1/2inches)(use2bolts(3/8x1inch)for
Z593mowersasshowninFigure5),2curved
washers(3/8inch),and2angenuts(3/8inch)
(Figure4,Figure5,andFigure6).
6