
Operator's Manual


23
15
Step
Parts needed for this step:
• 1 Dump handle
• 2 Washers, 13/16 inch
• 1 Cotter pin
Installing the Bagger Dump
Handle
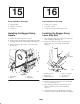
1. Unfasten the dump handle from the crate.
2. Install a washer onto the bagger dump handle and install
the bagger dump handle into the bagger frame (Fig. 42).
3. Fasten the bagger with a washer ( inch) and a cotter
pin (Fig. 42).
m–7054
3
2
2
1
4
Figure 41
1. Dump handle
2. Washer
3. Cotter pin
4. Bagger frame
16
Step
Parts needed for this step:
• 1 Bolt, 1/2 x 1–3/4 inch
• 2 Jam nuts, 1/2 inch
• 1 Long clevis, liquid cooled machines only
Installing the Bagger Dump
Lever Stop Bolt
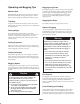
1. Move the bagger dump lever rearward to increase the
slack in the bagger cable (Fig. 42).
2. Remove the cotter pin and clevis pin securing the
bagger cable clevis to the bagger dump handle
(Fig. 42).
1
2
3
5
6
m–6985
4
Figure 42
1. Bagger dump lever
2. Bagger cable
3. Bagger cable clevis
4. Bolt, 1/2 x 1–3/4 inch
5. Jam nut, 1/2 inch
6. Stop bracket
3. Thread a jam nut (1/2 inch) all the way onto the bolt
(1/2 x 1–3/4 inch) (Fig. 42).
4. Move the bagger dump lever forward to move the
bottom of the lever away from the stop bracket
(Fig. 42).
5. Insert the bolt into the stop bracket hole and thread
another jam nut (1/2 inch) onto the bolt. Do not tighten.