
Operator's Manual


7
Note: Before drilling holes, place a piece of metal between
the clutch and pulley. This will prevent drilling into the
clutch.
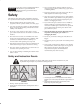
7. Using the template, drill one 1/8 inch pilot hole into the
pulley (Fig. 5).
8. Install the screw (#6 x 1/2 inch) into the 1/8 inch hole
(Fig. 5). This will hold the template in place while
drilling the other two holes.
9. Using the template, drill the remaining two 1/8 inch
pilot holes into the pulley (Fig. 5).
10. Remove the template and the screw (#6 x 1/2 inch) and
discard (Fig. 5).
11. Drill 3 holes, 3/8 inch diameter, into the 1/8 inch pilot
holes. (Fig. 5).
m–6006
2
3
3
1
4
5
6
Figure 5
1. Clutch pulley
2. Template
3. Hole to drill
4. Clutch flange
5. Screw, #6 x 1/2 inch
6. Drive spacer
2
Step
Parts needed for this step:
• 1 Bolt, 7/16 x 4–1/2 inch—Kawasaki engines only
• 1 Bolt, 7/16 x 4 inch—Kohler engines only
• 1 Drive pulley assembly
• 1 Clutch spacer
Installing the Clutch and Drive
Pulley Assembly
Note: Apply anti–seize compound to crank shaft before
installing the clutch and drive pulley assembly.
1. If not already removed, remove the existing clutch bolt
from the machine and discard (Fig. 4 and 6).
2. If not already removed, remove the existing drive
spacer from the clutch (Fig. 4 and 6).
3. Install the new pulley spacer into the clutch (Fig. 6).
4. Install the drive pulley assembly into the three holes
drilled into the clutch pulley (Fig. 6).
5. Install the drive spacer into the drive pulley assembly
(Fig. 6).
Note: There are two different size bolts for installing the
clutch. The size is determined by the type of engine on the
machine.
6. If the machine has a Kawasaki
engine, then install the
clutch with a bolt (7/16 x 4–1/2 inch) and 2 existing
curved washers (Fig. 6).
7. If the machine has a Kohler
engine, then install the
clutch with a bolt (7/16 x 4 inch) and 2 existing curved
washers (Fig. 6).
8. Torque the clutch bolt to 55 ft–lb (75 Nm) (Fig. 6).
9. If needed, install the existing deck belt onto the clutch.
10. If needed, install the clutch strap (Fig. 3).
11. If needed, plug in the clutch connector (Fig. 3).