
Operator's Manual


8
3
Step
Parts needed for this step:
• 1 Blower belt cover
• 1 Idler spring
Installing the Bagger Belt and
Idler Spring
Important The idler spring and bagger belt need to be
installed together.
This will create slight tension on both the spring and belt
while installing them.
Installing the Idler Spring
The idler arm can have either an eyebolt or a shoulder bolt
to install the spring.
1. Disengage the PTO, set the parking brake, and chock or
block the drive wheels.
2. Stop the engine, remove the key, and wait for all
moving parts to stop before leaving the operating
position.
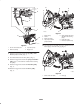
3. Open the blower assembly (Fig. 7).
4. Slide the spring into the blower eyebolt (Fig. 5).
5. Install the spring into the idler arm eyebolt (Fig. 5).
6. Close the blower assembly (Fig. 8).
3
2
4
1
5
m–6276
Figure 5
1. Idler spring
2. Blower assembly
3. Idler arm eyebolt
4. Blower eyebolt
5. Idler arm
Installing the Bagger Belt
Note: For 44 inch (112 cm) mowers, make sure the right
rear corner of the cover side plate is modified. Refer to the
mower Finishing Kit.
1. Disengage the PTO, set the parking brake, and chock or
block the drive wheels.
2. Stop the engine, remove the key, and wait for all
moving parts to stop before leaving the operating
position.
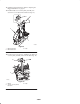
3. Push down on the front latch (colored red) and open the
blower assembly (Fig. 7).
4. For 52 inch mowers only, install the belt cover and
secure the latch (Fig. 6).
5. For 52 inch mowers only, install the bagger belt
between the top mower pulley and the belt cover
(Fig. 6).