
Operator's Manual


8
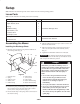
5. Hang the belt over the mower, then thread it forward
through the belt guide (Fig. 12) on the mower.
m–3457
1
2
Figure 12
1. Belt 2. Belt guide
6. Loop the other end of the belt over the drive pulley of
the mower. Additional belt slack can be obtained (if
needed) by turning the belt tension adjustment knob
(Fig. 10).
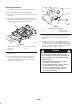
7. Make certain that the wide side of the PTO drive belt is
toward the outside diameter of all (four) pulleys (Fig.
13).
m–4230
2
1
Figure 13
1. Pulley outside diameter 2. Wide side of belt
8. Adjust the belt tension.
A. Push the belt tension release arm toward the pulley
box to tension the belt.
B. Check the tension indicators on front of the pulley
box. The two arrow points on the indicators should
line up (Fig. 10).
C. If the tension indicators do not line up, release the
belt tension, turn the adjustment knob and repeat
steps A through C until the indicators line up
(Fig. 10).
D. Swing the tension release arm into the pulley box
and seat it by moving it into the position shown in
Figure 10.
9. Loosen the belt guide bolt (Fig. 14).
m–3465
1
2
3
4
Figure 14
1. Belt guide
2. Belt
3. Belt touches here
4. Belt guide bolt
10. Adjust the belt guide so that it just touches the belt on
the inside arm of the guide (toward the center of the
mower) (Fig. 14).
11. Tighten the belt guide bolt.
12. Replace the front grill of the tractor.
Adjusting the Mower
Adjusting the Height of Cut
You can adjust the rear support wheels in different hole
locations for 1-1/2 to 4-1/2 in. (4 to 11 cm) heights of cut.
1. Start the tractor, set the parking brake, and raise the
mower. Get off the tractor.
2. Pull the height-of-cut lever out to disengage it from the
quadrant (Fig. 15).