
Operator's Manual


Installation
4
POTENTIAL
HAZARD
• Without the discharge chute or the
complete grass catcher assembly mounted
in place, you and others are exposed to
blade contact and thrown debris.
WHAT CAN HAPPEN
• Contact with rotating mower blade(s) and
thrown debris will cause injury or death.
HOW TO AV
OID THE HAZARD
•
NEVER r
emove the discharge chute from
the mower because the discharge chute
routes material down toward the turf. If
the discharge chute is ever damaged,
replace it immediately. Never put your
hands or feet under the mower.
• Never try to clear the discharge area or
mower blades unless you move the power
take off (PTO) to “OFF” and turn the
ignition key to “STOP.” Also remove the
ignition key and pull the wire(s) off the
spark plug(s).
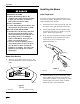
Mower Belt Routing
1. Route the mower belt as shown in Fig. 2. Be
sure to install the belt on the lower mower deck
pulley.
2
1
m–3525
Figure 2
T
op V
iew
1. Mower
belt
2.
Mower deck pulley
Installing
the Mower
Initial Preparation
The mower is most easily installed when done on a
level concrete surface. Rougher dirt or lawn surfaces
make installation more difficult.
1. Position the tractor and mower side by side, with
the mower on the right–hand side of the tractor.
2. Set the parking brake, raise the attachment lift,
and turn the ignition key to “STOP” to stop the
engine. Remove the ignition key.
3. If you have previously had a snowthrower, blade
or tiller attached to the attachment lift, remove
the two clevis pins on each side of the
attachment lift (Fig. 3).
2
1
m–3433
Figure 3
1. Clevis
pin
2.
Hairpin cotter
4. Attach the pulley box if it is not already on the
tractor. Make sure the latches on the tractor’s
front Attach–A–Matic are open (Fig. 4). Then
slide the pulley box into the Attach–A–Matic
latches and seat it. Close the latches.