
Operator's Manual


2.Shutofftheengine,removethekey,andwait
forallmovingpartstostopbeforeleavingthe
operatingposition.
3.Releasethelatchesontheaircleanerand
pulltheair-inletcoverofftheair-cleanerbody
(Figure61).
4.Cleantheair-inletscreenandcover.
5.Installtheair-inletcoverandsecureitwiththe
latches(Figure61).
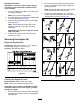
g012996
Figure61
1.Air-inletcover3.Air-cleanerbody
2.Air-inletscreen4.Latch
6.Releasethelatchesontheaircleanerandpull
theair-cleanercoverofftheair-cleanerbody
(Figure62).
7.Cleantheinsideoftheair-cleanercoverwith
compressedair.
8.Gentlyslidetheprimarylteroutofthe
air-cleanerbody(Figure62).
Note:Avoidknockingthelterintothesideof
thebody.
9.Removetheinnerlteronlyifyouintendto
replaceit.
Important:Neverattempttocleantheinner
lter.Ifthesafetylterisdirty,thenthe
primarylterisdamaged.Replaceboth
lters.
g012997
Figure62
1.Innerlter
4.Latch
2.Primarylter
5.Air-cleanerbody
3.Air-cleanercover
10.Inspecttheprimarylterfordamagebylooking
intothelter,whileshiningabrightlightonthe
outsideofthelter.
Note:Holesinthelterwillappearasbright
spots.Ifthelterisdamaged,discardit.
ServicingtheFoamElement
1.Washthefoamelementinliquidsoapand
warmwater.Whentheelementisclean,rinse
itthoroughly.
2.Drytheelementbysqueezingitinacleancloth.
Important:Replacethefoamelementifit
istornorworn.
ServicingthePaperElement
1.Gentlytapthepaperelementtodislodgedirt.
Note:Donotwashthepaperelementoruse
pressurizedair,asthiswilldamagetheelement.
Note:Replaceadirty,bent,ordamaged
element.Handlethenewelementcarefully;
donotuseifthesealingsurfacesarebentor
damaged.
2.Cleantheair-cleanerbaseasrequired,and
checkthecondition.
46