
Operator's Manual


Table Of Contents
- NO TITLE
- NO TITLE
- NO TITLE
- NO TITLE
- Adding Fuel
- Checking the Engine Oil Level
- Breaking In a New Machine
- Using the Rollover Protection System (ROPS)
- Think Safety First
- Operating the Parking Brake
- Operating the Mower Blade Control Switch (PTO)
- Operating the Throttle
- Operating the Ignition Switch
- Starting and Stopping the Engine
- The Safety Interlock System
- Driving Forward or Backward
- Stopping the Machine
- Adjusting the Height of Cut
- Adjusting the Anti-Scalp Rollers
- Adjusting the Flow Baffle Cam Locks
- Positioning the Flow Baffle
- Positioning the Seat
- Unlatching the Seat
- Changing the Seat Suspension
- Using the Drive Wheel Release Valves
- Using the Side Discharge
- Transporting Machines
- Loading Machines
- Greasing and Lubrication
- Where to Grease the Mower
- Lubricate the Caster Wheel Hubs
- Servicing the Air Cleaner
- Servicing the Engine Oil
- Servicing the Spark Plug
- Check Spark Arrester (if equipped)
- Inspecting the LPG System
- Servicing the Electronic Fuel Injection System
- Servicing the Battery
- Servicing the Fuses
- Checking the Seat Belt
- Checking the Rollover Protection System (ROPS) Knobs
- Adjusting the Tracking
- Checking the Tire Pressure
- Checking the Wheel Lug Nuts
- Checking the Wheel Hub Slotted Nut
- Adjusting the Caster Pivot Bearing
- Using the Clutch Shim
- Cleaning the Engine Screen and Engine Oil Cooler
- Cleaning the Engine Cooling Fins and Shrouds
- Check and Clean the Hydraulic Unit Shrouds
- Adjusting the Parking Brake
- Inspecting the Belts
- Replacing the Mower Belt
- Replacing the Hydraulic Pump Drive Belt
- Adjusting the Control Handle Position
- Adjusting the Motion Control Linkage
- Adjusting the Motion Control Damper
- Adjusting the Motion Control Neutral Lock Pivot
- Servicing the Hydraulic System
- Mower Deck Maintenance
- Cleaning the Mower Deck
- Waste Disposal
- NO TITLE
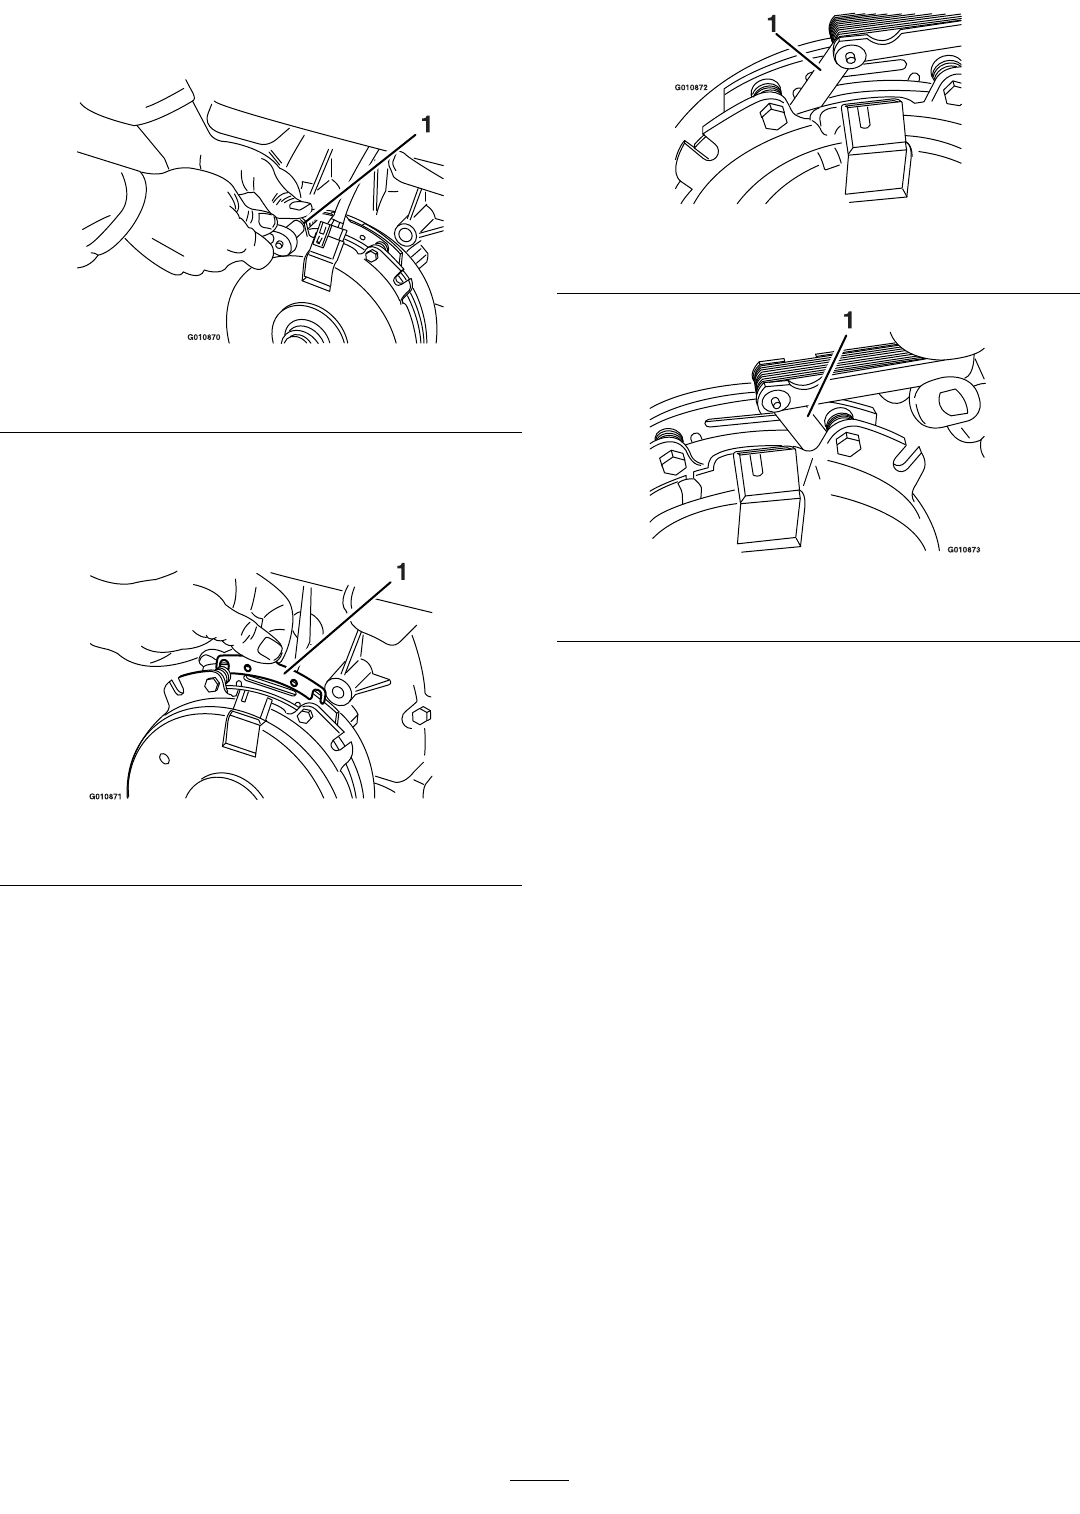
matchaftertheshimisremovedtoensureproper
braketorque.
Figure66
1.Brakemountingbolt
B.Usingneedlenosepliers,orbyhand,takehold
ofthetabandremovetheshim(DoNotdiscard
theshimuntilproperclutchfunctionhasbeen
conrmed).
Figure67
1.Shim
C.Usingapneumaticline,blowoutanydebris
fromunderthebrakepoleandaroundthebrake
spacers.
D.Re-torqueeachbolt(M6x1)to10ft-lb(13N-m)
+/-0.5ft-lb(0.7N-m).
E.Usinga0.010inchthickfeelergauge,verifythat
agapispresentbetweentherotorandarmature
faceonbothsidesofthebrakepoleasshown.
(Duetothewaytherotorandarmaturefaces
wear(peaksandvalleys)itissometimesdifcult
tomeasurethetruegap.)
Figure68
1.Feelergauge
Figure69
1.Feelergauge
•Ifthegapislessthan0.010inch,thenreinstall
theshimandreferencetheTroubleshooting
section.
•Ifthegapissufcient,proceedtothesafety
checkinstepF.
F.Performthefollowingsafetycheck:
i.Sitontheseatandstarttheengine.
ii.MakesurethebladesDoNotengage
withthePTOswitch“off”andtheclutch
disengaged.
Iftheclutchdoesnotdisengage,
reinstalltheshimandreferencethe
Troubleshootingsection.
iii.EngageanddisengagethePTOswitch
tenconsecutivetimestoensuretheclutch
isfunctioningproperly.Iftheclutch
doesnotengageproperly,referencethe
Troubleshootingsection.
46