
Operator's Manual


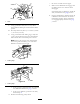


Important:Makesurethespringwashersare
installedcorrectlyasshowninFigure64.
5.Installthedustcap(Figure64).
Figure64
1.SpringWashers3.DustCap
2.LockNut
UsingtheClutchShim
Somelatermodelyearunitshavebeenbuiltwithclutchesthat
containabrakeshim.Whentheclutchbrakehasworntothe
pointwheretheclutchnolongerengagesconsistently,the
shimcanberemovedtoextendtheclutchlife.
Figure65
1.Armature5.Brakespacer
2.Fieldshell6.Re-gapshim
3.Rotor7.Brakepole
4.Brakemountingbolt
RemovingtheClutchShim
1.Stoptheengine,waitforallmovingpartstostop,and
removethekey.
2.Engagetheparkingbrakeandallowthemachineto
coolcompletelybeforestartingtheseinstructions.
3.Usinganaircompressor,blowoutanydebrisfrom
underthebrakepoleandaroundthebrakespacers.
Figure66
4.Checktheconditionofthewireharnessleads,
connectors,andterminals.Cleanorrepairasnecessary.
5.Verifythat12Vispresentattheclutchconnectorwhen
thePTOswitchisengaged.
6.Measurethegapbetweentherotorandarmature.If
thegapisgreaterthan1mm(0.04inch),proceedwith
thefollowingsteps:
A.Loosenbothbrakemountingboltsone-halfto
onefullturnasshownbelow.
Note:Donotremovethebrakepolefromthe
eldshell/armature.Thebrakepolehasworn
tomatchthearmatureandneedstocontinueto
matchaftertheshimisremovedtoensureproper
braketorque.
Figure67
1.Brakemountingbolt
B.Usingneedlenosepliers,orbyhand,takehold
ofthetab,andremovetheshim(Donotdiscard
theshimuntilproperclutchfunctionhasbeen
conrmed).
44