
Operator's Manual


13.Ifthedeckistoolow,tightenthesinglepoint
adjustmentboltbyrotatingitclockwise.Ifthedeckis
toohigh,loosenthesinglepointadjustmentboltby
rotatingitcounterclockwise(Figure89).
Note:Loosenortightenthesinglepointadjustment
boltenoughtomovetheheight-of-cutplatemounting
boltsatleast1/3thelengthoftheavailabletravel
intheirslots.Thiswillregainsomeupanddown
adjustmentoneachofthefourdecklinks.
g017036
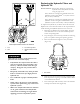
Figure89
1.Singlepointadjustmentbolt
14.Tightenthetwoboltsatthebottomoftheheightofcut
plate(Figure88).Torqueto27-33ft-lb(37-45N-m).
Note:Inmostconditions,thebackbladetipshould
beadjusted1/4inch(6.4mm)higherthanthefront.
15.Onbothsidesofthedeck,measurefromthelevel
surfacetothebacktipoftheblade(PostionB).
Themeasurementshouldread31/4inches(8.3cm)
(Figure86).
16.Finetunethescrewadjusterbyturningittoget3–1/4
inches(8.3mm)height(Figure87).
Toincreasetheheight,turntheadjustmentnut
clockwise;todecrease,turncounterclockwise.
17.Measureuntilallfoursidesarethecorrectheight.
Tightenallthenutsonthedeckliftarmassemblies.
18.Lowerdischargechute.
ServicingtheCuttingBlades
Maintainsharpbladesthroughoutthecuttingseasonbecause
sharpbladescutcleanlywithouttearingorshreddingthegrass
blades.Tearingandshreddingturnsgrassbrownattheedges,
whichslowsgrowthandincreasesthechanceofdisease.
Checkthecutterbladesdailyforsharpness,andforany
wearordamage.Filedownanynicksandsharpenthe
bladesasnecessary.Ifabladeisdamagedorworn,replace
itimmediatelywithagenuineTororeplacementblade.For
convenientsharpeningandreplacement,youmaywantto
keepextrabladesonhand.
DANGER
Awornordamagedbladecanbreak,andapiece
ofthebladecouldbethrownintotheoperator's
orbystander'sarea,resultinginseriouspersonal
injuryordeath.
•Inspectthebladeperiodicallyforwearor
damage.
•Replaceawornordamagedblade.
BeforeInspectingorServicingthe
Blades
Parkthemachineonalevelsurface,disengagetheblade
controlswitch(PTO),andsettheparkingbrake.Turnthe
ignitionkeytoOff.Removethekey.
InspectingtheBlades
ServiceInterval:Beforeeachuseordaily
1.Inspectthecuttingedges(
Figure90).Iftheedges
arenotsharporhavenicks,removeandsharpenthe
blades.RefertoSharpeningtheBlades.
2.Inspecttheblades,especiallythecurvedarea
(Figure90).Ifyounoticeanydamage,wear,oraslot
forminginthisarea(Figure90),immediatelyinstalla
newblade.
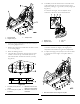
Figure90
1.CuttingEdge3.Wear/slotForming
2.CurvedArea4.Crack
55