
Operator's Manual


locknutonthesidewallofthemowerdecksecuring
theleftbafetothedeck.
G01 1149
1
1
2
3
4
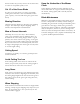
Figure36
1.Locknut(5/16inch)3.Leftbafe
2.Carriagebolt(5/16x3/4
inch)
4.Installfastenershere
7.Removetheleftbafefromthemowerdeckas
showninFigure36.
8.Locatethetwoboltsinloosepartsandusethe
existinglocknuts.Installthesefastenersintothe
holesshownin
Figure36onthemowerdeckto
preventyingdebris.Installtheboltup,throughthe
undersideofthedeckanduseanexistinglocknutto
securefromthetopside.
WARNING
Openholesinthemowerexposeyouandothers
tothrowndebriswhichcancausesevereinjury.
•Neveroperatethemowerwithouthardware
mountedinallholesinthemowerhousing.
•Installthehardwareinthemountingholes
whenyouremovethemulchingbafe.
9.Removethecarriagebolt(5/16x3/4inch)and
locknut(5/16inch)ontherearwallofthemower
decksecuringthebafetothedeck(Figure37).
G010712
1
2
4
3
5
6
7
Figure37
1.Carriagebolt(5/16x3/4
inch)
5.Hexheadbolt,forward
holeindeck(reinstallafter
bafeisremoved)
2.Locknuts,frontof
dischargeplate(reinstall
afterbafeisremoved)
6.Carriagebolts,frontof
dischargeplate(reinstall
afterbafeisremoved)
3.Locknut,forwardholein
deck(reinstallafterbafe
isremoved)
7.Locknut(5/16inch)
4.Bafeguard,54inch
decks
10.Locatethebafeguardatthefrontedgeoftheside
dischargeopening.Removethefastenerssecuring
thebafeguardandtherightbafetothemower
deckasshownin
Figure37.Removethebafe
guardandretainallfasteners.
11.Removethetwolocknuts(5/16inch)securingthe
weldedpostsoftherightbafetothetopofthe
mowerdeckatcenterandrightofcenterpositions
(
Figure38).
12.Removethecarriageboltandlocknutsecuringthe
rightbafetothetopofthemowerdeck.Remove
therightbafefromthemowerdeck(Figure38).
31